Quantcast
Channel: Linux How-Tos and Linux Tutorials
Viewing all 525 articles
Browse latest View live

Your Real-World Git Cheat Sheet

$
0
0

git-in-terminalThe Git version control system is pretty nice, a useful evolution from Subversion, CVS, and other older version control systems. It's especially strong for distributed development, as you can work disconnected and not have to depend on the availability of a central server.

It's also more complex than older VCS, and experienced users have their favorite ways of doing things that they think should be your favorites, too, even if they can't explain them very well. One of the most important things to understand is which commands are for remote repositories, and which ones are for your local work.

Git is extensively documented, so you can always find authoritative answers. Always look in the documentation before doing a Web search because it is faster and you'll get better answers.

Joining an Existing Project

The most common use-case is joining an existing project and getting flung in to sink or swim. Your first step, obviously, is to install Git. The various Linux distributions have packages for core Git, the Git man pages, and tools such as Gitk, the Git visual tools kit. (Github users may be interested in Beginning Git and Github for Linux Users.)

Next, run git config to set up your local environment with your repo credentials, default editor, password caching timeout, and other useful time-savers.

Then create a directory for your local repos and clone the project into it, using the actual address of your remote repo, of course:

$ mkdir project
$ cd project
$ git clone https://[remote-repo-address].git

Take a few minutes to look at your repo files. Everything is there in plain text. Git stores logs, commit messages and hashes, branches, and everything else needed to track your code in the .gitdirectory.

Your First Edits

The key to Git happiness is doing your work in a branch. You can make as many branches as you like, and mangle them to your heart's content without making a mess of upstream branches. The default for most projects is to work from the master branch. Let's use the fictional "coolproject" as an example. Create your new working branch like this:

$ cd coolproject
$ git checkout master
$ git pull
$ git checkout -b workbranch

What you did: you changed to your project directory, changed to the master branch, brought it up-to-date from the remote repository, and created the new branch "workbranch" from master. All the commands are local except git pull.

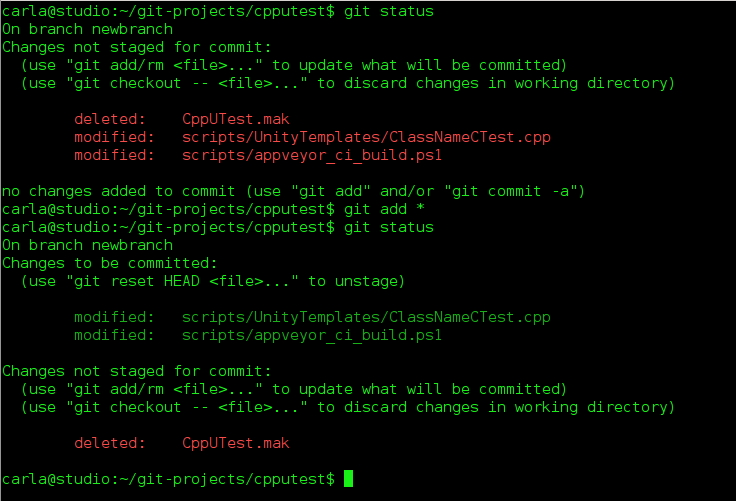
Now you can work in "workbranch" all you want without bothering anyone else's work. At any time you can run git status to see which files have changed and what branch you are on:

$ git status
On branch workbranch
Changes not staged for commit:
  (use "git add/rm ..." to update what will be committed)
  (use "git checkout -- ..." to discard changes in working directory)
        modified:   api.c
        deleted:    routes.c
no changes added to commit (use "git add" and/or "git commit -a")

git status gives lots of helpful hints, so you might map it to a hotkey. The two files, api.c and routes.c, are highlighted in red to indicate that they have not been added to any commits yet. This means they are available to any branch, so if you are in the wrong one by mistake you can now change to the right one. You can add all changes to your commit with the first command, or name specific files with the second command:

$ git add --all
$ git add [filename or filenames, space-delimited]

Now when you run git status the filenames are green to show they have been added to your working branch. You can delete files from Git without deleting them from your system:

$ git rm [filename]

git add [filename] restores it.

What if you change your mind and want to discard all changes to a file? To restore "api.c" run these two commands:

$ git reset HEAD api.c
$ git checkout api.c

Note that since you started working in "workbranch" all of the commands have been local. You can do most of your work disconnected, and connect only to pull updates and push changes. Now let's call our work in "workbranch" done and push our changes to the remote server. This is two steps: first commit your changes to your local branch with a nice message telling what you did, then push it to the remote server:

$ git commit -a -m "updates and changes and cool code stuff"
$ git push origin workbranch

Now your new branch is on the remote server waiting to be merged into master. In most projects you'll be on a public Git host such as Github, Bitbucket, or CloudForge, and will use the hosting tools to create a pull request. A pull request is a notification that you want your commit reviewed and merged with the master branch.

List - Delete Branches

Run git branch to see the branches on your local systems, and git branch -a to see all branches on the remote server. git branch -d [branch name] deletes local branches, and if you get an error message that it is not completely merged, and you're sure you're finished with it, run git branch -D [branch name].

Undo

What if, after pushing your commit to the remote repo, you want to undo it? There are a couple of ways. You can revert the entire commit:

$ git revert de4bbc49eab

Your default editor will open so you can write a commit message and complete the revert. Every commit gets a unique number, which you can find by running git log. If it's a small error then don't revert, but fix it in your local working branch, and then push it to your remote working branch.

Stashing for Later

When you want to leave unfinished work in a branch and switch to another branch, stash your changes:

$ git stash
Saved working directory and index state WIP on workbranch: 56cd5d4 Revert "update old files"
HEAD is now at 56cd5d4 Revert "update old files"

The status message will reference your previous commit. You can see a list of your stashes:

$ git stash list
stash@{0}: WIP on workbranch: 56cd5d4 Revert "update old files"
stash@{1}: WIP on project1: 1dd87ea commit "fix typos and grammar"

When you're ready to work on your stash, select the one you want like this:

$ git stash apply stash@{1}

Don't Be Afraid to Copy-Paste

Chances are you will work with Git wizards who have all kinds of amazing and advanced ways to fix errors. Don't be too proud to use copy-and-paste; get your work done now, and learn how to show off your Git wizardry later. All the files in your project repository are under Git control, so when you read the files you'll see only the versions of your current branch. There is no shame in changing to another branch, copying files into an outside directory, and then changing to your working branch and copying them there. It's a fast and sure way to fix problems or make large changes quickly.


How to Manage User Permissions From the GUI on Linux

$
0
0

eiciel-Linux-app-window

User permissions tend to center around UGO and +rwx. If you understand that, you’re in good shape...if you only need the basics. But using the standard methods, UGO permission systems limits how you can manage permissions with multiple users or multiple groups. If you want a more flexible permission mechanism for Linux, you turn to Access Control Lists (ACLs).

For example, what if Haley owns a file and wants to allow Ash to read it, Mixi to read it, and Anneke to read and write to it? Add to that mixture that they are all in different groups. What do you do then?

You turn to ACLs.

However, if you want to gain the added functionality of ACLs in a standard Linux desktop environment, where do you start? Probably the single easiest route to success is with the handy GUI app, Eiciel. With this tool you can easily control the extended permissions offered by ACLs without having to dive into the command line that would look something like:

setfacl -m "u:username:permissions" file

Naturally, for many a Linux system administrator, the command line will be the go-to tool. But for everyone else, a good GUI goes a long way. For ACLs, the best GUI in town is Eiciel. Let’s install it and use it.

How to Install Eiciel

Fortunately, Eiciel can be found in most standard repositories, so installation is only a matter of firing up your distribution’s package manager, searching for Eiciel, and clicking Install (who said installing apps on Linux was challenging?). I’ll be demonstrating the installation on Ubuntu 15.10 and, unfortunately, have discovered a rather odd bug in the available release of Eiciel (0.9.9). When selecting permissions, the checkboxes always appear empty. This is a GTK issue and is resolved in the latest release (0.9.11), which currently cannot be installed on the latest iteration of Ubuntu. I’ve tested the available release for Elementary OS Freya (Eiciel 0.9.8) and this bug doesn’t exist. Either way, Eiciel still works...only on Ubuntu 15.10 you have to guess what is checked and what is not. Hopefully this bug will be resolved asap.

Should you opt to go the installing from source route (and you’ve met the Eiciel dependencies), here are the steps for a successful installation:

  1. Download the source into your Downloads folder

  2. Open a terminal window

  3. Change into the Downloads folder

  4. Unpack the archive with the command tar xvfj eiciel-XXX.tar.bz2 (where XXX is the release number)

  5. Change into the newly created folder with the command cd eiciel-XXX (where XXX is the release number)

  6. Issue the command ./configure

  7. Issue the command ./make 

  8. Issue the command sudo make install

  9. Restart Nautilus with the command nautilus -q

NOTE: If you’re working with a distribution that doesn’t make use of sudo, you’ll need to su to the root user and then issue the final command make install without sudo.

That’s it; Eiciel is ready to run.

You might be thinking, “Doesn’t the kernel need ACL support rolled in? As of kernel 2.6.39, ACL is turned on by default. If you want to ensure that ACL is turned on and a drive is mounted with support for the feature, issue the following command in a terminal window:

sudo tune2fs -l /dev/sdXY | grep "Default mount options:"

Where XY is the specific location of your drive (for example /dev/sda1).

That command should report something like:

user_xattr acl

If you see acl, you’re good to go.

Should you want to go through the process of correcting the dependency issue and get a perfectly working instance of Eiciel running on Ubuntu 15.10, here are the steps:

  1. Open a terminal and uninstall the current Eiciel (if still installed) with the command

    sudo apt-get remove eiciel 
    (NOTE: This will install quite a lot of packages)
  2. Build the dependencies for Eiciel with the following command

    sudo apt-get build-dep eiciel
  3. Download the latest version of Eiciel and untar the package and install from source as instructed earlier

How to Use Eiciel

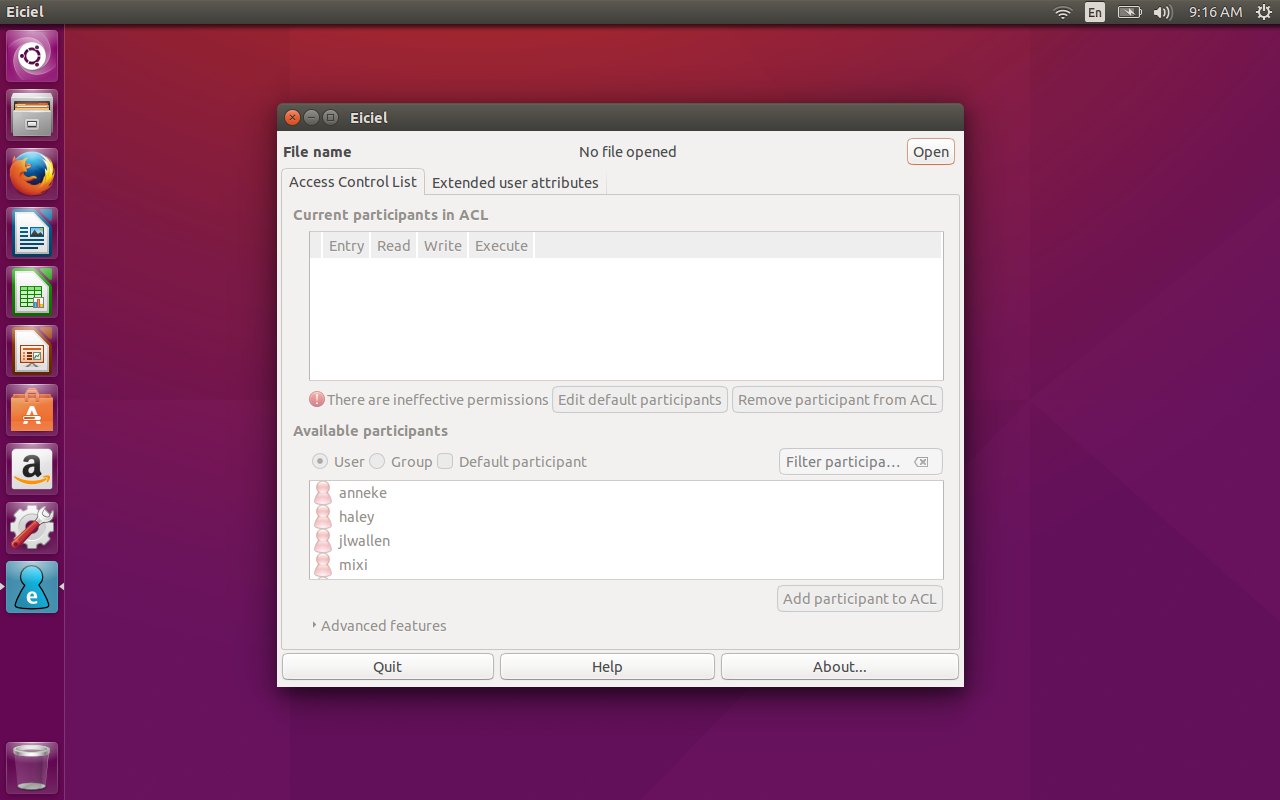
Using Eiciel is surprisingly simple. If you installed the app from within your package manager, you will find the launcher in your desktop menu. If you installed via source, you can fire up the GUI tool from the command line, with the command eiciel. Either way, the Eiciel main window will open (Figure A), and you’re ready to rock. 

You should notice that Eiciel reports that you have no file open. That is because this app works on a per-file basis. So in order to use it, you must open a file. To do that, click the Open button and locate the file you want to work with.

Once you have that file open, you should now see users and groups listed, so that you can manage the ACLs for those users/groups on that file (Figure B).

eiciel-GTK-bug

Take a look at the same app (only an earlier release), running on Elementary OS Freya (Figure C).

eiciel-permissions

In the upper pane of the GUI you will see a list of the current ACL participants. To add a new participant, click on that user from the lower pane and then click Add participants to ACL. That user will now appear in the upper pane. You can now manage the permissions for that file by clicking to add read, write, and/or execute permissions. Once you’ve added the user as an ACL participant, you can then select what permissions they should have for the file. As you add them, the permissions take effect in real-time.

You can also add groups as participants to the file ACL, by selecting Group from the Participant List and then adding the groups you want in the same manner you added the user(s).

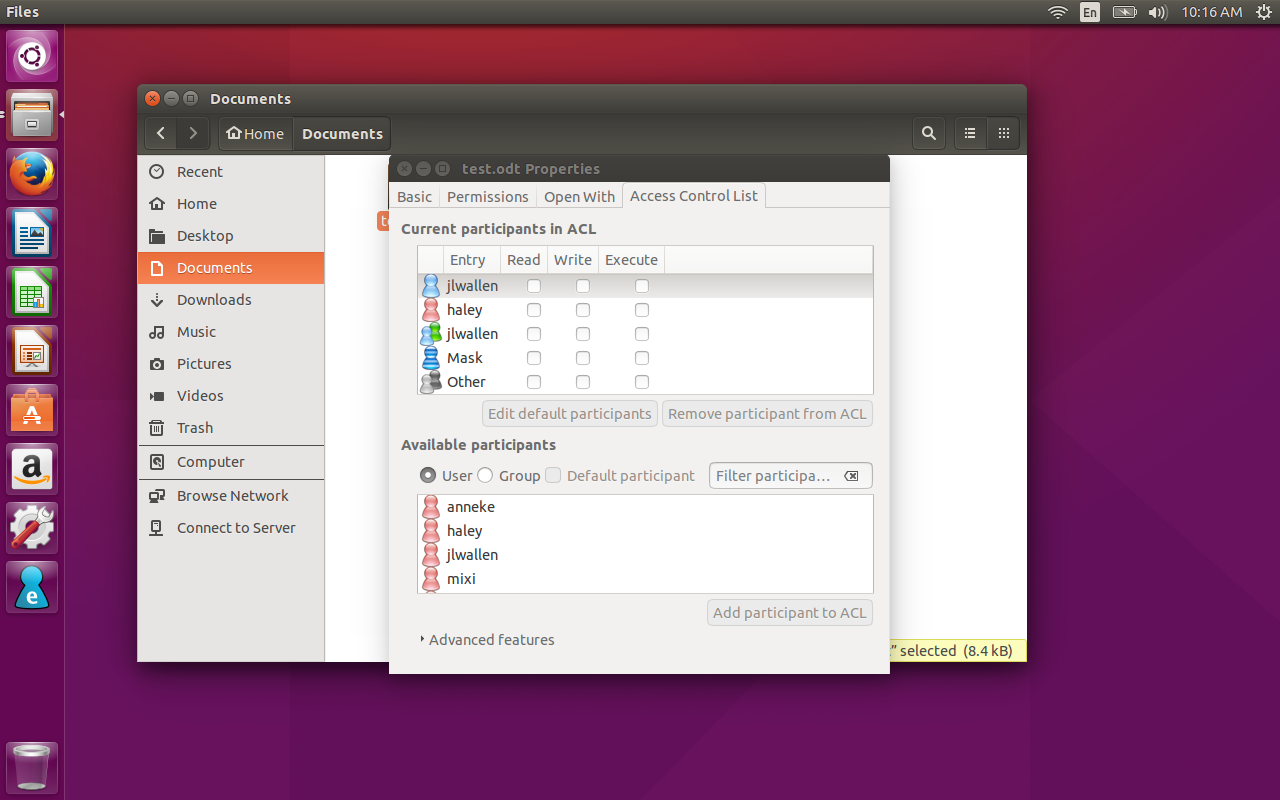
You will also find that the Eiciel functionality is built into the GNOME file manager. What this means is simple… open up the file manager, right-click on a file, select Properties, and you’ll see a tab for Access Control List. Click on that tab and you’ll have access to ACL permissions, thanks to Eiciel (Figure D).

eiciel-GNOME

There’s no doubt Eiciel easily overcomes the shortcomings of the standard Linux permissions system. If you have a need to work with Access Control Lists on your Linux system, and you’d prefer a GUI tool for the task, Eiciel is what you want. Just understand, if you’re working with a recent release of Ubuntu, you might be faced (for the time being) with having to guess if a permission is checked or not.

Best in Breed Twitter Clients for Linux

$
0
0

twitter choqok client on linux

Twitter is a social networking service that is a bit of a conundrum to many. At any given time it can be used to connect with people of a like mind, and at another it’s an exercise in frustration, thanks to the never-ending stream of data. But for those that depend upon the service as a means to either stay connected, promote a product or service, or even (on certain levels) research a given topic, it’s a boon.

But for Linux users, the client side of things has lagged behind for some time. Thankfully, you can now find solid clients that do the job and do it well. Back in “the day” amazing tools like Tweetdeck were client-based tools for Windows and Mac. Running the best of the best required you install WINE and download the .msi installer and cross your fingers. That was then...this is now. Most services like Tweetdeck now run flawlessly in nearly every browser (even Midori).

But even though the browser has become King of the apps, there are still desktop and command line clients for the likes of Twitter available—each of which offers a variety of features. But if one of those desktop clients won’t do it for you, I’ll show you a handy trick to help make one browser-based client behave a bit more like a desktop client.

Let’s first look at what I consider to be the two best in breed Twitter clients for Linux.

Choqok

Choqok is the Persian word for sparrow and is a Twitter client that has an impressive list of features. Although it is a KDE-centric app (and does run a bit better in its native environment), Choqok will perform splendidly in nearly all desktop environments and it supports the latest Twitter API. Choqok also enjoys panel integration (even with Ubuntu Unity), where you can do quick posts, update your timeline, and configure the app. But what is most impressive about this desktop client is its interface. Unlike Tweetdeck or Hootsuite (which can both very quickly become overwhelming), Choqok simplifies the Twitter experience and even helps to curtail the insanely fast flowing stream of tweets (that can cause you to miss out on twitter Choqok client setupsomething you actually want to see).

Installing Choqok is actually very simple, as it is found in your standard repositories. You can open up the Ubuntu Software Center (or whatever you happen to use—AppGrid, Synaptic, etc.) and, with a single click, install the client. The nice thing about installing from the Ubuntu Software Center is that this is one instance where you actually get the latest release.

Once you’ve installed it, I recommend logging into your Twitter account using the desktop’s default browser. With that out of the way, fire up Choqok and then (when prompted) request an authentication token. Once you have the token, copy/paste it into the requesting Choqok window and grant the app permission to your Twitter account. You will finally be greeted by the Choqok main window (Figure A).

Beyond the interface, one feature you will want to make use of is the Choqok filtering system. With the help of this filtering system you can make it far easier to see exactly what you want from your Twitter feeds. This is actually one area where Choqok excels. Here’s how it works.

Open up Choqok and then click Tools > Configure Filters. When the new window opens, click the + button to open the filter definition window (Figure B).

At this point you have to make a few choices. The first is the Filter field. There are four options:

  • Post Text: filter the text of a post

  • Author Username: filter the name of a Twitter user

  • Reply to User: filter replies from a user

  • Author Client: filter through the client used by the author.

Let’s say you want to set up a filter for posts containing the keyword linux. To do that you would set the following options:

  • Select Post Text from the Filter field

  • Select Contain from the Filter type

  • Enter linux in the Text field

  • Select Highlight Posts from the filter action.

Once you’re done, click OK and the filter is ready. These are considered quick filters, so they are applied immediately. How do they work? Simple. Since we selected Highlight Posts from the Filter action, all posts that match a filter will be highlighted with a red box as your timeline updates (Figure C).

twitter choqok filters

This makes it incredibly easy to scan through your main Twitter feed to find posts related to your filters.

Corebird

Here is another simple-to-use Linux Twitter client with an eye for outstanding interface. Once again you won’t be inundated with a blinding fast timeline that’s nearly impossible to follow. Corebird is to GNOME what Choqok is for KDE...and it does so with a bit more zip. It offers a very similar feature set to Choqok and can be installed from a specific PPA. Here are the steps for installation:

  1. Open up a terminal window

  2. Add the PPA with the command sudo apt-add-repository ppa:ubuntuhandbook1/corebird

  3. Update apt with the command sudo apt-get update 

  4. Install Corebird with the command sudo apt-get install corebird

  5. Allow the installation to complete

  6. If you run into dependency errors during installation, solve the errors with the command sudo apt-get install -f

One of the best features of Corebird is the inclusion of lists. This makes following a collection of users so much easier (especially when you have thousands of people you follow). Say, for example, you follow a number of users interested in (or posting about) linux and you want to be able to quickly see what they’ve posted on a regular basis. You can create a list for these users by doing the following:

  1. Open Corebird

  2. Click on the list icon in the left navigation (third up from the bottom)

  3. Enter a name for the list

  4. Click Create.

Now that the list is created, you have to add users. To do this, simply find a user in your timeline (there’s a handy search function for that) and then, from the drop-down in their profile, select Add to/Remove from list. In the popup window, locate the newly created list(s), select the list, and click Save (Figure D). The user has now been added to the list. Continue adding users until your list is complete.

twitter Corebird client

To read posts associated with that list, click on the List icon, locate the list in question, and double click its name. All posts from users on the list will appear in the feed.

Tweetdeck

At one time, the only way you could enjoy Tweetdeck was to install the Chrome addon and view it from your browser. Now, however, Tweetdeck works perfectly from within Firefox. However, if you happen to be a Chrome (or Chromium) user, here’s a cool trick. You can create a launcher for Tweetdeck such that it will open the webpage in its own app-like window (without the extraneous web browser bits and pieces). I’ll demonstrate how to do that in Elementary OS Freya.

  1. Install the Tweetdeck addon to Chrome (or Chromium)

  2. From within Chrome, click the Apps button

  3. Locate the Tweetdeck icon

  4. Right-click the Tweetdeck icon

  5. Click Create Shortcuts

  6. De-select Desktop

  7. Right-click the Tweetdeck icon again

  8. Select Open as window

  9. Click on the desktop menu (aka Slingshot Menu)

  10. Locate and click the Tweetdeck entry to open the “app”

That’s it. You should see Tweetdeck open in its very own app-like window (Figure E).

twitter tweetdeck linux

While the Tweetdeck window is open, you can right-click its icon on the dock and select Keep In Dock to add a launcher on the dock.

TTYtter

For those who prefer the command line over a GUI, you’re in luck. The TTYtter application is a simple tool you can use to quickly post to Twitter from the command line. It’s easy to install, a bit tricky to set up, and very simple to use.

To install TTYtter, do the following:

  1. Open a terminal window

  2. Issue the command sudo apt-get install ttytter 

  3. Type your sudo password and hit Enter

  4. Type y to continue

  5. Allow the installation to complete

Once installed, you run the app with the command ttytter. On first run, the app will request a token and then return a URL that you then must paste into a browser (one that has already logged into your Twitter account). When prompted (in your browser) click the Authorize App button which will present you with an authorization PIN. Enter that PIN into the waiting command prompt (Figure F) and hit Enter. Run the ttytter command again and you will be logged on with your Twitter account.

twitter command line client

To post to your account with TTYtter, you simply issue a command as such:

ttytter -status=”The Linux Foundation rocks!”

You can also issue the command ttytter and then hit Enter to get a TTYtter prompt, where you can post status simply by typing your post and hitting Enter (without having to add ttytter -status=””). To exit out of TTYtter, hit CTRL+c.

Personally, of the three GUI options, Tweetdeck is by far the best—but it’s not truly a desktop client. If you’re looking for a straight up desktop Twitter client for Linux, you can’t go wrong with either Choqok or Corebird. If you’re okay with a web-based client, you can always trick Tweetdeck into behaving like a desktop app with my handy little trick (which also works for most desktop environments).

Happy tweeting!

The tar Command Explained

$
0
0

The Linux tar command is the swiss army of the Linux admin when it comes to archiving or distributing files. Gnu Tar archives can contain multiple files and directories, file permissions can be preserved and it supports multiple compression formats. The name tar stands for "Tape Archiver", the format is an official POSIX standard.

Read more at HowtoForge

How to Control Hardware With the Raspberry Pi Using WiringPi

$
0
0

Raspberry Pi motor

Our last tutorial in this series used the Raspberry Pi 2’s 40 pin header to connect a touch screen to the Pi. This time around we'll take a look at how to directly interact with hardware -- in this case an electric gearmotor -- from the command line using the 40 pin header. The following design can also be extended to allow a Raspberry Pi to be mounted to a small robot and move it (and itself) around.

The Raspberry Pi is a small ARM single board computer which has great community support and has many Linux distributions available for it. The Raspberry Pi 2 is the latest model of the series and includes among other things a quad core ARM, 1GB of RAM, Ethernet, USB, HDMI, microSD, and a 40 pin header for connecting hardware.

First, we’ll need to connect the Pi to the breadboard. The connecting wires that are used on breadboards are Male to Male Dupont connectors, which won’t work with the Pi. You can get Male to Female connectors, and the latter end will let you directly connect to the pins on the Raspberry Pi 2. Another option is to get a "Wedge" which connects the Raspberry Pi using a ribbon cable with a custom PCB that can be inserted into a breadboard. A significant advantage to using a Wedge is that the pins are labeled on the Wedge PCB -- much, much simpler than trying to keep count of which pin you are at in the 20 columns of unlabeled pins on the Pi itself.

Next we’ll install the WiringPi project’s "gpio" command line tool which allows interaction with the 40 pins on the Raspberry Pi header. I was using the Raspbian distribution on my Pi. The below commands should checkout the latest source, compile, and install it for you.

pi@pi ~/src $ git clone git://git.drogon.net/wiringPi

Cloning into 'wiringPi'...

remote: Counting objects: 914, done.

remote: Compressing objects: 100% (748/748), done.

remote: Total 914 (delta 654), reused 217 (delta 142)

Receiving objects: 100% (914/914), 285.58 KiB | 123 KiB/s, done.

Resolving deltas: 100% (654/654), done.

pi@pi ~/src $ cd ./wiringPi

pi@pi ~/src/wiringPi $ ./build

The WiringPi library offers easy access to the GPIO pins on the Raspberry Pi and provides both the command line tool gpio and an API for hardware interaction for your programs. It also includes some support for interacting with chips which are connected to the Raspberry Pi. For example, mapping a GPIO pin multiplexer chip for easy access using calls that are familiar with Arduino programmers such as digitalWrite().

WiringPi has its own pin numbering scheme. As you can see from the table below, much of the time the name of the pin and the name that WiringPi uses will match. I used the SparkFun Wedge, which labels the GPIO pins using the BCM numbers. So the physical pin 12 on the Raspberry Pi header has a BCM pin name of 18, and so is labeled as G18 on the Wedge. The same pin has a WiringPi pin number of 1. It seems like there might be one too many levels of indirection in there. But, if you are using a Wedge then you should be able to read the BCM pin number and know what WiringPi (wPi) pin number you need to use in order to interact with that pin on the Wedge. The Wedge also makes it a little less likely to accidentally connect ground and voltage to the wrong places.

root@pi:~# gpio readall
+-----+-----+---------+------+---+---Pi 2---+---+------+---------+-----+-----+
| BCM | wPi |   Name  | Mode | V | Physical | V | Mode | Name    | wPi | BCM |
+-----+-----+---------+------+---+----++----+---+------+---------+-----+-----+
|     |     |    3.3v |      |   |  1 || 2  |   |      | 5v      |     |     |
|   2 |   8 |   SDA.1 |   IN | 1 |  3 || 4  |   |      | 5V      |     |     |
|   3 |   9 |   SCL.1 |   IN | 1 |  5 || 6  |   |      | 0v      |     |     |
|   4 |   7 | GPIO. 7 |   IN | 1 |  7 || 8  | 1 | ALT0 | TxD     | 15  | 14  |
|     |     |      0v |      |   |  9 || 10 | 1 | ALT0 | RxD     | 16  | 15  |
|  17 |   0 | GPIO. 0 |   IN | 0 | 11 || 12 | 1 | ALT5 | GPIO. 1 | 1   | 18  |
|  27 |   2 | GPIO. 2 |   IN | 0 | 13 || 14 |   |      | 0v      |     |     |
|  22 |   3 | GPIO. 3 |   IN | 0 | 15 || 16 | 0 | IN   | GPIO. 4 | 4   | 23  |
|     |     |    3.3v |      |   | 17 || 18 | 0 | IN   | GPIO. 5 | 5   | 24  |
|  10 |  12 |    MOSI | ALT0 | 0 | 19 || 20 |   |      | 0v      |     |     |
|   9 |  13 |    MISO | ALT0 | 0 | 21 || 22 | 0 | IN   | GPIO. 6 | 6   | 25  |
|  11 |  14 |    SCLK | ALT0 | 0 | 23 || 24 | 1 | ALT0 | CE0     | 10  | 8   |
|     |     |      0v |      |   | 25 || 26 | 1 | ALT0 | CE1     | 11  | 7   |
|   0 |  30 |   SDA.0 |   IN | 1 | 27 || 28 | 1 | IN   | SCL.0   | 31  | 1   |
|   5 |  21 | GPIO.21 |   IN | 1 | 29 || 30 |   |      | 0v      |     |     |
|   6 |  22 | GPIO.22 |   IN | 1 | 31 || 32 | 0 | IN   | GPIO.26 | 26  | 12  |
|  13 |  23 | GPIO.23 |   IN | 0 | 33 || 34 |   |      | 0v      |     |     |
|  19 |  24 | GPIO.24 |   IN | 0 | 35 || 36 | 0 | IN   | GPIO.27 | 27  | 16  |
|  26 |  25 | GPIO.25 |   IN | 0 | 37 || 38 | 0 | IN   | GPIO.28 | 28  | 20  |
|     |     |      0v |      |   | 39 || 40 | 0 | IN   | GPIO.29 | 29  | 21  |
+-----+-----+---------+------+---+----++----+---+------+---------+-----+-----+
| BCM | wPi |   Name  | Mode | V | Physical | V | Mode | Name    | wPi | BCM |
+-----+-----+---------+------+---+---Pi 2---+---+------+---------+-----+-----+

Test the Setup

Connecting an LED and resistor in series to a GPIO is a standard test to quickly see if setting a GPIO has an effect. Connecting one end of the LED-resistor combination to G18 (BCM18) on the Wedge and the other end to ground allows the below commands to turn the LED on and off.

root@pi:~# gpio mode 1 output
root@pi:~# gpio write 1 1
root@pi:~# gpio write 1 0

Pin G18/BCM18 is special on the Raspberry Pi because it can send a Pulse Width Modulated (PWM) signal. One way of thinking about a PWM signal is that it is on for a certain percentage of the time and off for the rest. For example, a value of 0 means the signal is always a low (ground) output. A value of 1023 would keep the pin high all of the time. A value of 512 would result in the pin being on half the time and off half the time.

The script shown below will give a glowing pulse effect on the LED instead of just turning it on and off directly. Notice the use of the trap command which runs a cleanup function when the script is exited or closed using control-c from the command line.

root@pi:~# cat ./gpio-pwm.sh
#!/bin/bash

pin=1;
minval=10
maxval=1023

trap "{ echo 'bye...'; gpio mode 1 output; gpio write 1 0; exit 0; }" EXIT SIGINT SIGTERM
gpio mode 1 pwm

for i in $(seq 1 10); do

  for v in $(seq $minval 10 $maxval); do
     gpio pwm $pin $v
     sleep 0.001
  done
  for v in $(seq $maxval -10 $minval); do
     gpio pwm $pin $v
     sleep 0.001
  done
  sleep 0.5
done

exit 0

Get Your Motor Running!

The photo above shows a common method to control an electric gearmotor from a microcontroller or computer. A few complications are introduced when running gearmotors from computers. For a start, the motor is likely to want to run at a higher voltage than what the computer is using. Even if the motor can operate at the voltage that the GPIO pins on the computer operate at, the motor will likely want to draw more current than the computer is rated to supply. So operating a gearmotor directly from the GPIO pins is usually a very bad idea. Damage to the controlling computer has a fairly good chance of occurring if you try that. A common solution to this problem is to use a motor driver chip which drives the motors using a separate power supply and lets you command the chip from your computer.

The small red PCB on the left side of the photo has a TB6612FNG motor driver chip on it. The TB6612FNG is not a DIP chip, so it cannot insert directly into the breadboard. There are many PCBs available like that shown in the photo which contain the TB6612FNG chip and have a pinout that allows for insertion into a breadboard. The chip lets you run two motors at different speeds and directions using a dedicated power source for the motor and control the chip using a different voltage level from a computer. Each motor wants to use three pins on the Raspberry Pi for control; a PWM pin to set the motor rotation speed, and two pins to set the direction that the motor spins.

Shown on the lower side of the TB6612FNG chip, the motor is wired to B01 and B02. It doesn't matter which way around you wire this, as inserting the motor the other way around will only cause it to spin in the other direction. I'm using a block of AA batteries to power the gearmotor; the battery has its positive lead connected to the VM (Voltage Motor) input and the ground is connected to the ground shared with the Raspberry Pi. Using red and green/black for power and ground is a reasonably common wire color scheme and helps to avoid accidentally connecting things that might create a short circuit. The ground of the Raspberry Pi and the battery pack are connected to establish a common ground. The battery pack supplies the Voltage Motor pin which is used to power the gearmotor. All signals sent to the TB6612FNG chip use the logic voltage level which is set by the Raspberry Pi.

The STBY (Standby) line is pulled to logic voltage high. There is an internal pull down resistor on the STBY pin, and if the STBY is low (ground) then the motors will not turn. The PWMB, BIN2, and BIN1 are connected to G18, G19, and G20 respectively. The G18 pin has a special double meaning because it can output a PWM signal using hardware on the Raspberry Pi.

The first commands shown below will set the motor rotation direction and setup the controlling PWM pin ready to start rotating the motor. The PWM setting defaults to a range 0-1023 with higher values causing the motor to spin faster. Once the motor is stopped, the settings on pins 24 and 28 are swapped, so the motor will spin in the opposite direction.

root@pi:~# gpio mode 24 out
root@pi:~# gpio mode 28 out
root@pi:~# gpio write 24 1
root@pi:~# gpio write 28 0
root@pi:~# gpio mode 1 pwm

root@pi:~# gpio pwm 1 200
root@pi:~# gpio pwm 1 800
root@pi:~# gpio pwm 1 0
root@pi:~# gpio write 24 0
root@pi:~# gpio write 28 1
root@pi:~# gpio pwm 1 800
root@pi:~# gpio pwm 1 0

The same PWM chip that controls wPi pin 1 also controls wPi pin 26. Moving the PWM pin of the gearmotor to wPi pin 26 I could still control the speed of the motor by setting the PWM signal on wPi pin 1. So these pins seem to share the same PWM signal, at least when I controlled them through the gpio tool. Moving the direction setting pins to free up wiring pin 24 (BCM pin 19) allows the use of a second PWM output signal. For example, moving to using BCM_20 and BCM_21 to set the motor direction.

Final Words

The Raspberry Pi 2 has two PWM outputs. It has been mentioned that using one of those PWMs might affect audio on the Raspberry Pi. A common method of controlling a robot is differential drive which uses two independently controlled motors and a drag wheel or ball as a third point of contact with the ground. Using two PWM outputs and four other GPIO pins the above design can be extended to allow a Raspberry Pi to be mounted to a small robot and move it around.

The Wiring Pi project can also control 595 shift registers, and GPIO extension chips like the MCP23008 and MCP23017. I hope to show interaction with some of these chips using Wiring Pi as well as TWI or SPI interaction in a future article.

How to Install Gitlab with PostgreSQL and Nginx on Ubuntu 15.04

$
0
0

Gitlab is a web-based git repository management application written on Ruby. It is similar to GitHub and includes features like a project wiki and issue tracking system. In this tutorial, I will guide you step by step trough the installation of Gitlab CE with PostgreSQL as the database system, and Nginx as the web server on Ubuntu 15.04 version. We will use Ruby version 2.x.x, gitlab stable version 8.x.

Read more at HowtoForge

Cleaning Linux: Jeds Nappy /boot

$
0
0
  • > dpkg-query -l linux-header* | grep 'ii ' | wc -l
  • 45
Read more at Freedom Penguin.

Let’s Encrypt Automation on Debian

$
0
0

Free SSL certificates for everyone! the https://letsencrypt.org/ initiative backed by Akamai, Cisco, Mozilla and EFF, is going to offer free certificates. On this post I am going to explain how I have automated the process of creation and renewal of certificates, on a Debian server with a lot of virtualhosts with the minimal modification of the apache conf files.

The idea of the projects is to extend the use of SSL certificates everywhere, the aproach of the projects is that the process of provisioning certificates is selfprovisioned from the servers with no manual interaction, to force that the certificates expiration is 90 days, forcing sysadmins to automate the proccess.

Read more at Damia Blog.


GalliumOS: The Ideal Linux Distribution for Chromebook Hardware

$
0
0

gallium install I must confess that I’m a big fan of the Chromebook. I do all initial drafts of my novels on a Pixel (the screen/keyboard/trackpad are simply the best) and use an Acer C720 as a “grab and go” device. However, as much as I enjoy working with Chrome OS, there are some things that simply cannot be done with Google’s platform. For example—working with an editor on Google docs is cumbersome. Editing or creating images with Pixlr is like working with half of GIMP’s power. If I want to record, forget having the flexibility and performance of Audacity.
So, when I want those tools available to me, at full strength, what do I do? One option is to install Linux on a Chromebook. And why not? This allows you to take advantage of low cost hardware by installing a full-blown, powerhouse platform that is ready to undertake any task you can throw at it. Of course, if you happen to have a standard piece of hardware lying around, and you want a Chrome OS experience, you can always install CloudReady (see my piece “Neverware’s CloudReady Brings a Chromium-Fueled Chromebook OS to Standard Hardware”).

I’ve outlined the installation of Bodhi Linux on a Chromebook (see “How to Install Linux on an Acer c720”). To some Bodhi is a great platform for the Chromebook. To others, the quirkiness of the distribution leaves a bit to be desired. That’s where GalliumOS comes into play. Gallium is an ideal Linux-to-Chromebook platform because:

  • It is based on Xubuntu, which is already an incredibly lightweight and performance-centric desktop environment.

  • It offers a much faster boot time than other Chromebook-ready Linux distributions.

  • It offers an integrated ChromeOS touchpad driver for better performance/responsiveness.

  • Kernel watchdog timer has been disabled for improved power saving.

  • Kernel has been further optimized to gain as much performance as possible.

  • Zram is used for swap for higher performance.

Under normal circumstances, I’ll install Linux on my Acer c720, use it for a few days, and then return the device back to Chrome OS. After testing Gallium OS for a couple of weeks, I have decided to keep the Linux distro running on the little Chromebook. Why? Because Gallium OS is that good.

Interest piqued yet? Good. Let’s install Gallium OS.

NOTE: Before you install Gallium, I highly recommend you install the Chromebook Recovery Tool and create a recovery USB drive. Without this recovery drive, you’ll have a hard time reverting back to Chrome OS.

Hardware considerations

Before you jump into creating the bootable USB drive, there are a few considerations you must make. First is hardware compatibility. The developers of Gallium OS have released a compatibility matrix that lists out all devices known to work with the distribution, as well as their included chipset (an important bit of information you’ll need later on). Check through the list to ensure your hardware is included (and note the chipset of your device).

The next consideration is the chipset. If your device has a Haswell chipset, you’re good to go (the only thing you have to do for preparation is to enable a couple of boot flags). If, however, you have either a Broadwell or Bay Trail chipset, you’ll need to follow these instructions in order to prepare your device for Gallium OS. My Acer c720 is a Haswell-powered device, so I will walk you through the steps of getting Gallium OS installed and running.

Creating the USB drive 

The first thing you must do is create the bootable USB flash drive. Download the correct image for your device on your Linux machine (keeping in mind the proper chipset), to the ~/Downloads directory, and follow these steps: 

  1. Open up a terminal window

  2. Change into the Downloads directory with the command cd ~/Downloads

  3. Rename the downloaded file to galliumos.iso

  4. Plug in your USB drive

  5. Issue the command lsblk and locate the name associated with the USB device (it will be something like /dev/sdj

  6. Unmount your USB drive (if mounted) with the command umount /dev/sdX (Again, where X is the name of the drive)

  7. Create the bootable drive with the command sudo dd bs=1M if=galliumos.iso of=/dev/sdX (Where X is the name of the USB drive)

  8. Allow the process to complete.

NOTE: If you use a desktop distribution that doesn’t take advantage of sudo, you will su to the root user and issue the dd command without sudo.

You can now remove the USB drive and plug it into your Chromebook. 

The next step is to reboot your device in developer mode. This is done by holding down the Escape and Refresh button and then tapping the Power button. When the device reboots, you will be greeted by a screen with a warning. Tap CTRL+D to continue on. You now have access to the developer mode and can enable the necessary boot flags. Here’s what you need to do:

  1. Press CTRL+Alt+T

  2. In the bash screen, type shell and hit Enter

  3. Enable to necessary flags with the command sudo crossystem dev_boot_usb=1 dev_boot_legacy=1

You can now insert your USB drive and reboot your Chromebook. When you are presented with the same warning screen as earlier, hit CTRL+L and the device will boot from the USB drive.

Installing Gallium OS 

At this point, you should be in familiar territory, as Gallium OS will have booted into a live instance of the OS. You will want to connect to your wireless network and then double-click the Install Gallium OS icon. This will fire up an all-too familiar installation wizard (Figure A).

The installation wizard is the standard fare, so anyone who has installed Linux will zip through this with ease. When you finish the installation, reboot and enjoy a full-blown Linux distro on your Chromebook. 

Usage 

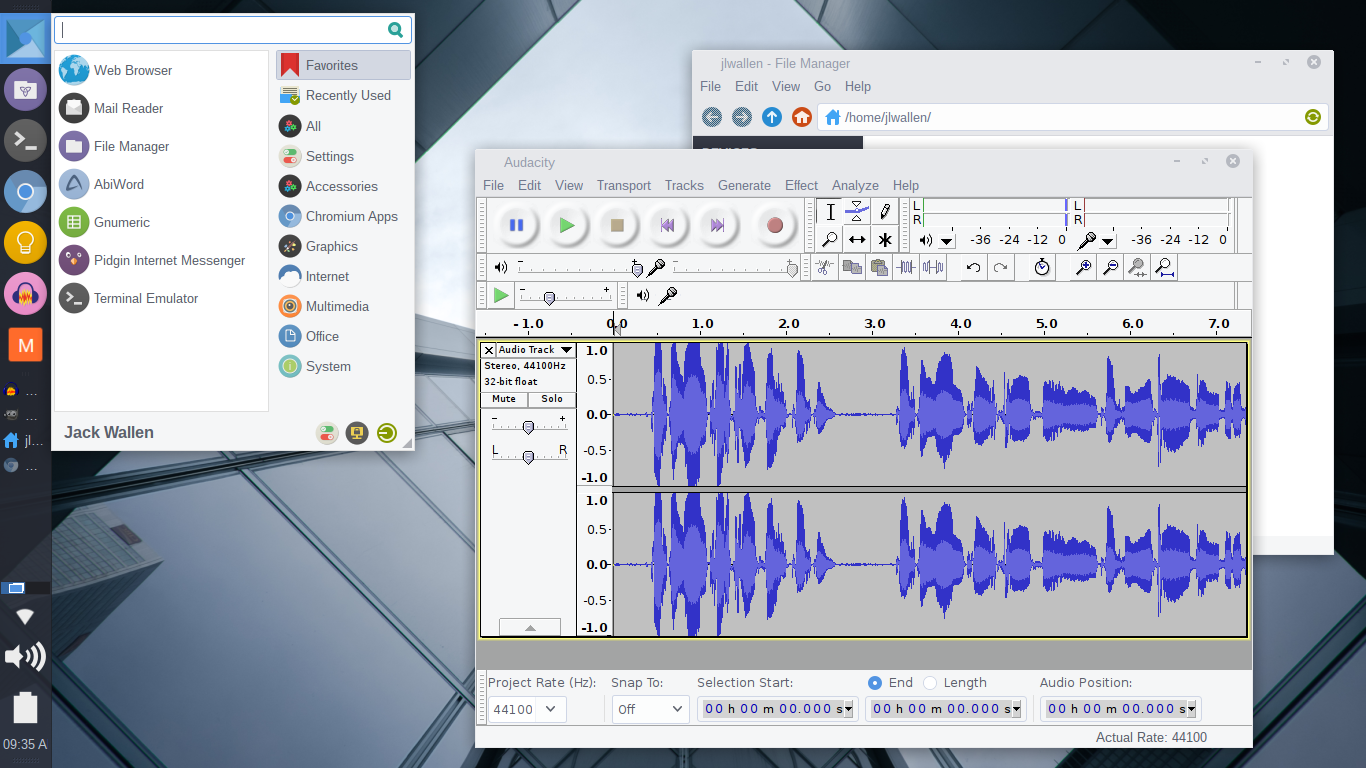
Fortunately, the desktop environment will be immediately familiar. By using Xfce, Gallium has a very shallow learning curve. It also offers up a bit of flexibility in the layout of the desktop. In the end, however, this is all about getting the most out of your portable hardware. One of the first things I did with Gallium on my Acer C720 was to install Audacity to create a portable recording studio (Figure B).

gallium audacity

You’ll find installing applications as simple as opening up Synaptic, search for the app, and installing. Or, if you prefer the command line, you can open up a terminal window, and issue the command to install the desired app (Figure C).

gallium clementine

Limited storage

The one caveat to take into consideration is the limited storage space on your Chromebook. Gallium does such a great job of making you feel right at home using Linux on your device, you might be tricked into thinking you have far more storage space than you really do. Keep that in mind when installing apps and you’ll do just fine.

Gallium OS might well be the ideal platform for those wanting to get more out of their Chromebook devices. The installation isn’t terribly challenging and what you gain by installing Linux is beyond impressive. Give this full-blown Linux distro a try and see if it doesn’t greatly expand your Chromebook usage.

How to Delete User Accounts with Home Directory in Linux

$
0
0

In this tutorial, I am going to take your through steps you can use to delete a user’s account together with his/her home directory on a Linux system. To learn how to create user...

[[ This is a content summary only. Visit my website for full links, other content, and more! ]]

 
Read more at TecMint

How to Install the Enlightenment E20 Desktop on Ubuntu 15.10

$
0
0

The new Enlightenment E20 Desktop has just been released. The Enlightenment project consists of the Enlightenment Window manager (which was started in 1996), the EFL library that contains graphic, widget, network, and other basic desktop functions and some applications that are based on EFL like a terminal emulator, a video player, and an IDE. In this tutorial, I will show you how to install the E20 Desktop on the current Ubuntu 15.10.

Read more at HowtoForge

Three Ways to Easily Encrypt Your Data on Linux

$
0
0

Data encryption is one very solid security measure/precaution that everyone who owns data with significant personal or objective value should perform. What data encryption does is securing your data when they fall into the wrong hands. There are many tutorials on howtoforge.com that show one way or another to decrypt your data. This one will show the most easy-to-use tools that can do the job for us. For this purpose, I will showcase the decryption of a removable media drive.

Read more at HowtoForge

Fixing Mistakes in Git

$
0
0

gitWhat do you do when you make a mistake in Git? There are many ways to get in trouble, and several good ways to get out of trouble.
Prevention

The best method is to stay out of trouble. Of course, this isn't always possible, but there are some best practices you should use to prevent problems, and to make fixing problems easier. (For a refresher in Git basics, start with Your Real-World Git Cheat Sheet.)

  1. Follow the conventions of the project you are contributing to. Hopefully, they have written style and process guides to follow. Obey them.

  2. Keep your commits small, specific, and frequent. Giant commits are asking for trouble. They're difficult to debug, and who wants to review massive commits? Small frequent commits are better than infrequent giant commits, which will fall behind and require manual conflict resolution.

  3. Make detailed commit messages. A good commit message describes what your commit does, and why. Start with a brief descriptive subject line followed by a line break. Then, in the body of your commit message, describe what the problem your commit is solving -- improvement, new feature, or whatever. Cite relevant issues or commits. Leave a nice backtrail that you and other contributors can follow long after you have forgotten why you did it in the first place.

  4. Remember to always run git pull on your master branch, or whatever upstream branch you are using, before creating your working branch.

  5. Never work directly in your upstream branch. Always make your own working branch. You can do anything you want in your working branch without affecting upstream, and if you make an unfixable mess, you can nuke it and start over.

  6. Git branches are cheap and easy. Use 'em and lose 'em. No matter how small your changes are, make them in a new branch. After your commits are merged upstream, delete your working branch.

  7. Make sure that your new working branch is derived from the correct upstream branch.

  8. There is no shame in maintaining backups of your working branches, and copy-pasting to get out of trouble.

  9. Study the Pro Git book, and search it first for answers. The Internet is full of bad Git answers, so stick with the authoritative source.

Catching Mistakes Early

In a typical Git workflow there are four phases: editing, staging, committing, and finally, creating a pull request for review before merging. The earlier you catch mistakes, the easier they are to fix.

Editing is when you edit or create a file in your new working branch. Staging is when you use git add to stage your changes. Committing is when you use git commit to add your staged files to a commit. At this point, all of your work is local; nothing you do affects any other branches or anyone else's work. The pull request is your last chance to make fixes before it gets merged into the upstream branch. Hopefully, there are people and automated build testers who will review your pull request and catch mistakes. Do not despair when they find problems with your work, because it is far better to fix them before they get propagated upstream, or even worse, get released into the wild and excite the wrath of users.

Pre-Staging and Staging Errors

You haven't made any commits yet, so this is the easiest time to make fixes: Just edit your files. No muss, no fuss. You can change and git add the same file a million times, and Git won't care.

If you have a lot of changes to undo, you can reverse all the changes in a file:

$ git reset HEAD [filename]
$ git checkout [filename]

Now you can start over.

Errors After Committing

There are multiple ways to make repairs to a commit. If you are worried about zapping changes that you might want to keep or just want a safety net, back up your files first.

1. Correct the mistake and then commit again. You can make a million commits before creating your pull request, and Git won't care. However, a pull request made up of a large number of commits is more difficult to review and debug. A nice low-tech way to fix this is to make a backup of your final version. Copy your backup into a new branch created from the same upstream, and then you can make a single commit in the new branch.

2. You may amend a commit. This replaces the previous commit instead of adding another one. Make and add your edits, and use the --amend option:

$ git add [files]
$ git commit --amend

This action overwrites the previous commit, and you can change or keep the previous commit message.

You can un-commit a commit with git reset --soft. This doesn't change any of your files, but rather goes back in time as though your last commit did not happen and you are still in staging. You can edit, add, or remove files, and then commit again.

$ git reset --soft HEAD^

At this point, you can even reset files all the way back to their original state.

$ git reset HEAD [filename]
Unstaged changes after reset:
M       filename
$ git checkout [filename]

3. Revert the offending commit. This method is good for a more complex commit that would take a lot of work to edit. After you make a commit, git status tells you "nothing to commit, working directory clean" even when you have not yet pushed your commits. Use git log to see your commits that have not yet been pushed:

$ git log --branches --not --remotes
commit 42c54ed7262df89f3799918c056f3dbb2d0523bd
Author: Carla Schroder <carla@example.com>;
Date:   Tue Dec 1 13:53:55 2015 -0800

   More items to append to changelog

commit 48ff152fafbb5a1d9d276277f9ac73d84a5e064b
Author: Carla Schroder <carla@example.com>;
Date:   Tue Dec 1 13:52:58 2015 -0800

   Added new items to changelog

You can use git revert to reverse a specific commit:

$ git revert 42c54ed7262d

However, this approach can lead to more problems if you made multiple commits on a single file, because you will probably have to manually resolve conflicts. You can undo git revert if it looks too messy to fix:

$ git revert --abort

The nuclear option for reversing commits is with a hard reset to move back in time to a specific commit. Use git reflog to see your recent commits from newest to oldest:

$ git reflog
d42c5e9 HEAD@{0}: commit (amend): Yet more changelog updates, plus corrections
e54b68c HEAD@{1}: commit: Yet more changelog updates
d1f8998 HEAD@{2}: commit: Additional entries to bring changelog current
48ff152 HEAD@{3}: commit: Added new items to changelog
1297eaa HEAD@{4}: checkout: moving from master to workbranch
1297eaa HEAD@{5}: clone: from https://github.com/project/project.git

Then, use a hard reset to go back in time to your chosen commit:

$ git reset --hard d1f8998

This permanently discards everything that came after your selected commit.

Fixing Pull Requests

Errors in pull requests are fixed with new commits to your pull request. If your pull request is a hopeless mess, you can nuke the whole thing. Typically, pull requests are created and managed with tools provided by a Git host such as GitHub, so deleting a pull request is done with a button click.

In addition to the Pro Git book, you can check out the reference manual and videos at git-scm.com/doc. Git is complex, so don't let the showoff Git wizards make you feel inferior. Stick with the authoritative documentation, and you'll do fine.

How to install and configure ZFS on Linux using Debian Jessie 8.1

$
0
0
ZFS is a combined file system and logical volume manager. The features of ZFS include protection against data corruption, support for high storage capacities, efficient data compression, integration of the concepts of filesystem and volume management, snapshots and copy-on-write clones, continuous integrity checking and automatic repair, RAID-Z and native NFSv4 ACLs. This tutorial will show you how to install ZFS on Debian 8.
Read more at HowtoForge

How to connect your Android device on Ubuntu Linux

$
0
0
Buying a media device that needs a special driver and/or connectivity suite to navigate and update its contents is a common case nowadays, and has been ever since manufacturers decided that it would be a good idea to just limit the access that users can have on the products that they bought. This may not be a huge problem to Windows and Mac OS users who can simply download the manufacturer's suite and use it to connect to their device, but Linux is often (if not always) left unsupported in that part. The first time I encountered this problem was with the first generation of iPods and Creative Zen players that refused to show any contents on the File Manager when connected via the USB port, and then came the newest generations of Android devices which do the same. In this quick guide, we will see how we can overcome this problem, and connect our media device on our Linux system.
Read more at HowtoForge

How to Customise Your Linux Desktop: LXDE

$
0
0

Part six(!) in my Linux Desktop series, I'm looking at LXDE on Debian GNU/Linux and Raspbian.

So far in this series I have looked at customizing XfceKDEGnome 3,Cinnamon and MATE. That covers a lot of territory, and there has been some significant overlap in focus, features and capabilities between those desktops.

This time I'm going to look at LXDE, and I think the difference will be clear - LXDE is focused on being lightweight and low overhead but still easy to use and configure.

Read more at ZDNet News

Tips and Tricks to Get the Most out of Your Linux WiFi

$
0
0

jack wifi a
Regardless of your operating system, wireless can sometimes be a headache. Either you drop a signal, your wireless connections flakes out, your connection is slow, or your wireless device winds up MIA. Either way, there are times you’ll wind up having to troubleshoot or tinker to get the most out of that connection.

Everyone using Linux knows that wireless problems aren’t limited to our favorite open source platform. As with printers, all operating systems can succumb to the woes of wireless. Fortunately, with Linux, there are plenty of ways to prevent or fix the problems.

For those that like to eke out the most power and functionality from their system, I will provide a few tips and tricks specific to wireless connectivity. Hopefully, one of these tips will be exactly what you need to get the most out of your own wireless connection.

I will be demonstrating these tips using Ubuntu GNOME 15.10 and elementary OS Freya. If you’re using a different distribution, you’ll only need to make minor alterations to the command structure for this to work (such as, su’ing to root instead of using sudo).

Increase Wireless Signal Strength

Believe it or not, you can actually strengthen the signal of your wireless card. It’s not very hard, but it does require the use of the command line. What this tip does is increase the TX (or transmit) power of your wireless card. For those that don’t know, the TX power is the broadcasting power of your transmitting antenna. Typically, the TX power is set to 20 dBm, but can be set to significantly higher values. Here’s what you need to do:

  1. Open up a terminal window

  2. Issue the command ifconfig

  3. Determine the name of your wireless card (mine is wlp4s0)

  4. Install wavemon with the command sudo apt-get install wavemon

  5. Run the wavemon command and notate the TX value under Statistics

  6. Bring your wireless connection down with the command ifconfig wlp4s0 down

  7. Set the wireless regional setting to Bolivia (where they allow the use of 1000 mW tx-power) with the command iw reg set BO

  8. Bring the wireless connection back up with the command sudo ifconfig wlp4s0 up

  9. Rerun the wavemon command and take note of the TX value

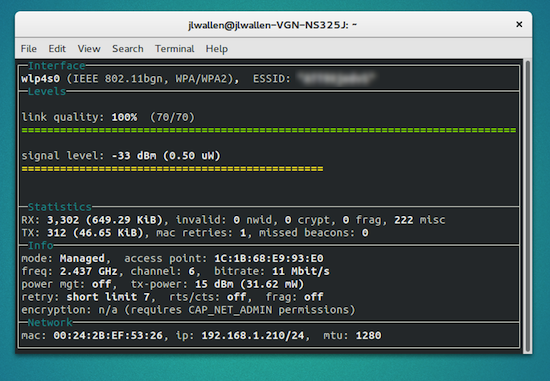
After switching the regional setting on my card, the TX value saw a significant increase. Check out the values of the post-configured TX settings (see Figure 1 above).

There are some caveats to setting such a high TX:

  • You might find your wireless card getting a bit too hot, which can lead to data errors

  • Excessive power usage, which can heat up the board surrounding the wireless chip

If you start seeing errors associated with wireless, or your machine reboots or shuts down for no reason, you should set the TX power to a lower setting. If that’s the case, you can always set a specific TX rating with a command like:

iw wlp4s0 set txpower fixed 30mBm

That would set the TX power to 30 (as opposed to the usual default of 20). This is a decent increase that won’t have the added effect of possibly overheating your chip.

Disable Power Management

Some wireless cards support power management. This feature can sometimes get in the way of the card’s connection quality (which also affects connection speeds). If your card happens to support it, you can turn off the power management feature with a simple command:

iwconfig wlp4s0 power off

The problem with the command is that, as soon as you reboot, it will reset to the default on setting. To get around this, you’ll have to create a short script that will run the command at boot. Here’s how:

Create the script (we’ll call it wifipower) with the following contents (you will substitute the name of your wireless card where mine says wlp4s0):

#!/bin/sh
/sbin/iwconfig wlp4s0 power off

Save the script and give it executable permissions with the command chmod u+x wifipower. With the permissions in place, move the file to /etc/init.d and issue the command update-rc.d wifipower defaults. Now the power management feature will turn off at boot. The only caveat to this is ensuring your card supports the feature. If it doesn’t, the power off command will report back to you that the feature isn’t supported.

Set the BSSID

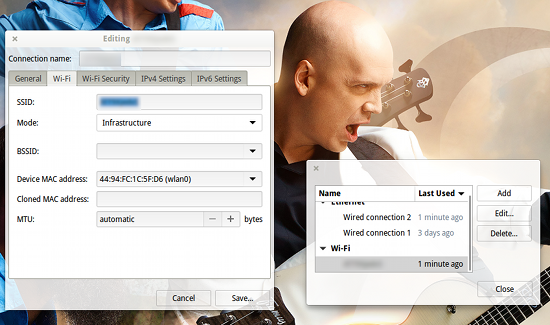
Did you know that the Linux Network Manager rescans the network every two minutes? This can actually cause problems with your wireless connection. If you happen to work with your wireless in the same, familiar locations, you can set the BSSID to the MAC address of your router which will prevent Network Manager from scanning for access points on that particular wireless connection. Here’s how:

  1. Open up the Network Manager (usually found in the system tray of your desktop)

  2. Select the wireless connection you want to work with

  3. Click Edit

  4. In the Wi-Fi tab, click the drop-down associated with BSSID (Figure 2)

  5. Select the MAC address for your router (if it does not appear, you’ll have to locate it on your router and enter it manually)

  6. Click Save
    jack-wifi b

Dual-Boot Blues

If your Linux box dual boots with Windows, you may find that, after booting into Windows, your machine can no longer get an IP address. This situation is most likely caused by the fact the router thinks it already handed an IP address out to the MAC address associated with your network card.

There are a few ways around this issue. What you do will depend on how you use your machine. If you spend the vast majority of your time dual booting at home, you can simply set a static IP address for one of the operating systems. By doing this, the router will not fail to hand out a dynamically assigned IP address to the other operating system.

If you want to set the static address on the Linux side, follow these steps:

  1. Open up Network Manager

  2. Select your wireless connection from the list and click the settings icon (or Edit, depending on your desktop)

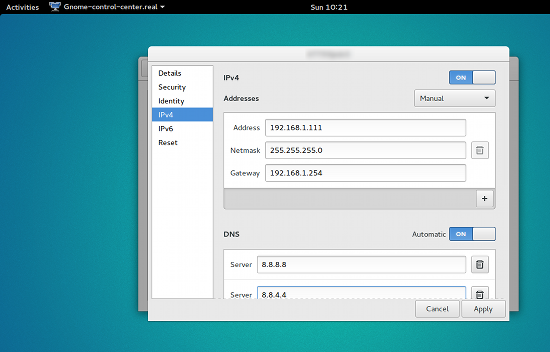
  3. Go to the IPv4 section

  4. Select Manual from the Addresses section

  5. Enter the necessary information (Figure 3)

  6. Click Apply

  7. Close Network Manager

jack-wifi c
If you don’t want to set a static address on either side (or you cannot do so because you’re on someone else’s network), your best bet is to have Windows release the IP address before you reboot into Linux. This is done (within Windows), with the command:

ipconfig /release

Once Windows has released the IP address back to the router, it will assume the MAC address will need an IP address the next time it checks in. Reboot, and then Linux shouldn’t have any problems with wireless.

There are plenty of other wireless situations that call for other solutions, but what I’ve outlined here should go a long way to help you get the most out of your wireless connection on Linux.

How to use snapshots, clones and replication in ZFS on Linux

$
0
0
In the previous tutorial, we learned how to create zpool's and a ZFS filesystem or dataset. In this tutorial, I will show you step by step how to work with ZFS snapshots, clones, and replication. Snapshot, clone and replication are the most powerful features of the ZFS filesystem.
Read more at HowtoForge

How to Install Django 1.9 on Ubuntu 15.04

$
0
0
Django is a web application framework written in python that follows the MVC (Model-View-Controller) architecture, it is available for free and released under an open source license. In this tutorial, we will install Django 1.9 on a Ubuntu 15.04 server. Django can be installed on a server in many ways, in this tutorial, I will show you to install it with pip, virtualenv and directly from the Django GIT sources. Finally, I will show you the first steps to start a new project with the Django web framework.
Read more at HowtoForge

Tips for Securing your Home Network with Linux and Open Source

$
0
0

jack-network a
Security is at a prime and that’s not going to change in the unforeseeable future. With more and more people taking advantage of technology in nearly every aspect of their lives, it’s now time for people to get serious about security.

That includes your home network.

But, outside of simply using Linux to increase the security of your data (which helps a great deal), what can you do? Can you just demand that everyone in the house switch to Linux? In a perfect world, that would be ideal—however, we do not live in a perfect world and some users won’t want to leave behind their platform of choice.

With that in mind, I’ve gathered up a few suggestions that can help you gain the extra security your home network needs. Some of these suggestions are fairly simple to implement, whereas others will require considerable further reading. With that said, let’s dive in and see how Linux can beef up your home network security.

Router

Let’s start at the heart of your network—the router. Most likely your ISP handed you a modem/router combination that does its job. You’ve probably noticed, however, that the router leaves a lot to be desired in terms of options. Your best bet is to consider that piece of equipment nothing more than a modem and deploy your own, Linux-powered, router.

There are a few ways to go about this. DD-WRT is an open source firmware that can be flashed to many commercial router hardware devices. You could go the easy route and get a router pre-installed with DD-WRT (e.g., the Buffalo line of routers), or you can go through the process of flashing the DD-WRT firmware onto a supported router (check the list of supported devices).

Once you’ve done that, check out the collection of tutorials DD-WRT has for subjects like Access Restrictions, Firewall, Easy SSH Tunnels, Port Blocking, OpenVPN Remote Access by Static Key, and more.

Make sure, when you setup your wireless router, that you use very strong passwords for both the SSID and admin access into the router.

The Production Machines

I’m talking about the desktops and laptops. There’s much to be said here, and what is said depends upon the platform being used. I’ll first make mention of Windows. Because Windows is the platform most vulnerable to attacks, you’ll need to spend a bit of extra time with it. You’ll need to install anti-malware and antivirus tools immediately. You’ll be hard-pressed to find an open source anti-malware-specific application on the market. You will, however, be happy to know there is an open source antivirus tool in ClamAV, which also happens to detect both viruses and malware—so this should be installed on all Windows machines within your home network. If you have OS X machines, you should install ClamXav as your antivirus/anti-malware solution. I also highly recommend you not use the default Windows web browser (Internet Explorer). Instead, download Firefox or Chromium.

If at all possible (and with the way the average user works today, it is very possible), I would recommend not allowing Windows machines on your home network. Insist on users work with Linux desktops, Chromebooks, or OS X for everyday work and dual boot into Windows for games (if necessary).

I would also very strongly suggest you not share out folders from within Windows. If you must share out folders on the network, do so from either a Linux machine or a dedicated NAS (more on this in a bit).

As for the Linux machines on your network? Do not assume they are invulnerable. If they are online, they can be had. To that end, make sure you get to know your distribution’s firewall tool. Most end users won’t have to dive deep into the heart of iptables, because most modern distributions work with the much simpler UFW—which is a front end for iptables that goes a very long way toward making the tool accessible to the average user.

Your distribution most likely includes a front end (for more on UFW, read “An Introduction to Uncomplicated Firewall (UFW)”). Also, make sure every user with a Linux account on a machine creates strong passwords for their account. This should be considered a must.

On all platforms, always make sure to do regular updates. Do not let these sit idly by; otherwise, your desktops, laptops, and servers will be vulnerable. Check daily and, if updates are available, install them.

Sharing Folders

You’re probably used to sharing out folders on your company network. The one thing you must remember about this is that your company probably has shelled out quite a lot of money for security appliances (e.g., Cisco) that allow you to safely share all those folders on your Windows machine without the slightest concern for security. The thing is, without that hardened security, your best bet for sharing out folders is either from a Linux machine or from a NAS. If you want to share out from your Linux desktop, it’s quite easy, because most desktop distributions include the ability to share folders with a few quick clicks (see Figure 1 above).

If you don’t want to share your folders out from a Linux desktop, you can always go with a NAS solution. If you opt to build a NAS on your own, I highly recommend FreeNAS as the platform of choice. FreeNAS not only allows you to set up a powerful network attached storage solution, but a multi-media streaming solution as well.

If you want more of a cloud solution, you can always roll your own internal cloud with ownCloud. Not only can you easily share your data within your home network, you can also set up streaming media, a shared calendar, and even collaborate...all without having to reach beyond your LAN.

Content Filtering

Not all nefarious doings occurs from the great beyond. You, or anyone on your network, could navigate to a site containing any number of malicious software or code (this is especially important when Windows machines are involved). To avoid this, I highly recommend making use of a content filtering system like Dans Guardian. NOTE: I will be writing a much more in-depth article on this system very soon. Once setup, you can download extensive blacklists (from the likes of URLBlacklist) and even create your own.

VPN

If you have a need to get into your home network from outside, you most likely will want to set up a VPN. Yes, you can SSH into your network, but that’s not nearly as user-friendly as being able to access that LAN as if you were inside your home. If you’re looking for such an addition to your LAN, look no further than OpenVPN. For more information on setting up OpenVPN, take a look at this older piece “Install and Configure OpenVPN Server on Linux” to give you an idea where to start. For more up to date VPN information, give the “Setting up VPN on Linux” a try (this will set up a VPN using PPTP).

Test your Network

For those that really want to ensure the security of their home network, there is no better path to success than to actually test your network. For that, you’ll need a penetration testing distribution like Kali Linux. With this distribution, you can run tests for information gathering, vulnerability analysis, wireless attacks, web applications, exploitation, forensics, stress testing, sniffing and spoofing, password attacks, access attacks, reverse engineering, and hardware hacking.

When using a massive toolbox like Kali Linux, you’ll probably find your home network far less secure than you originally thought. The good news is that you now know exactly where to begin to lock it down.

Your home network does not have to fall prey to malicious software or external, nefarious users. With just a little extra work, and plenty of open source, your home LAN can become nearly as safe as the network you use within your company.


Viewing all 525 articles
Browse latest View live