Quantcast
Channel: Linux How-Tos and Linux Tutorials
Viewing all 525 articles
Browse latest View live

Must-Know Linux Commands For New Users

$
0
0

fedora cli

One of the beauties of Linux-based systems is that you can manage your entire system right from the terminal using the command line. The advantage of using the command line is that you can use the same knowledge and skills to manage any Linux distribution.

This is not possible through the graphical user interface (GUI) as each distro, and desktop environment (DE), offers its own user interfaces. To be clear, there are cases in which you will need different commands to perform certain tasks on different distributions, but more or less the concept and ideas remain the same.

In this article, we are going to talk about some of the basic commands that a new Linux user should know. I will show you how to update your system, manage software, manipulate files and switch to root using the command line on three major distributions: Ubuntu (which also includes its flavors and derivatives, and Debian), openSUSE and Fedora.

Let's get started!

Keep your system safe and up-to-date

Linux is secure by design, but the fact is that all software has bugs and there could be security holes. So it's very important to keep your system updated. Think of it this way: Running an out-of-date operating system is like being in an armored tank with the doors unlocked. Will the armor protect you? Anyone can enter through the open doors and cause harm. Similarly there can be un-patched holes in your OS which can compromise your systems. Open source communities, unlike the proprietary world, are extremely quick at patching holes, so if you keep your system updated you'll stay safe.

Keep an eye on news sites to be aware of security vulnerabilities. If there is a hole discovered, read about it and update your system as soon as a patch is out. Either way you must make it a practice to run the update commands at least once a week on production machines. If you are running a complicated server then be extra careful and go through the changelog to ensure updates won't break your customization.

Ubuntu: Bear one thing in mind: you must always refresh repositories (aka repos) before upgrading the system or installing any software. On Ubuntu, you can update your system with the following commands. The first command refreshes repositories:

sudo apt-get update

Once the repos are updated you can now run the system update command:

sudo apt-get upgrade

However this command doesn't update the kernel and some other packages, so you must also run this command:

sudo apt-get dist-upgrade

openSUSE: If you are on openSUSE, you can update the system using these commands (as usual, the first command is meant to update repos)

sudo zypper refresh
sudo zypper up

Fedora: If you are on Fedora, you can use the 'dnf' command which is 'kind' of equivalent to zypper and apt-get:

sudo dnf update
sudo dnf upgrade

Software installation and removal

You can install only those packages which are available in the repositories enabled on your system. Every distro comes with some official or third-party repos enabled by default.

Ubuntu: To install any package on Ubuntu, first update the repo and then use this syntax:

sudo apt-get install [package_name]

Example:

sudo apt-get install gimp

openSUSE: The commands would be:

sudo zypper install [package_name]

Fedora: Fedora has dropped 'yum' and now uses 'dnf' so the command would be:

sudo dnf install [package_name]

The procedure to remove the software is the same, just exchange 'install' with 'remove'.

Ubuntu:

sudo apt-get remove [package_name]

openSUSE:

sudo zypper remove [package_name]

Fedora:

sudo dnf remove [package_name]

How to manage third party software?

There is a huge community of developers who offer their software to users. Different distributions use different mechanisms to make third party software available to their users. It also depends on how a developer offers their software to users; some offer binaries and others offer it through repositories.

Ubuntu heavily relies on PPAs (personal package archives) but, unfortunately, there is no built-in tool which can assist a user in searching PPAs. You will need to Google the PPA and then add the repository manually before installing the software. This is how you would add any PPA to your system:

sudo add-apt-repository ppa:<repository-name>

Example: Let's say I want to add LibreOffice PPA to my system. I would Google the PPA and then acquire the repo name from Launchpad, which in this case is "libreoffice/ppa". Then add the ppa using the following command:

sudo add-apt-repository ppa:libreoffice/ppa

It will ask you to hit the Enter key in order to import the keys. Once it's done, refresh the repos with the 'update' command and then install the package.

openSUSE has an elegant solution for third-party apps. You can visit software.opensuse.org, search for the package and install it with one click. It will automatically add the repo to your system. If you want to add any repo manually, use this command:.

sudo zypper ar -f url_of_the_repo name_of_repo
sudo zypper ar -f http://download.opensuse.org/repositories/LibreOffice:Factory/openSUSE_13.2/LibreOffice:Factory.repo LOF

Then refresh the repo and install software:

sudo zypper refresh
sudo zypper install libreoffice

Fedora users can simply add RPMFusion (both free and non-free repos) which contain a majority of applications. In case you do need to add a repo, this is the command:

dnf config-manager --add-repo http://www.example.com/example.repo

Some basic commands

I have written a few articles on how to manage files on your system using the CLI, here are some of the basic commands which are common across all distributions.

Copy files or directories to a new location:

cp path_of_file_1 path_of_the_directory_where_you_want_to_copy/

Copy all files from a directory to a new location (notice the slash and asterisk, which implies all files within that directory):

cp path_of_files/* path_of_the_directory_where_you_want_to_copy/

Move a file from one location to another (the trailing slash means inside that directory):

mv path_of_file_1 path_of_the_directory_where_you_want_to_move/

Move all file from one location to another:

mv path_of_directory_where_files_are/* path_of_the_directory_where_you_want_to_move/

Delete a file:

rm path_of_file

Delete a directory:

rm -r path_of_directory

Remove all content from the directory, leaving the directory folder intact:

rm -r path_of_directory/*

Create new directory

To create a new directory, first enter the location where you want to create a directory. Let's say you want to create a 'foundation' folder inside your Documents directory. Let's change the directory using the cd (aka change directory) command:

cd /home/swapnil/Documents

(exchange 'swapnil with the user on your system)

Then create the directory with mkdir command:

mkdir foundation

You can also create a directory from anywhere, by giving the path of the directory. For example:

mdkir /home/swapnil/Documents/foundation

If you want to create parent-child directories, which means directories within other directories then use the -p option. It will create all directories in the given path:

mdkir -p /home/swapnil/Documents/linux/foundation

Become root

You either need to be root or the user should have sudo powers to perform some administrative tasks such as managing packages or making changes to the root directories or files. An example would be to edit the 'fstab' file which keeps a record of mounted hard drives. It's inside the 'etc' directory which is within the root directory. You can make changes to this file only as a super user. In most distros you can become root by 'switching user'. Let's say on openSUSE I want to become root as I am going to work inside the root directory. You can use either command:

sudo su -

Or

su -

That will ask for the password and then you will have root privileges. Keep one point in mind: never run your system as root user unless you know what you are doing. Another important point to note is that the files or directories you modify as root also change ownership of those files from that user or specific service to root. You may have to revert the ownership of those files otherwise the services or users won't be able to to access or write to those files. To change users, this is the command:

sudo chown -R user:user /path_of_file_or_directory

You may often need this when you have partitions from other distros mounted on the system. When you try to access files on such partitions, you may come across a permission denied error. You can simply change the ownership of such partitions to access them. Just be extra careful, don't change permissions or ownership of root directories.

These are the basic commands any new Linux user needs. If you have any questions or if you want us to cover a specific topic, please mention them in the comments below.
Installing Android Apps on Linux with ARChon

$
0
0

android apps on linux

I’ve spent a lot of time on the Google Play Store. During that time I have discovered plenty of really useful apps that would be great on the Linux desktop. Fortunately, thanks to some crafty developers, it is quite possible (and actually easy) to run Android apps on the Linux desktop.

Of course, this statement does come with some caveats. First and foremost, this is all handled with the help of the Chrome browser. To make matters easier, you’ll need to be running the Chrome Developer channel. The second caveat is that not all apps will actually work. That some apps do not function should not surprise you (you won’t be getting an app that requires the functionality of a phone service to run on your desktop). As for other apps, the results can be hit and miss. The third caveat is that, to make this process easier, you’ll also need an Android device to package the .apk file that will be used on the desktop.

With that said, let’s dive into the process of getting Android apps running on Linux. I will be demonstrating on an Ubuntu 14.04 LTS installation.

Installing Chrome

If you haven’t already installed Chrome, let’s walk through that quick process. Remember, you’re installing the dev channel (you can safely install all three channels—stable, beta, and dev—on the same machine). Here's how this is done:

  1. From the download page, select the installer associated with your package manager and architecture (because I’m using Ubuntu, I’ll download a .deb file)
  2. Click Accept and Install
  3. When prompted, select Open with and make sure /usr/bin/software-center (default) is selected
  4. Click OK
  5. When the Software Center opens, click Install
  6. When prompted, enter your sudo password
  7. Allow the installation to complete.

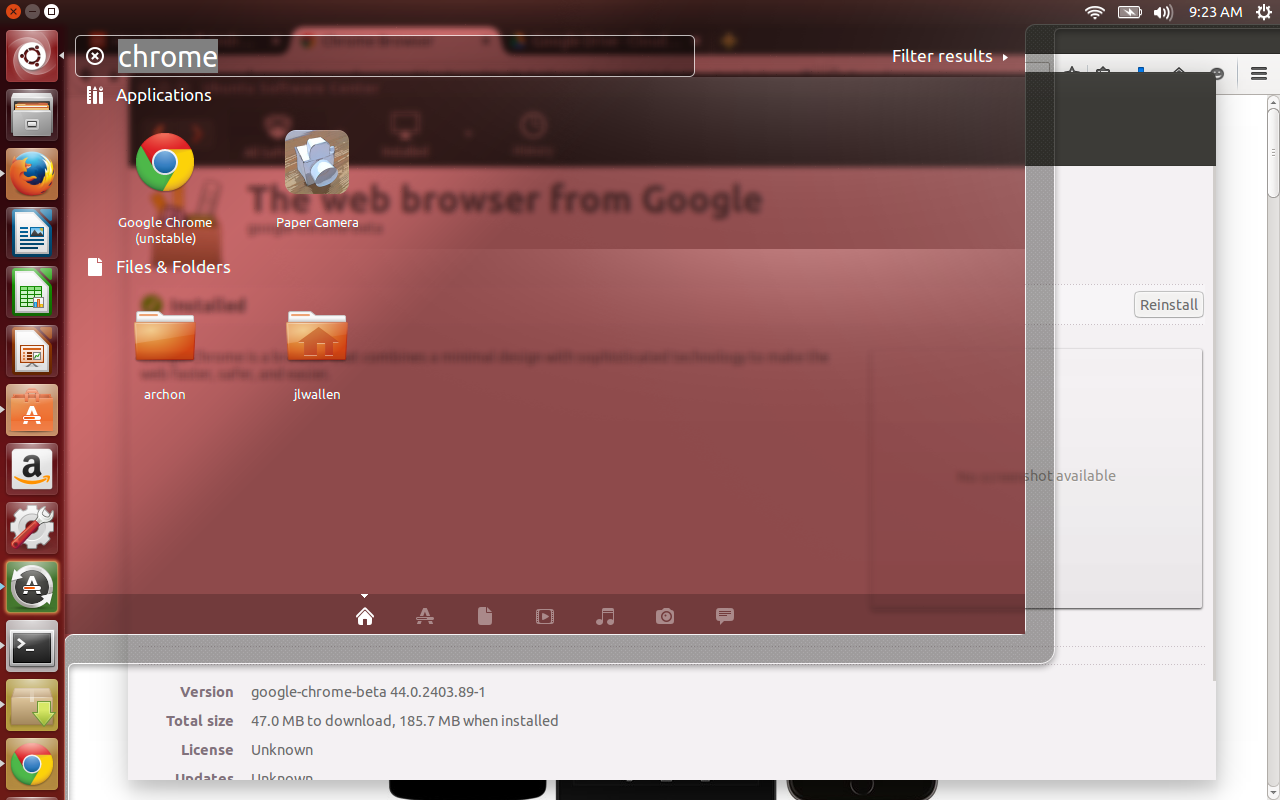
You should now find an entry for Google Chrome (unstable) in your Dash (Figure 1, above).

Installing ARChon

The tool that will do the heavy lifting for this task is called ARChon. This is an Android runtime, created by Vlad Filippov, which brings a specialized version of the Android runtime that works on the desktop version of Chrome. This phase of the process is also quite simple:

  1. Download the ARChon runtime for your architecture—32-bit or 64-bit
  2. Open your file manager and navigate to the Downloads directory (or wherever you have downloaded the .zip file)
  3. Right-click the ARChon zip file and select Extract Here
  4. Rename the newly created folder (right-click and select Rename) to archon
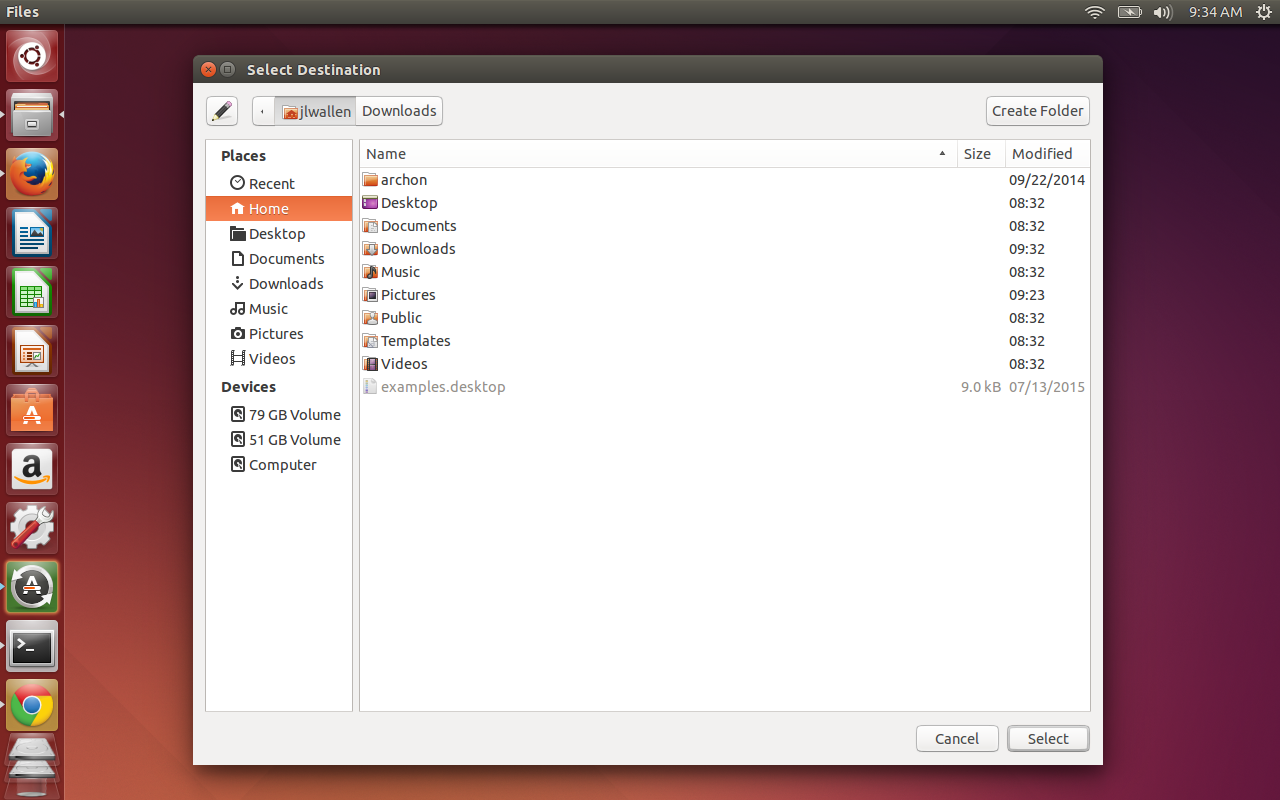
  5. Move the newly named folder to your home directory (right-click on archon, select Move To…, select Home, and click Select (Figure 2).

android

Adding ARChon to Chrome

It’s time to add the runtime to Chrome. This will enable you to finally run those Android apps on your desktop. Here’s how:

  1. Open Chrome
  2. Click on what is often referred to as the Overflow Menu (three horizontal bars in the top right corner)
  3. Select More tools > Extensions
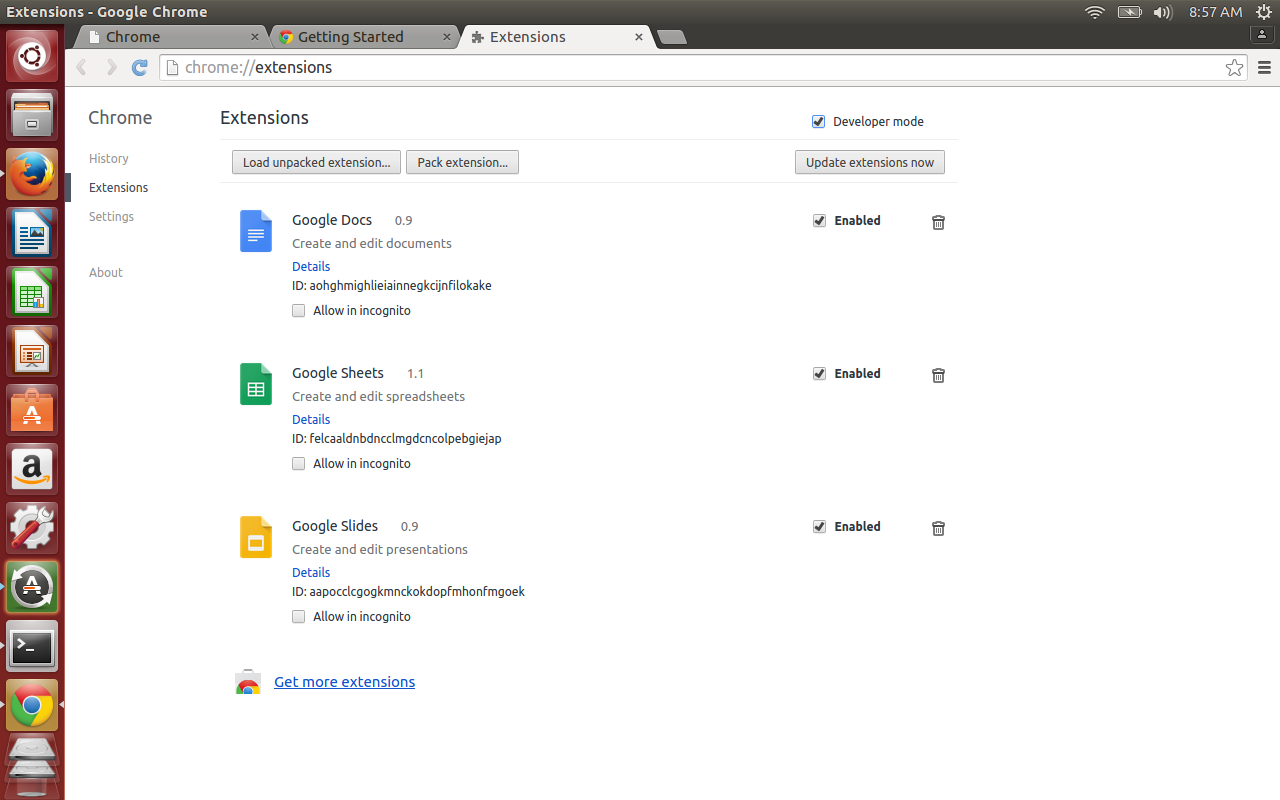
  4. Click to enable Developer mode
  5. Click Load unpacked extension… (Figure 3)
  6. Navigate to your home directory
  7. Select archon
  8. Click Open. 

android-3

ARChon should now appear in the listing of Chrome extensions.

Generating APKs

Now we move over to the Android platform. It used to be necessary to build APK files manually (which wasn’t always successful). Thankfully, there are now apps for Android that can build APKs with a few taps. The app I prefer is called ARChon Packager and can be installed from within the Google Play Store for free. Install that app, and you’re ready to go.

With ARChon Packager, you can generate APKs from installed apps or from APKs within the phone’s storage. I highly recommend you install the desired app onto your phone and then have ARChon Packager generate the APK from the installed app.

Here’s how to use ARChon Packager. 

  1. Open the app from your Android device
  2. Tap NEXT
  3. Select Installed application and tap NEXT
  4. Select the app you want to install from the pop-up listing
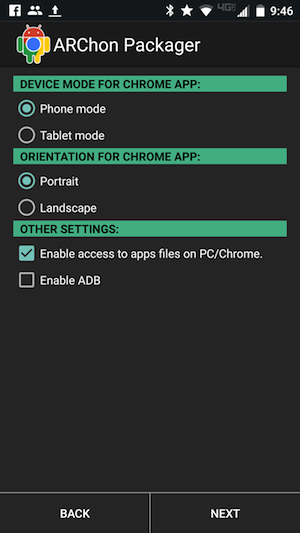
  5. Select the necessary options for the app (Figure 4)
  6. Tap NEXT
  7. When the APK generation is complete, tap SHARE CHROME APPLICATION
  8. Share the file in whatever way will best allow you to save it to your desktop (I opted for Google Drive)
  9. Click FINISH when complete. 

Android-Linux-ARChon-4

Retrieve the file and save it to your ~/Downloads directory on your Linux PC.

Installing the APK

You’re ready to now install the app. This is done in the same manner as was ARChon. Here are the steps:

  1. Open up your file manager
  2. Navigate to the ~/Downloads directory
  3. Right-click the downloaded APK zip file
  4. Select Extract here
  5. Open Chrome
  6. Click the Overflow Menu
  7. Click More Tools > Extensions
  8. Click Load unpacked extension…
  9. Navigate to the ~/Downloads directory
  10. Select the folder for the newly extracted APK
  11. Click Open.

That’s it! Now, if the app is usable on the desktop version of Chrome, it should be ready to run.

Running the App

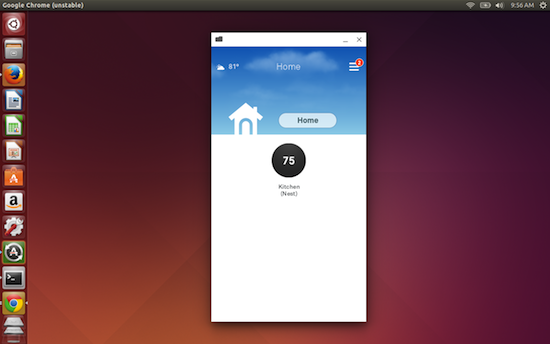
Chrome has a handy tool called Apps. Open Chrome and you should see a button in the upper left corner labeled Apps. Click on that and the newly installed apps will be ready to run. Click on the app you want to run to see how well it functions. To demonstrate, I installed the Nest App from the Google Play Store to find it runs flawlessly (Figure 5). 

Android-Linux-ARChon-5 copy

The ability to easily run Android apps on Linux is a real boon to the desktop. Not only does this functionality extend the reach of the desktop, it empowers it to join the ever-expanding mobile generation. If you happen to enjoy the Android platform, give this a try and see how well your favorite mobile apps perform on the Linux desktop.

How To Make Your Linux Server More Secure

$
0
0

running-services-1
I run a couple of Linux servers; one at home as a file server and three live servers for my site, my mail, and my cloud storage, respectively. Although I don't worry about the home server because it doesn't talk to the external world, the other three servers need to be maintained, all the time. Those who are new to Linux and want to run their own servers must keep a few points in mind...which is the focus of this article.

Install What You Need

If you are planning to run a server, you might think "I have 40GB of SSD storage from Linode so I can install whatever service I want." That's true: your server, your software. However, don't take things for granted. Even the most hardened servers can be hijacked by exploiting any unpatched or vulnerable component running on that server.

So, the first rule is to keep your server lean and mean. Install only those packages that you really need. If there are unwanted packages; purge. The fewer the packages the less chance of unpatched code. Before installing any software and dependent packages (e.g., ownCloud), you should read the documentation for ownCloud and install only those packages that it needs.

Run What You Need

The second rule is to run only those services that you need. Many distros, or packages, may start certain services, running on different ports. That could pose security risk. So, open the terminal and run:

netstat -npl

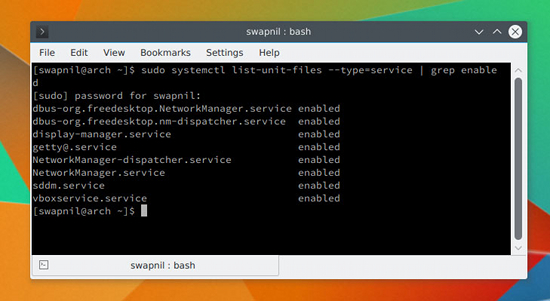
The output will show you which services are running on which ports. If you spot any service that is not supposed to be running, stop it. You should also keep an eye on the services that are enabled and run at system startup. You can check it by running the following command on systems running systemd:

systemctl list-unit-files --type=service | grep enabled

Depending on your system you will get an output like that shown in Figure 1 above. If you spot any unwanted service, you can disable it using the mighty systemctl command:

systemctl disable service_name

Restrict Access to Your Server

In the same way that you would not give your house keys to just anyone you know, you should not give server access to just someone you know. Once this rule is clear, you can restrict access to your server. Keep one thing in mind: None of this will discourage someone who is hellbent on taking your server down. What it will do, however, is add more layers of security to your server to fend off casual offenders.

Never Log In As Root

It’s not a good practice to ssh into your server as superuser. We will be disabling sshing as root user on the server, but before doing so, let's create a user with sudo powers so that you can ssh into the server and perform administrative tasks. Once you are logged into the server, you can always switch user to root, if needed. If you already have a user on your system, skip these steps; otherwise, stay with me.

Different distributions use different methods to add a new user; Red Hat/CentOS use useradd and Ubuntu/Debian use user adduser.

Create a new user on Fedora/CentOS:

useradd swapnil

Then create a password for the user:

passwd swapnil

It will ask you to provide it with the new password for the user. Now you need to give this user sudo powers. Run the following command:

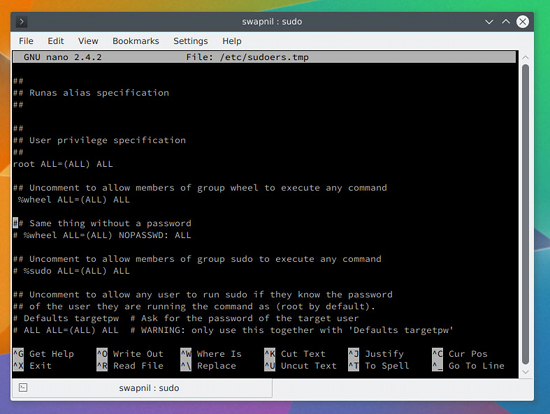
EDITOR=nano visudo

And look for the following line (Figure 2):

# %wheel ALL=(ALL) ALL

sudo-wheel-2
Uncomment the line (the # symbol means it is commented; just remove the symbol to uncomment) so that it looks like this:

%wheel ALL=(ALL) ALL

Now save and close the file. If the user doesn't belong to the wheel group, you can easily add it to the group by running this command:

# usermod -aG wheel swapnil

On Ubuntu systems, you can add a new user by running:

adduser swapnil

Answer some questions that the system will ask, including creation of the password for this user. Once created, provide the user with sudo powers:

gpasswd -a swapnil sudo

Open another terminal window and try to log into the server as the newly created user and try performing some administrative jobs with sudo. If it works, move to the next step.

Disable root Login

We are now going to disable root login, which means no one can ssh or log into the server as root user. To do so, open the sshd configuration file:

nano /etc/ssh/sshd_conf

Next, look for the commented line that says:

#PermitRootLogin no

Then save and close this file and restart the service:

service ssh restart

or

systemctl restart sshd

Important: Don't log out of the server yet. You need to test whether you can successfully ssh into the server using the previously created user. Open another instance of the terminal and ssh into the server with user you previously created. You don't want to be totally locked out of your server. If everything works fine, you can safely log out of the server as root.

Change the Port

The second change that we are going to make to the sshd config file is changing the default port. It's more about adding a layer of obscurity to keep your server safe instead adding of any real security to the server. Think of it as security services using identical vehicles to transport an important person so that an attacker won't know which vehicle to take down.

Open the sshd_config file (this time as sudo, because you can no longer log into the server as root.):

sudo nano /etc/ssh/sshd_conf

Then, find this commented line:

#Port 22

Uncomment the line and choose a port number. While choosing a port, do ensure that it’s not used by any other service on your system. You can learn more about which ports are commonly used from this Wikipedia article and avoid such ports. I chose 1977 for my server:

Port 1977

Next, save and close the file and restart the sshd service. Once again, before logging out of the server, check the settings by opening another terminal window and then log in using this pattern:

ssh -p{port_number}@server_IP

Example:

ssh -p1977 swapnil@10.14.190.118

If you can successfully log in; it’s all set.

Passwordless Login

You can make it easier to ssh into your server via passwordless login and add another layer of security by totally disabling password authentication. Just keep in mind that you will be able to log into your server only from that machine on which you generated the ssh keys.

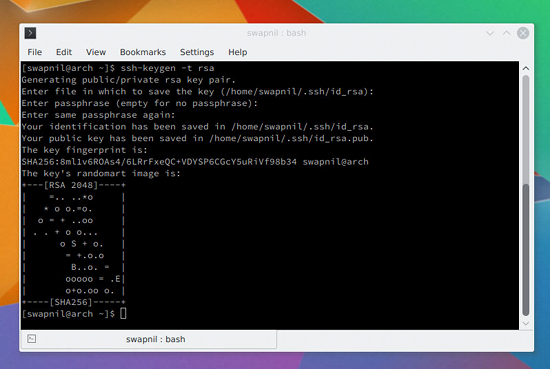
Let’s generate the ssh key on your local system (Figure 3) using the following command:

ssh-keygen - t rsa

ssh-key-3
It will ask some questions; you can leave the location of the key to default and provide it with a hard-to-guess passphrase. Next, you need to copy these keys to the server so that the two machines can communicate with each other using the keys.

cat ~/.ssh/id_rsa.pub | ssh -p 1977 swapnil@remote-server ";mkdir -p ~/.ssh && cat >> ~/.ssh/authorized_keys"

Now try sshing into the server from another terminal and, if everything is working fine, it will not ask you to enter the password.

This step was more about convenience than some real security. You can add some security by disabling password authentication for the server. Just open the sshd_config file and look for commented line:

#PasswordAuthentication yes

Uncomment the line and change it from yes to no; save and close the file. Then, restart the sshd service. Once again, don't close the connection to the server from the current window yet. Open another terminal and log into the server (make sure it didn’t ask for the password). 

The flip side of this setting is that you can now ssh into your server only from the machine where you generated the ssh keys. If you often log into your server from different machines, please don’t use this method.

In Closing

These are some of the basic considerations for new users trying to run their own servers. Keep in mind that crackers are always a step ahead; they keep looking for any holes to hack into your server. Therefore, the best practice is to keep an always updated backup of your server. I recommend you take a backup before and after you make any changes to your site. That way, in case your server is compromised, you can always restore from the previous backup. 

If you have any questions or suggestions, feel free to share in the comments section below.

Making The Most of Skype on Linux

$
0
0

wallen-skype-1
Although Skype is owned by Microsoft, it is still one of the most popular VOIP clients/services available. And with good reason. You can use Skype on nearly every platform on the market, it makes for an outstanding interview platform, and it’s incredibly easy to use. Of course, using Skype means you must be okay with proprietary software. If you meet that criteria, you’re good to go. If not, you’ll want to turn to alternatives, such as Firefox Hello.

If you’re okay with proprietary software, let’s continue on with instructions on how to install Skype, how to manage your Skype-aware hardware, as well as how to install the Skype call recorder software. I will be demonstrating on the Ubuntu-based Elementary OS Freya distribution. The instructions will work for nearly all Ubuntu derivatives and should also work with most recent Debian releases.

Installation of Skype

As of Ubuntu 10.04, Skype has been included in the Canonical Partner Repository. By default, however, this repository is not enabled. You can enable the Partner repository two ways: Command line or GUI. To enable the repository via command line, open up a terminal window and issue the command:

sudo add-apt-repository "deb http://archive.canonical.com/ $(lsb_release -sc) partner"

Now issue the command:

sudo apt-get update

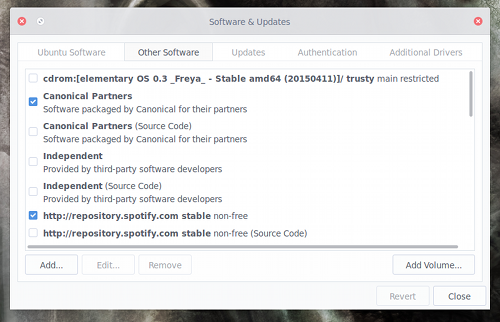
If you prefer the GUI way, open up the Software & Updates tool, click on the Other Software tab, and click to enable Canonical Partners (see Figure 1 above).

If you’re using a 64-bit machine, you will have to take one extra step before the actual installation of Skype. As of this writing, Microsoft only offers a 32-bit version of the Skype software for Linux. To be able to install the 32-bit Skype on your 64 bit machine, you must add MultiArch to your system. To do this, open up a terminal window and issue the following command:

sudo dpkg --add-architecture i386

At this point, you can install Skype by issuing the following command:

sudo apt-get update && sudo apt-get install skype pulseaudio:i386

If you’re installing on 32-bit architecture (once you’ve added the Canonical Partner repository), you will only need issue the command:

sudo apt-get install skype

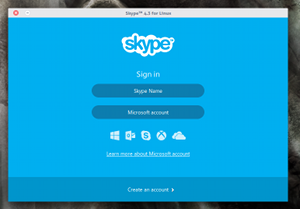
Once installed, you should be able to launch Skype and log into your account (Figure 2).

wallen-skype-2Now let’s install the Skype Call Recorder. This will be necessary should you want to record calls for interviews. Unfortunately, installing the call recorder isn’t as straightforward as installing Skype. Here are the steps:
  1. Download the Skype Call Recorder .deb file
  2. Open a terminal window and change to the directory housing the downloaded file
  3. Issue the command "sudo dpkg -i skype-call-recorder-ubuntu_0.10_i386.deb" (NOTE: Check to make sure the release number on the command matches the downloaded file)
  4. Allow the installation to complete with errors
  5. To fix the installation errors, issue the command "sudo apt-get install -f"

At this point, you should now see the Skype Call Recorder application in your desktop menu.

Setting Up Hardware

It should go without saying that not all hardware is created equal and not all hardware is supported in Skype for Linux. I have an older Logitech QuickCam Pro 9000 that works flawlessly as a video camera. For a microphone, I use my CAD E100S mic running through a Focusrite Scarlet 2i2. The mic is overkill for Skype, but I also use it for podcasting and audiobook narration (plus, it sounds fantastic).

You may need to venture into the Skype settings window to select the hardware to be used. Here’s how.

For Audio:

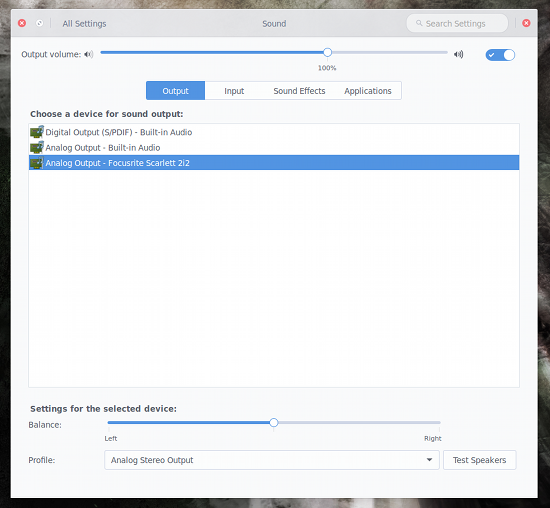
Most likely your system is using PulseAudio. Because of that, you will need to select your hardware in the Sound Settings window of your desktop (as the only option within Skype for audio devices will be PulseAudio). You can click on the sound icon in your notification area and select Sound Settings. From this window, make sure to select the proper input and output devices (Figure 3).

wallen-skype-3

For Video:

As for video hardware, you actually have the ability to select the hardware from within the Skype settings window. Do the following:

  1. Open Skype
  2. Log into your account
  3. Click on Skype > Options
  4. Click on Video Devices
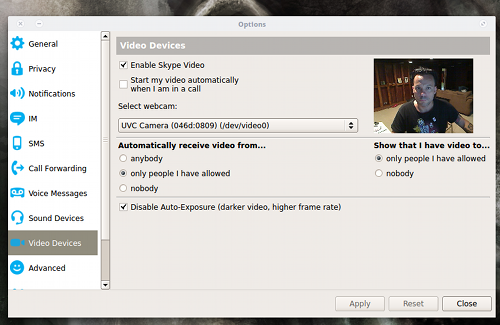
  5. From the Select Webcam drop-down, select the correct camera (a live preview should appear when you’ve selected the correct camera—Figure 4)

wallen-skype-4

Recording Calls

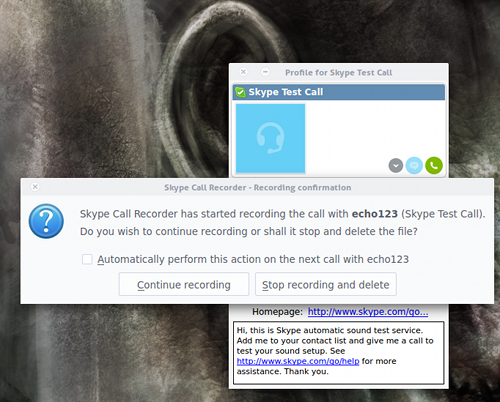
Once you have Skype up and running properly, it’s time to start recording calls. After you’ve logged into Skype, open up the Skype Call Recorder. As soon as you place a call, the application will pop up asking if you want to continue recording or if you want stop recording (Figure 5).

wallen-skype-5

I will give you fair warning about the Skype Call Recorder. If you want high-quality recordings you need to click on the Skype Call Recorder icon in the notification area, select Open preferences, click on the File Format tab, and set the following:

  • File format: Ogg Vorbis
  • Ogg Vorbis quality: Quality 7
  • Stereo mix: Set at local 50%, remote 50%

So far, the above settings have resulted in the best quality (without creating files too large in size). By default, the Stereo mix will be set such that the local voice will be in one channel and the remote voice in another. For anything like podcasting, this can be offputting, so set it such that the voices are equal on both channels.

You should now have Skype running like a well-oiled machine, including the ability to record audio calls at a high enough quality that they can be used as podcast interviews and the like. Although for some, Skype may not be the ideological choice for an open source platform, it is the most widely used VOIP system. And, if you want to be able to keep in contact with friends and family who happen to use Skype, you can now do so.

Why, When, and How To Use a Virtual Machine

$
0
0

swapnil-vm-1

I must admit I haven't been a huge fan of virtual machines for personal use until recently. As a Linux advocate who would take pains to convert users to Linux, virtual machines served no purpose for me.

Back in 2005, the greatest challenge for Linux was hardware: wireless wouldn't work; Bluetooth might not work, graphics would give glitches and even USB devices like tablet pens refused to talk. Every time you came across a new device, you had to find drivers and wrappers to make things work. A Linux user needed to interact with “real” hardware to find solution; a virtual machine was out of question. As a Linux journalist, I could not rely on a virtual machine to review a distro and recommend it. I needed to know how well it worked with “real” metal.

Things have changed, however. Thanks to work done by kernel developers like Greg Kroah-Hartman, most hardware works out of the box on Linux. Hardware support has become less and less important and the focus has shifted to the unique features of distros. Of late, I have become a heavy user of virtual machines, which allows me to safely play with multiple distros on the same machine and write about them.

Virtual machines are used heavily in the enterprise segment, but in this article I am going to talk about advantages of virtual machines for new Linux users and how they can benefit from them.

Who Needs a Virtual Machine?

Many Linux users have to dual boot because they need certain proprietary software or services that are not yet available for Linux. In many countries, software needed for tax filing and other government related work is supported only on Windows. Instead of going through the complexity and pain of dual booting, you can easily use virtual machine to run Windows software.

Looking at the vulnerabilities found in Microsoft Windows, I would be extremely careful with it running on my main system. I am much more comfortable keeping Windows in a contained virtual environment. That way, even if it is compromised, it will not damage my entire system or data and will only affect the limited set of files it was accessing. I run a Windows 8.1 machine in virtual environment to perform certain tasks that couldn’t be done under Linux -- although I rarely use that machine.

One area where virtual machines won’t work are gaming. You need to talk to real CPU, GPU, and RAM to get the gaming experience you want -- especially if you are playing resource hungry games like Crysis. Audio and video editing won’t work either, as you don’t want a virtual layer between the application and the hardware. Beyond these and some other areas, virtual machines work great.

VMs also can be useful for those non-Linux users who want to play with Linux or who want to migrate to it but don't want to jump shark by formatting the OS they were used to and switching to Linux. Virtual machines get these users comfortable with Linux, so they can make the switch with confidence when they are ready. And, you can be running Linux “inside” your shiny Mac OS X or Windows 10.

The best thing about virtual machines is that I can run multiple Linux distributions on the same hardware, without having to reboot to switch between distros. As a Linux journalist, it’s extremely important for me to run various distros and keep an eye on them. And, as a Linux user, it’s even more important to be well versed with all major distros instead of being “vendor-locked” or totally dependent on any one. Using VMs, I can also run different desktop environments on the same system without having to log out to change the environment.

If you are aspiring to become a system admin or developer, you certainly don’t want to know only one distro; you must be an expert in any Linux; you never know which OS your employer or client would be using. You can’t say “sorry, I know only Ubuntu.” If you are a developer, you need different distributions to test your applications.

You can clearly see that there are many advantages of using virtual machines. The biggest advantages of using virtualization instead of multi-booting is efficiency. I used to waste way too much time in formatting hard drives and switching between distros. With virtual machines, you can start a new virtual machine for a distro without affecting your work; it’s as easy as opening a new application.

If you are a distro-hopper or enthusiast like me then a virtual machine is bliss. I am an Arch Linux user, but I keep an eye on half a dozen other distros including openSUSE, Kubuntu, Ubuntu, Fedora, Linux Mint, etc. It’s “virtually” impossible for me to have six physical machines, which waste financial resources and electricity and take up space. Instead of buying six physical machines, I would rather invest in more RAM and a multicore processor that can handle more virtual machines. Now I run almost a dozen distros (including Windows) on the same machine; and there is no downtime.

Which Virtual Machine to Use

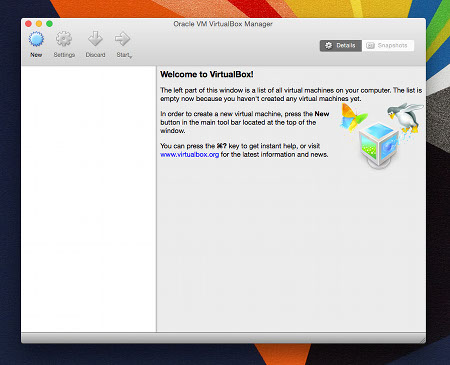
Because we are talking about Linux here, you have several options, such as VMware, Qemu, KVM, Xen, and VirtualBox, among many others; each with their own pros and cons. Of these, I prefer VirtualBox (see Figure 1 above), even though solutions like KVM can be more powerful and efficient. The reason I chose VirtualBox is that it’s extremely easy to use even by a new Linux user. It has tons of features and functionalities that can be easily accessed without any hard-core technical knowledge. The biggest advantage is its cross-platform support -- you can install VirtualBox on Linux, Windows, and Mac OS X.

How to Use VirtualBox

You can download VirtualBox and install it on your system like a regular application. For this story, I installed VirtualBox on a MacBook Pro so that I can use Linux on the same machine. Open the VirtualBox app and click on the New button to create a new virtual machine. Give the machine a name (which should be the name of the distro). Then, enter the amount of RAM you want to allocate to the virtual machine.

Now you have to create virtual hard drive for the system; I would suggest VDI format. Here you can choose dynamically allocated size, because it won’t reserve all the allocated space and will grow as it uses more space. However, it can’t exceed the space you allocated. In the next step, you can choose the amount of space you want to allocate to the virtual hard drive. At this stage, you can also choose the location of the drive on the physical hard drive.

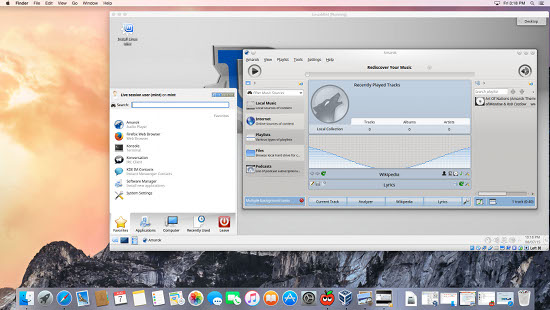
You are almost there; you will see the name of the newly created virtual machine in the left pane. When you click on it to start the system, in the first run, it will ask for the .iso image of the distro that you want to install on the system. Just browse to the .iso image of your desired distro and there you have a Linux distro running inside the Mac OS X (Figure 2).

swapnil-vm-lm-inmac

One advantage is that, once you have a virtual machine up and running, you can just move the vdi file around and get the same distro up and running with all settings and data. This comes in handy if you are migrating from one host (host is the system where you install VirtualBox software and guest is the OS that runs inside VirtualBox) system to another.

Customizing Virtual Machines

Depending on your distribution, you may or may not be able to get full screen resolution. In such cases, you will have to install some virtualbox packages inside the guest OS. The most common packages are virtualbox-guest-additions-iso, virtualbox-guest-x11, virtualbox-guest-dkms, and virtualbox-guest-utils (Figure 3).

swapnil-vm-packages
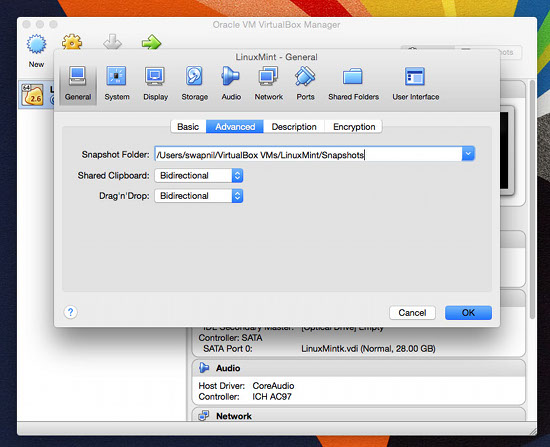
You can further tweak the VirtualBox settings to bring the guest and host OS closer. Shut down the virtual machine and click on Settings for that machine. In the General tab, go to Advanced and select Bidirectional for Shared Clipboard and Drag and Drop. Now you can copy and paste text between guest and host machines. You will also be easily drag and drop files between the two machines.

swapnil-vm-bidirectional
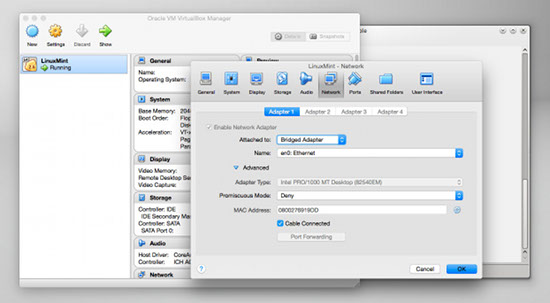
In some cases, you may have to also change the default network from NAT to Bridged Adapter to access the local network (Figure 5). I run a local file server, so I always switch to Bridged Adapter (more about file sharing later).

 swapnil-vm-network

You can also change the amount of RAM allocated to the virtual machine, just open the System from the settings and modify RAM from the Motherboard tab; if you need to increase CPU capacity of the VM, you can easily do that from the Processor tab. What you can’t easily change is the storage space; that needs extra work, so be thoughtful with hard drive space when you create a virtual machine.

How to Share Directories Between Host and Guest

In Settings, you will find an option where you can add “shared” folders from the host machine to the guest system. However, because I run a local file server that keeps all my files, I simply mount the file server on the VM and then gain access to all my files. You can also enable access to USB ports so you can use the USB devices plugged into the system. Just go to the ports tab and add any USB devices connected to the system.

That’s pretty much what I do on my VirtualBox. If you haven’t tried VirtualBox before and have been multi-booting, you should give virtual machines a try. If you are a VirtualBox user, let us know in the comments what all you use it for.

Replacing ifconfig with ip

$
0
0

jack-ip-1
If you’ve been around Linux long enough, you know tools come and go. This was assumed to be the case back around 2009 when the debian-devel mailing list announced plans on deprecating the net-tools package due to lack of maintenance. It is now 2015 and net-tools is still around. In fact, as of Ubuntu 14.10, you can still issue the ifconfig command to manage your network configuration.

However, in some instances (e.g., Ubuntu Docker container), the net-tools suite isn’t installed by default. This means the ifconfig command isn’t available. Although you can install net-tools with the command

sudo apt-get install net-tools

it is most often recommended to move forward with the command that has replaced ifconfig. That command is ip, and it does a great job of stepping in for the out-of-date ifconfig.

Thing is, ip is not a drop-in replacement for ifconfig. There are differences in the structure of the commands. Even with these differences, both commands are used for similar purposes. In fact, ip can do the following:

  • Discover which interfaces are configured on a system

  • Query the status of a network interface

  • Configure the network interfaces (including local loop-back, and Ethernet)

  • Bring an interface up or down

  • Manage both default and static routing

  • Configure tunnel over IP

  • Configure ARP or NDISC cache entry

With all of that said, let’s embark on replacing ifconfig with ip. I’ll offer a few examples of how the replacement command is used. Understand that this command does require admin privileges (so you’ll either have to su to root or make use of sudo — depending upon your distribution). Because these commands can make changes to your machine’s networking information, use them with caution.

NOTE: All addresses used in this how-to are examples. The addresses you will use will be dictated by your network and your hardware.

Now, on with the how-to.

Gathering Information

The first thing most people learn with the ifconfig command is how to find out what IP address has been assigned to an interface. This is usually done with the command ifconfig and no flags or arguments. To do the same with the ip command, it is run as such:

ip a

This command will list all interfaces with their associated information (Figure 1 above).

Let’s say you only want to see IPv4 information (for clarity). To do this, issue the command:

ip -4 a

Or, if you only want to see IPv6 information:

ip -6 a

What if you only want to see information regarding a specific interface? You can list information for a wireless connection with the command:

ip a show wlan0

You can even get more specific with this command. If you only want to view IPv4 on the wlan0 interface, issue the command:

ip -4 a show wlan0

You can even list only the running interface using:

ip link ls up

Modifying an Interface

Now we get into the heart of the command… using it to modify an interface. Suppose you wanted to assign a specific address to the first ethernet interface, eth0. With the ifconfig command, that would look like:

ifconfig eth0 192.168.1.101

With the ip command, this now looks like:

ip a add 192.168.1.101/255.255.255.0 dev eth0

You could shorten this a bit with:

ip a add 192.168.1.101/24 dev eth0

Clearly, you will need to know the subnet mask of the address you are assigning.

What about deleting an address from an interface? With the ip command, you can do that as well. For example, to delete the address just assigned to eth0, issue the following command:

ip a del 192.168.1.101/24 dev eth0

What if you want to simply flush all addresses from all interfaces? The ip command has you covered with this command:

ip -s -s a f to 192.168.1.0/24

Another crucial aspect of the ip command is the ability to bring up/down an interface. To bring eth0 down, issue:

ip link set dev eth0 down

To bring eth0 back up, use:

ip link set dev eth0 up

With the ip command, you can also add and delete default gateways. This is handled like so:

ip route add default via 192.168.1.254

If you want to get really detailed on your interfaces, you can edit the transmit queue. You can set the transmit queue to a low value for slower interfaces and a higher value for faster interfaces. To do this, the command would look like:

ip link set txqueuelen 10000 dev eth0

The above command would set a high transmit queue. You can play around with this value to find what works best for your hardware.

You can also set the Maximum Transmission Unit (MTU) of your network interface with the command:

ip link set mtu 9000 dev eth0

Once you’ve made the changes, use ip a list eth0 to verify the changes have gone into effect.

Managing the Routing Table

With the ip command you can also manage the system’s routing tables. This is a very powerful element of the ip command, and you should use it with caution.

Suppose you want to view all routing tables. To do this, you would issue the command:

ip r

The output of this command will look like that shown in Figure 2.

jack-ip-2-crop

Now, say you want to route all traffic via the 192.168.1.254 gateway connected via eth0 network interface: To do that, issue the command:

ip route add 192.168.1.0/24 dev eth0

To delete that same route, issue:

ip route del 192.168.1.0/24 dev eth0

This article should serve as merely an introduction to the ip command. This, of course, doesn’t mean you must immediately jump from ifconfig. Because the deprecation of ifconfig has been so slow, the command still exists on many a distribution. But, on the occasion of ifconfig finally vanishing from sight, you’ll be ready to make the transition with ease. For more detailed information on the ip command, take a look at the ip man page by issuing the command man ip from a terminal window.

Live Booting Linux

$
0
0

jack1-live-1“I’d like to give Linux a try, but I’m not sure how.”
I’ve heard that statement so many times over the years. During that period, my pat response has changed from something akin to “It’s worth the effort” to “It’s incredibly easy.” Linux is, actually, the single most easy operating system to “try out.” How is that possible? Two words… live booting.

For those of you who are familiar with Linux, this is not only old news, it’s also very basic:

  1. Download an ISO

  2. Burn the ISO to disk

  3. Boot your computer with the newly burned disk

  4. Try out the live distribution

For those not so familiar with Linux—but very much interested in giving the platform a try—I want to introduce you to the concept of live booting. Because most new machines don’t ship with optical drives, you will also learn how to create a bootable live USB flash drive (so you can carry Linux with you all the time).

What Is Live Booting

The concept of live booting is actually quite simple. With a live Linux distribution (not all distributions come in “live” flavors), you can boot your machine from either a CD/DVD disk or from a USB flash drive and choose to try out the operating system without making any changes to your hard drive.

How this works is by running the entire system from volatile memory (RAM). The operating system and all programs are usable, but run from memory. Because of this, you can boot the live system, test/use it for as long as you need, and then reboot the system (remembering to remove the live media) to return to your original system.

Live distributions can be used for several purposes:

  • Testing a Linux distribution: This is the best way to see if Linux is for you.

  • Testing hardware: If you’re unsure if your hardware will work with a Linux distribution, run it live and find out.

  • Kiosks or cafes: If you need a machine that can be booted fresh each day, a live linux distribution might be the solution for you.

Live distributions also form a collection of very important tools that handle crucial tasks, such as:

  • Data recovery

  • System recovery

  • Rescue and repair

  • PC Forensics

  • Boot repair

As I mentioned, not all Linux distributions offer a live solution. Here is a complete list of distributions available as live releases.

What Do You Do With That Downloaded File?

This is the crux of the issue. For live booting, you will have downloaded an ISO image (the file will end in the .iso file extension). What you have to do next is burn that file to a disk. If you’re burning the disk from within Windows, all you need to do is locate the downloaded file and double-click it to begin the burning process. However, as I mentioned earlier, many newer PCs do not ship with optical drives. If that is the case, what do you do?

You turn to the tried and true USB flash drive.

Once upon a time, you would have had to manage the creation of a bootable USB flash drive with the Linux command line. Now, however, there are plenty of tools available for just that purpose. One such tool is called UNetbootin. This easy to use app can create a bootable USB flash drive from a downloaded ISO file or can even download the necessary ISO file for you. UNetbootin is available for Windows, Mac, or Linux and can, within a few short minutes, have you booting a live Linux distribution.

Creating a Bootable Live Distribution on a USB Flash Drive

Let’s walk through the process of creating a live USB flash drive with UNetbootin. Download and install the application on your platform of choice (Windows, Linux, Mac) and grab a USB flash drive large enough to hold your distribution (4GB USB flash drive should accommodate most distributions).

With everything ready, here are the steps to creating a bootable USB flash drive with UNetbootin (from a downloaded ISO file from your distribution of choice):

  1. Insert your USB flash drive

  2. Launch the software (you’ll need administrator privileges)

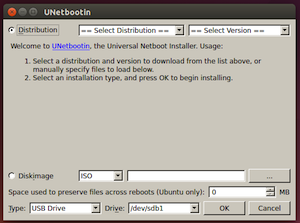
  3. Check the box for Diskimage (see Figure 1 above)

  4. Click the browse button (indicated with three dots)

  5. Locate the downloaded ISO images

  6. Select USB Drive from the Type drop-down

  7. Select the location of your USB drive from the Drive drop-down

  8. Click OK

  9. Allow the creation of the live USB drive to complete

  10. Click Exit (not Reboot), when the process completes

jack-live-2If you happen to have a Ubuntu system handy, you can create a bootable flash drive without installing third-party software. To do this, follow these steps:
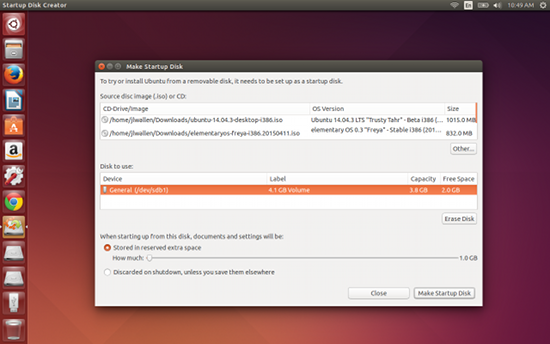
  1. Download your desired ISO image and save it to ~/Downloads

  2. Insert your USB drive

  3. Open the Dash

  4. Type startup

  5. Open the Startup Disk Creator

  6. Select your downloaded file from the list (Figure 2)

  7. Click Make Startup Disk

  8. When prompted, enter your admin password

One of the options available on the Ubuntu Startup Disk Creator is the ability to include extra space on the USB drive. This space is used for saving files—so you don’t lose everything when the system is rebooted. By doing this, you effectively create a portable Linux system that can be carried with you wherever you go.

Booting the USB Drive

With the live USB drive complete, you now need to insert the drive into the target computer (the computer to be used to run the live image) and boot up. If your machine doesn’t automatically boot from the USB drive, you may have to go into your machine’s BIOS and set the boot order such that external devices boot first (how this is done will vary, machine to machine).

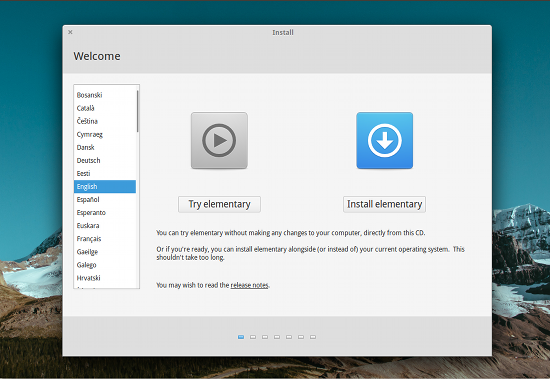
jack-live-3In most cases, you will be greeted with some form of the “Try” screen (Figure 3). To run the distribution as a live instance, click Try NAME (where NAME is the name of the distribution) and allow the desktop to load. Once the desktop is loaded, you’re ready to go.

Caveats to Running Live

One of the biggest issues people face with running live instances of Linux is insufficient RAM, which can cause the system to run slowly. Remember, this will be running completely from memory, so chances are it won’t run as smoothly as if it were installed on the hard drive. However, if your system contains 2 GB or more of RAM, you’ll find the live instance runs fairly well.

Another caveat you must understand is that the second you reboot, all is lost. Just because the system is running from memory, doesn’t mean you cannot install applications or save files. But, unless you’ve saved files to an external drive, as soon as the system is rebooted, everything you’ve saved (installed or configured) will be gone.

You now have all the power necessary to test and run Linux without making a single change to your machine’s hard drive. Linux is an incredibly powerful and flexible platform… live booting is just one way to experience and even share the flagship open source operating system.

Tricks For Using Desktop-Integrated Calendars

$
0
0

jack-kde-1The Linux desktop is full of interesting features. In fact, users are often surprised at just how many handy tools the various iterations of the open source desktop there are. One such tool is the Calendar. Although most users are content with working straight out of Google Calendar, or Thunderbird’s Lightning (or any other calendaring tool), what happens when you don’t want to mess with opening a web page or email client to get to your calendar? Lucky for you, plenty of options are available in panels and system trays—all ready to make accessing your calendars a cinch.

Of course, because there is so much variety, every option/combination will be different (as will the success of app/applet integration with your calendar of choice). To simplify this, for the sake of instruction, I’m going to discuss only those apps that are able to gain access to Google Calendars and live on the desktop… as built-in elements of either a panel or system tray. Thus, I will be looking at KOrganizer, Elementary OS desktop calendar, and the Ubuntu Unity desktop calendar.

Before we dive into these efficient calendar tools, I need to help you understand how to connect them to your Google account. Some of them (such as KDE’s KOrganizer) make connecting to a Google account incredibly simple. All you have to do is open up KOrganizer, click on Settings > Configure KOrganizer > General and then click on the Calendars tab. From there, click the Add button, select Google Calendars and Tasks from the list (see Figure 1 above), and then click OK.

In the new window, click Add and then walk through the process of authenticating with your Google account. If you have two-step authentication setup, worry not, because KOrganizer supports two-step authentication.

Other Linux calendar tools aren’t so lucky. For the likes of the Elementary OS default calendar, you have to set up an app password for calendar integration. To do this, head on over to the Google App passwords page, create a new 16-digit app password, and use it for the password when connecting the default Elementary OS calendar to Google.

With that said, let’s take a look at how to make the most out of these desktop calendar tools.

KOrganizer

Once you’ve connected KOrganizer to your Google Account (or whatever online calendar you use), you’ll want to take care of a few details. The first step is to change the refresh rate of the calendar. I tend to be a Google Calendar power user, so I am constantly working with one or more calendars. This means I need my Google Calendar and KOrganizer to be in constant sync. To that end, I always set the refresh rate to be more frequent than the default 60 minutes. To do this, follow these steps:

  1. Open up KOrganizer

  2. Click Settings > Configure KOrganizer

  3. Select your Google calendar from the list and click Modify

  4. In the new window (Figure 2), make sure Enable interval refresh is checked

  5. Set the Refresh interval to your desired time

jack-kde-2Once you have KOrganizer set up, click on the Calendar app in the KDE system tray. At first, you’ll notice nothing showing up, in the way of events. Now that you’ve clicked to open the app for the first time, it will now sync with your Google Calendar. Give it a moment and the events will populate.

In the same window you set the Refresh interval, you can also enable/disable your various Google Calendars. If you are a power user (with multiple Google Calendars), I suggest you disable those lesser-used calendars, as the system tray app can get a bit challenging with too many calendars present.

Unfortunately, you cannot add events from within the KDE system tray calendar. You can, however, get a quick view of upcoming events simply by hovering your mouse over the calendar app in the system tray (Figure 3). 

jack-kde-3To add/modify events, you have to open up KOrganizer and manage them from there.

Elementary OS Desktop Calendar

With the Elementary OS iteration of the tool, you must authenticate to your Google account with an app password. As soon as you authenticate, you will quickly learn one of the shortcomings of the built-in calendar—it can only sync your default Google calendar. For some, this is fine. For power users, this will only lead to frustration. However, the developers of Elementary are working on this and hope to bring multiple Google calendar support to the app soon.

You will also find, as of this writing, the desktop app does little more than indicate on what days you have events (not even what the events are). Thankfully, there is a solution for this… one that is also available for the Ubuntu Unity desktop (the installation and usage is the same in both). Let’s take a look.

Ubuntu Unity

Out of the box, the Ubuntu desktop calendar app behaves similarly to that of Elementary OS… in that you cannot interact with the notification area applet. In fact, the default calendar app is (like that of Elementary OS) fairly useless—outside of just seeing dates.

Fortunately, a much more interactive applet has been created. The calendar-indicator applet allows you quick access to your Google Account—such that you can quickly see what’s coming up and also add events—all from the applet.

To install the calendar-indicator applet, follow these steps:

  1. Open up a terminal window

  2. Add the necessary repository with the command sudo add-apt-repository ppa:atareao/atareao

  3. Update apt with the command sudo apt-get update

  4. Install the applet with the command sudo apt-get install calendar-indicator

Once installed, run the app from the Unity Dash, authenticate with your Google account, and you’re ready to go.

Click on the new calendar icon in your Unity panel and you’ll see all of your upcoming events. Click on the Add new event entry (Figure 4) and then fill in the details for the event. 

jack-calendar-1The calendar-applet also includes a full calendar that you can view (click the calendar-indicator icon and then select Show Calendar). This calendar will actually display all of your Google calendars (so if you’re using Elementary OS, this is the best route to getting multiple Google calendars (until the developers add this feature to the default app).

Plenty of other calendar apps and applets are available for Linux… all of which are not created equal. If you happen to be a power user (especially of Google calendar), it is quite easy to bring a level of efficiency to the Linux desktop that’s not found out of the box.

Have you found a trick to using Linux desktop integrated calendars for your distribution/environment of choice? If so, share with your fellow Linux.com readers.


Five Linux-Ready, Cost-Effective Server Control Panels

$
0
0

jack-webuzoWhen you consider web-based control panels, the first thing to comes to mind is the de facto standard cPanel. It’s a powerhouse of a tool, that can do just about everything a server admin could imagine (and then some). Of course, if you’re looking for a cost-effective or open source option, you’d best turn away from that solution. Even though cPanel is one of the most powerful control panel tools available, it is out of the price range of anyone outside of medium to large businesses.

And it’s proprietary.

With that in mind, where do you turn? Linux, that’s where. Fortunately, plenty of options are available to meet almost every need. From web, email, DNS, database, backups, FTP, monitoring, and so much more… open source server control panels have you covered.

Diving into the mix, you might find so many available options, you’re not sure where to start. To alleviate that stress, I’ve narrowed down a list of five such tools I believe fall into the “best of” category.

Each of the following control panels can be installed on your Linux distribution of choice. Some of the offerings are completely free to use (some even open source), whereas others offer inexpensive premium versions. Read on and see if one of these tools is what you’re looking for.

Webuzo (see above) is a LAMP stack application manager that enables you to quickly and easily deploy a large number of web applications and services onto your server. With the ability to, in just a few clicks, install the likes of WordPress, PrestaShop, Drupal, Joomla, phpBB, SMF, Magento, WHMCS, Xoops, Open Real Estate, Mambo, Geeklog, Coppermine, MediaWiki, Dolphin, Jcow, Elgg, OpenClassifieds, Booked, Roundcube, SquirrelMail, Collabtive, and more, Webuzo is a dream tool for anyone needing to deploy apps and services with ease. To make Webuzo even more appealing, the installation is incredibly easy. Download and run the install.sh script and, when prompted, open up your web browser to the given address and you’ll soon be installing and managing more web-based apps than you can imagine.

jack-webminWebmin has been one of the go-to web-based control panels for Linux for a very long time… with good reason. Webmin is very easy to install, enables you to administer nearly every aspect of your Linux server, and even makes the task of administration so much easier. Even better, if the default installation doesn’t have what you need, Webmin offers an extensive plugin system that can extend the functionality of this very well-designed control panel. Search the third-party modules page, and you’ll find a large number of available plugins (you can also simply browse through all the listings manually). Webmin is free and also offers Virtualmin (a Webmin module for managing virtual hosts) as well as Cloudmin (a Webmin module to manage virtual machines).

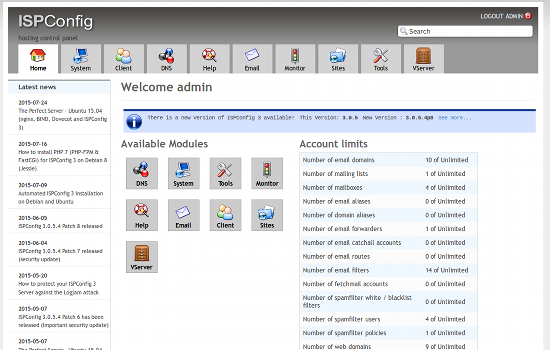
jack-ispconfigISPConfig lets you manage multiple servers from a single control panel. With this handy interface you can manage servers/services such as Apache, NGINX, FTP, SQL , BIND DNS, mirroring, clusters, database and virtual servers, email, and others. ISPConfig offers four access levels for amazing flexibility: Administrator, Reseller, Client, Email Login. You will also find add-ons as well as a monitoring app for Android. The one caveat for ISPConfig is that it’s not the easiest to install. In fact, with ISPConfig, you will have to manually install every component you want on the server before installing this control panel. Even with ISPConfig installed, a number of the configurations aren’t one-click actions. In other words, you’re going to have to give this one some time to get beyond the learning curve. However, once installed and mastered, ISPConfig will treat you (and your server) quite well.

jack-vestaVesta is one of the easiest control panels to install. You do, however, have to install it on a server where both Apache and MySQL are not previously installed (as the Vesta installer wants to compile them individually). When your server is prepared, all you do is download the install script, run it, and wait to be prompted for your credentials and login link. Once installed, you’ll be managing the likes of: Web, DNS, database, mail, FTP, Nginx, SSL certificates, configuration templates, backups, updates, monitoring, antispam/antivirus, WHMCS billing, and more. Vesta also offers a very clean UI, which makes managing all of your systems and servers incredibly easy.

jack-directadminDirect Admin is an open source web hosting platform that allows you to manage an unlimited amount of web sites, email accounts, and much more. One of the best features of Direct Admin (besides the vast amount of configuration options it gives you) is that many of the tasks, once set up, can be automated. You will also find a built-in file manager (for easy handling of direct uploads), as well as an easy system for the creation of error pages, and directory password protection. Clients will enjoy the easy to use the built-in support ticketing system and the user-friendly SSL certification manager. The main caveat to using Direct Admin is that it’s not free. However, you can purchase a lifetime license for $299.00 USD, which includes 90 days of support, automatic upgrades, unlimited domains, and free installation.

And there you have it. Five outstanding web-based control panels, all ready to serve your Linux server. Although not all of the tools are open source, they are all cost effective and incredibly powerful. If you have a need to master your Linux servers, you would be very remiss if you didn’t give one of these systems a try.

Have you found a control panel worth your time and effort? One that does everything you need within a simple, user-friendly, web-based GUI? If so, share with your fellow Linux.com readers.

How To Convert Media Files in Linux

$
0
0

swap-1-vlcOnce in a while, you need to convert media from one format to another, even in a cloud-centric world where everything is a “stream.” There can be different reasons for doing so. In most cases, I have to convert videos that I shoot or purchase so that I can play them on my mobile devices or other players, which support only certain formats.

Converting media files or transcoding is extremely easy in Linux, thanks to many open source projects.

Transcoding Videos

I have a heterogeneous environment at home, a mix of Mac OS X, Linux desktops, Chrome OS devices, Android phones and tablets, Yamaha music system, and car infotainment. So, I always convert my videos in a format that is supported on all these platforms and, in most cases, the supported format is .mp4.

There are two ways you can convert your videos to mp4: either using a less-known feature of VLC or with the standalone app Handbrake.

Use VLC to Convert Videos

VLC is known as the media playback Swiss army knife because it can play virtually every media format out there. However, many features of VLC are less known, and transcoding is one of them.

To get started, open VLC and, from the main menu, choose Media > Convert/Save (see Figure 1 above).

Then, click on the Add button and browse the video file that you want to transcode. Click on the Convert/Save button at the bottom and it will open another window. Here you will see the source file, and under Settings, you can choose what format do you want to convert it into.

You can also click on the wrench/screwdriver icon, which will allow you to fine-tune your transcoding as you can choose the appropriate container, codecs for your video (Figure 2).

swap-4-vlc

If you are transcoding for a particular device or platform, for example YouTube, you can choose appropriate format from the drop-down menu (Figure 3)

swap-5-vlcOnce you have chosen the desired output format, it’s time to choose the destination. Click on the Browse button and choose the location where you want the converted file to be saved. At this point, you need to give a name to the file you are going to convert. (I wish it used the current name of the file.) Give it a name and then click on Save.

Once everything looks good, hit the Start button and VLC will start transcoding your video.

Handbrake for Batch Transcoding

Although VLC does an excellent job of transcoding, Handbrake is the open source app that was created just to do this. And, it can also do batch conversion. If you are on an Ubuntu-based system, you need to install two packages in order to get .mp4 support. Add the handbrake repository to your system and install those packages:

sudo add-apt-repository ppa:stebbins/handbrake-git-snapshots
sudo apt-get update
sudo apt-get install handbrake-cli handbrake-gtk

Open Handbrake and click on Source. Then, select the file you want to convert; once it’s loaded, click on the Enqueue button, and it will add the file to the queue. Click on Source again, select the next file, and add it to the queue. Repeat the process to add all the files that you want to convert (Figure 4).

swap-7-handbrakeAlternatively, if you want to make it easier, create a folder and copy all the files that you want to convert into that folder. Then select that entire folder -- instead of a file -- from Source. Once Handbrake scans all files, click on Queue from main menu and choose Add Multiple. Handbrake will then add all the files from that directory to the conversion queue.

Once all the files are added to the queue, choose the desired output format from the Preset List. You can further fine-tune it by adjusting the settings from the options on the main window.

Next, choose the destination for the exported/converted files. If everything looks good, go ahead and start conversion either from Queue > Start Queue or by hitting the Start button.

Handbrake will start converting your files (Figure 5).

swap-10-handbrake

Audio Conversion with Sound Converter

swap-13-lf-soundVLC can convert audio files as well, just follow the instructions above and choose audio files instead of videos files. But if you are looking for batch processing or a simpler app, then you can install the Sound Converter application on your Linux box; it’s available in the main repo of major distributions. The app has a very simple interface.

If you want to convert only one audio track, choose Add File, if you have more than one file, then choose Add Folder option.

Once all files are added, click on Preferences and change the destination in the Where to place results option. You can also choose how to rename files (if you want to).

The third and the most important option is output format. Most players support .mp3 format, so that’s the one I would prefer. Adjust the bitrate and quality, if you want to, and close the window (Figure 6).

swap-14-soundYou will see the list of all the files you added; select them all and click on Convert; Sound Convert will transcode all your files in the desired audio format.
One of the greatest features of Sound Converter is that it can also “extract” audio from video files. So, if you need to rip just the audio, this is the app for you. Just add the video files and convert them to the desired audio format. As you can see in Figure 7, there are three video files that I am converting to audio files.

That’s pretty much what you need to convert media in Linux. It’s Linux, so there’s more than three ways to do it; tell us how do you do it.

Get to Know the Elementary OS Freya Firewall Tool

$
0
0

jack-fire-1

Out of the box, Linux is one of the most secure computing platforms you will ever use. For most users, that out-of-the-box experience is good enough. For some, however, there is plenty of fine-tuning that can be done to make the desktop distribution even more secure or more flexible. If you’ve made the switch to elementary OS Freya, you’ll be pleased to know there’s a new GUI tool that makes working with the firewall quite easy.

Like most all Linux distributions, Freya works with iptables to lock down the platform. The iptables system is an incredibly powerful tool that let you configure the tables provided by the Linux kernel firewall. For most Linux admins, iptables is second nature; adding policies and chains can be done during REM sleep. For most desktop users, however, iptables tends to fly over their heads. That’s why the elementary OS Freya firewall tool is so important—it makes editing the iptables policies a snap.

What You Need to Know

Although you do not have to fully grasp the ins and outs of iptables to work with the elementary OS Freya firewall tool, it doesn’t hurt to at least understand the fundamentals of firewalling. At the bare minimum, you should know:

  • A firewall can block traffic going in and out of a machine

  • A firewall blocks using port numbers and protocols

  • A firewall can reject/deny/allow/limit incoming and outgoing TCP and UDP traffic

  • You must be a member of the sudo group to work with the Elementary OS Freya firewall tool

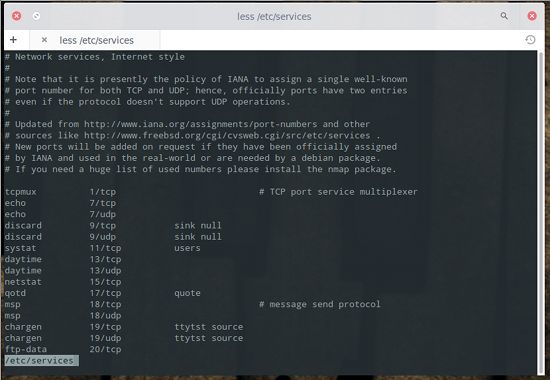
That is the bare minimum you must know before you start using this tool. If you’re unsure of what protocols you want to work with, you can look at the file /etc/services to see an entire listing of the networking ports used by Linux. If you issue the command less /etc/services you can comb through the full listing (see Figure 1 above).

The elementary OS Freya firewall tool is, ultimately, a front end for Uncomplicated Firewall (UFW). UFW is a “user-friendly” command line front end for iptables found in the Ubuntu distribution. The Elementary OS Freya firewall tool (and, by association, UFW) doesn’t have nearly the power of iptables, but it does a good enough job for the desktop.

Finding the Tool

The firewall GUI isn’t tucked too deeply away from view. If you open up the Settings tool and then click on Security & Privacy, you’ll see the Firewall tab. Click on that tab and you’ll see that the firewall isn’t activated. When you click on the Firewall tab, you will see an unlock button in the upper right corner (Figure 2). To do anything with the firewall tool, you must click that button and then enter your sudo password to continue.

jack-fire-2

Using the Tool

Now that you’ve unlocked the firewall tool, it’s time to use it. You can begin adding your rules and then enable the firewall, or you can enable the firewall and then add your rules. Let’s enable the firewall first. Do this by clicking the Firewall Status slider to the right. When the firewall is enabled, the slider will turn blue. With the firewall enabled, you can start adding to the iptables chain. Let’s say, for instance, you want to allow incoming vnc traffic on ports 5800, 5900, and 6000 but want to block incoming vnc traffic on ports 5801, 5901, and 6001. Here’s what you need to do.

From the firewall tool window, click the + sign in the bottom left corner. In the pop-up window (Figure 3), enter the details for the first rule. For example, to allow vnc port 5800 you’d enter the following: 

  • Action: Allow
  • Protocol: TCP
  • Direction: In
  • Ports: 5800

jack-fire-3Go through the same steps to add ports 5900 and 6000. Once you’ve done that, you’ll add the rules to block incoming traffic for ports 5801, 5901, and 6001. The only difference when you add this new set of rules is that you’ll select Deny from the Action drop-down.

If you haven’t enabled the Firewall Status by this point, go ahead and do so now. At this point, all your rules should appear in the listing (Figure 4). If you notice duplicate entries listed, understand that the firewall tool adds both IPv4 and IPv6 entries for each rule.

jack-fire-4As you might expect, you will need to have a fundamental understanding of firewalls. Why? You could easily add rules into the chain only to find network traffic stops running. The nice thing about the tool is you can quickly enable/disable the firewall so that you can work with your iptables chain until you get it right. The good news is that you don’t have to dive into the deep waters of iptables. You can get enough information from reading about UFW (check out the official page) to have the Elementary Freya OS firewall tool working smoothly.

Do note. Simply by enabling the firewall tool, the firewall chain will change. By default, the out-of-the box iptables policy is to ACCEPT INPUT, FORWARD, and OUTPUT… and that is it. The second you enable the firewall tool, a number of new entries are added to the chain, such as:

Chain ufw-before-input (0 references)
target prot opt source            destination    
ACCEPT all  --  anywhere          anywhere       
ACCEPT all  --  anywhere          anywhere          ctstate RELATED,ESTABLISHED
ufw-logging-deny  all  --  anywhere     anywhere          ctstate INVALID
DROP    all  --  anywhere          anywhere          ctstate INVALID
ACCEPT icmp --  anywhere        anywhere          icmp destination-unreachable
ACCEPT icmp --  anywhere        anywhere          icmp source-quench
ACCEPT icmp --  anywhere        anywhere          icmp time-exceeded
ACCEPT icmp --  anywhere        anywhere          icmp parameter-problem
ACCEPT icmp --  anywhere        anywhere          icmp echo-request
ACCEPT udp  --  anywhere         anywhere          udp spt:bootps dpt:bootpc
ufw-not-local  all  --  anywhere          anywhere       
ACCEPT udp  --  anywhere         224.0.0.251       udp dpt:mdns
ACCEPT udp  --  anywhere         239.255.255.250   udp dpt:1900

You might even notice, after enabling the firewall and without adding any rules, web traffic no longer works. To remedy that, you might have to add an outgoing rule rule for DNS. In that case, you’ll add a rule with the following parameters:

  • Action: Allow

  • Protocol: UDP

  • Direction: Out

  • Ports: 53

You now know enough to navigate the elementary OS Freya firewall tool. As I mentioned earlier, if you need to get more out of the firewall, you should read up on UFW. For even more power, check out the full-on iptables tool, and you can create an incredibly powerful firewall for either your desktop or server.


Real-Time E-Book Editing With Calibre

$
0
0

jack-calibre-1If you’ve worked with e-books, you know that editing them can be a work-flow nightmare. You format the book, save it, convert it, and check it out. When you find issues, you then must reformat, save again, reconvert, and recheck. This can become quite tedious when you run into stubborn or numerous formatting errors that slip through the cracks.

However, that time-consuming process doesn’t have to be so frustrating… at least not when you have Calibre at hand. With this outstanding, open source e-book management software, there’s a lesser-known feature that allows you to edit your e-book, in real time, to remove those formatting (and other) mistakes with ease. You can even do the entire formatting within Calibre and bypass any errors introduced by a middle man.

The only caveat to this process is that it requires you have at least a basic understanding of HTML and CSS (as the editing pane works with both). In other words, you’re not going to be editing a LibreOffice .odt file in a WYSIWYG editor. Also, you must have converted your e-book to either .epub or .azw3 formats (the Calibre editor cannot work with .mobi files).

I won’t go through the Calibre conversion process, so these steps assume you already have your book converted into the necessary format. With that said, let’s walk through the editing process of your book.

The Editing Window

To get to the editing window, right-click on the book you want to work with (from within Calibre’s main window—see Figure 1 above) and select Edit book.

Once opened, you’ll find three panes:

  • Book navigation (far left) is where you select what you want to view (chapters, styles, images, fonts, etc)

  • Work pane (center) is where you do the editing of the book

  • Preview pane (right) displays the contents of the book

What’s important to note is, from within in the navigation pane, you can expand each tree to view individual entries. When you expand the text tree, you will see each chapter of your book (depending upon how you’ve handled the conversion). For example: When I convert books, I always change the conversion wizard to search for the HTML <h3> tag to use as chapter headings. I also instruct Calibre to start a new page with every <h3> tag. Figure 2 illustrates each new chapter of a book.

jack-calibre-2When you double-click on a chapter in the left navigation, it will open up in a new tab in the editing pane. You can also open up the document style sheet. This makes for a handy reference point as you work through the files (or should you need to make changes to one or more of the styles). As you make changes (to either a chapter or to the style sheet), they will appear in the live preview window. As you switch tabs in the editor window, the preview window will automatically switch to preview what is being edited.

At the bottom of the preview pane, you will notice a toolbar with a few buttons and a search bar (Figure 3). The buttons are (from left to right):

  • Disable/enable auto-reload of preview

  • Disable/enable syncing of preview position to editor position

  • Split file at specified location

  • Reload preview

  • Find next

  • Find previous

jack-calibre-3The editor pane also has several buttons (Figure 4) that allow you to easily insert tags, images, hyperlinks, formatting, colors, and even a button for beautifying the current working file.jack-calibre-4

Working with the Editor

Now that you are familiar with the editor layout, let’s take a look at the heart of the tool. As long as you are familiar with HTML and CSS, getting up to speed with the editor should be quite simple. Open up a chapter (or style sheet) and start editing.

If you open a file and find the HTML to be hard to read (some applications like MS Word are very bad at creating HTML), you can click the Beautify button to clean up the code. This will auto-indent and color code the HTML of the file. Figure 5 illustrates how well the Beautify tool works to make your job much easier.

jack-calibre-5When you complete the editing (and beautifying), I highly recommend you run the Check Book tool. In the main toolbar you’ll see the ladybug icon—click it to run the checker. If it reports errors, address them and rerun the checker. You can also run the built-in spell checker from the Calibre main toolbar (Figure 6). 

jack-calibre-6Once you’ve completed the entire editing process, all you have to do is click the Save button (or Ctrl+S) and the epub (or azw3) file will automatically reflect your changes.

Creating Checkpoints

This is an important feature—one you should not overlook. As you work on your book, you can create checkpoints. These checkpoints are restore points that you can revert to, should something go awry in your editing (which could save you a lot of work).

calibre 7To create a Checkpoint, simply click the thumbtack icon in the toolbar and give the Checkpoint a name. If you find yourself in a situation where you need to revert, click on the Edit menu and you should see the last Checkpoint created. If you’ve created more than one Checkpoint, you can click the View menu and check the box for Checkpoints. This will add an additional preview pane (in the bottom of the left navigation—Figure 7) so you can jump to whatever Checkpoint you need.

Creating and editing e-books doesn’t have to be a struggle. If you’re looking for a way to make this process far more efficient, you should dive into Calibre’s e-book editor and you’ll save time and frustration alike.

Using G’MIC to Work Magic on Your Graphics

$
0
0

jack-gmic-1I’ve been doing graphic design for a long, long time. During that time, I’ve used one tool and only one tool… Gimp. Gimp has always offered all the power I need to create amazing graphics from book covers, to promotional images, photo retouch, and much more. But…

There’s always a but.

Even though Gimp has a rather powerful (and easy to use) set of filters, those filters tend to be very much one-trick-ponies. In other words, if you want to create a complex look on an image, you most likely will wind up using a combination of multiple filters to get the effect you want. This is great, simply because you have the filters at your command. However, sometimes knowing which filter to use for what effect can be a bit daunting.

That’s why GREYC’s Magic for Image Computing (aka G’MIC) is such a breath of fresh air. This particular plugin for Gimp has saved me time, effort, and hair pulling on a number of occasions. What G’MIC does is easily extend the capabilities of not just Gimp, but the Gimp user. G’MIC is a set of predefined filters and effects that make using Gimp exponentially easier.

The list of filters and effects available from G’MIC is beyond impressive. You’ll find things like:

  • Arrays & tiles

  • Bokeh

  • Cartoon

  • Chalk it up

  • Finger paint

  • Graphic novel

  • Hope poster

  • Lylejk’s painting

  • Make squiggly

  • Paint daub

  • Pen drawing

  • Warhol

  • Watercolor

  • Charcoal

  • Sketch

  • Stamp

  • Boost-fade

  • Luminance

  • Decompose channels

  • Hue lighten-darken

  • Metallic look

  • Water drops

  • Vintage style

  • Skeleton

  • Euclidean - polar

  • Reflection

  • Ripple

  • Wave

  • Wind

  • Noise

  • Old Movie Stripes

 And more. For an entire listing of the effects and filters available, check out the ascii chart here.

At this point, any Gimp user should be salivating at the thought of using this wonderful tool. With that said, let’s install and get to know G'MIC.

Installation

The good news is that you can find G'MIC in your distribution’s standard repositories. I’ll show you how to install using the Ubuntu Software Center.

The first thing to do, once you’ve opened up the Ubuntu Software Center, is to search for Gimp. Click on the entry for Gimp and then click the More Info button. Scroll down until you see the Optional add-ons (see Figure 1 above).

From within the optional add-ons listing, make sure to check the box for GREYC’s Magic for Image Computing and then click Apply Changes.

With the installation of G'MIC complete, you are ready to start using the tool.

I will warn you: I currently use the unstable version (2.9.1) of Gimp. Although unstable, there are features and improvements in this version that blow away the 2.8 branch. So… if you’re willing to work with a possibly unstable product (I find it stable), it’s worth the risk. To install the 2.9 branch of Gimp on a Ubuntu-based distribution, follow these steps:

  1. Open a terminal window

  2. Add the necessary repository with the command sudo add-apt-repository ppa:otto-kesselgulasch/gimp-edge

  3. Update apt with the command sudo apt-get update

  4. Install the development build of Gimp, issue the command sudo apt-get install gimp

The above should also upgrade G'MIC as well. If not, you might need to follow up the install with the command sudo apt-get upgrade.

Usage

Now it’s time to start using G'MIC. If you search through your desktop menu, you’ll not find G'MIC listed. That is because it is integrated into Gimp itself. In fact, you should see G’MIC listed in the menu structure. If you click that entry, you’ll see G’MIC listed, but it’s grayed out. That is because G'MIC can only open when you’re actually working on an image (remember, this is a set of predefined filters that act on an image, not create an image). With that said, open up an image and then click G’MIC > G’MIC. A new window will open (Figure 2) showing the abundance of filters and effects available to you.

jack-gmic-2The first thing you need to know is the Input/Output section (bottom left corner). Here you can decide, first, what G’MIC is working on. For example, you can tell G’MIC to use the currently active layer for Input but to output to a brand new layer. This can sometimes be handy so you’re not changing the current working layer (you might not want to do destructive editing on something you’ve spent hours on). If you like what G’MIC did with the layer, you can then move it into place and delete (or hide) the original layer.

At this point, it’s all about scrolling through each of the included pre-built effects and filters to find what you want. Each filter/effect offers a varying degree of user-controlled options (Figure 3 illustrates the controls for the Dirty filter under Degradations).

jack-gmic-3One thing you must get used to is making sure to select the layer you want to work on before opening G’MIC. If you don’t, you’ll have to close G’MIC, select the correct layer, and re-open G’MIC. You also need to understand that some of the filters take much longer to work their magic than others. You’ll see a progress bar at the bottom of the Gimp window, indicating the filter/effect is being applied.

If you want to test G’MIC before installing it, or you want to test filters/effects before applying them to your own work, you can test it with this handy online demo version. This tool allows you to work with G’MIC on a demo image so you can not only see how well the effects/filters work, but get the hang of using G’MIC (it’s not hard).

If you’re a Gimp power user, G’MIC is, without a doubt, one of the single most important add-ons available for the flagship open source image editing tool. With G’MIC you can bring some real magic to your digital images… and do so with ease. Give it a go and see if it doesn’t take your Gimp work to the next level.

How to Convert Videos in Linux Using the Command Line

$
0
0

Swapnil-cli-presetsLinux users don't need to transcode video files, because they have VLC and many other apps at their disposal that can play almost any media format out there. However, if you want to play videos on mobile devices such as your iPhone or iPad, or if you run streaming servers, then transcoding your videos into supported formats becomes essential.

In a previous article, I wrote about some GUI tools that can transcode videos with ease. There was a demand for CLI (command-line interface) tools for the same job. I confess that even if I ran a headless file server at home, I never really bothered to do it via an SSH session. I would mount the removable drive on my desktop and convert files using GUI tools. It's never late to do it differently.

In this article, I will share how I transcode video in Linux using CLI tools. Just keep one point in mind: this is just one of the “many” ways you can do it in Linux. There are dozens of such tools out there, and I am covering the one that I frequently use, because it’s easy and I’ve been using it for a long time. Some of the popular tools include ffmpeg, mencoder, and my favorite Handbrake. In this article, I will show how to use Handbrake to convert video files.

Using Handbrake to Transcode

First you need to install the “Handbrake CLI” packages on your system. Most major distributions such as openSUSE, Arch, Fedora, and Ubuntu have this in their main repositories. If not, then you can enable the necessary third-party repo and install the software.

Now that Handbrake is installed, let’s take a closer look. First, open the terminal. This is the command you will need to convert any file:

HandBrakeCLI - i PATH-OF-SOURCE-FILE -o NAME-OF-OUTPUT-FILE --"preset-name"

Ok, this is not the only command you can use; there are different ways of doing it. For example, you can give Handbrake detailed instructions on how it should deal with audio, video, what bitrate it should use, and what codec it should deploy, but that would become intimidating for a new user, and I like to keep things simple. So, I use the above pattern.

In the above command “i” stands for input and “o” stands for output here. It's self-explanatory that you have to provide the path of the source file and the destination where you want to save the converted file. If you want to keep the transcoded file in the same folder, then just give the name of the file. Keep in mind that you do have to give the name and extension of the output file.

The "Preset Name" option is the reason I use Handbrake over others. If you have used the GUI version of Handbrake (as you can see in this article), it comes with different presets so you can transcode your video for the targeted devices. If you don't use the preset (and I am not sure why you should not), then you will have to specify every single thing as I explained above and that, in my opinion, is overkill.

If you want to use the presets, it's extremely easy to find what you need, just run this command:

[swapnil@arch ~]$ HandBrakeCLI --preset-list

This will give a long and detailed output of all the available presets (see Figure 1 above).

You will notice presets for iPhone, iPod, iPad, Apple TV, and other such devices. I use the last preset -- "High Profile” -- for two reasons: 1) In my experience, it offers the best quality; 2) It will work across devices -- from mobile to HDTV. If you run Kodi instead of Plex server, then I suggest this profile, because Kodi doesn't transcode videos on the server side.

Let's Do It

I downloaded the “flv” format of a Linux Foundation video called Distributed Genius and wanted to transcode it into .mp4 format, which is the format that plays everywhere -- from Mac OS X to iPad and Kodi (Linux plays everything, so I am not worried about it).

swapnil-encoding-cropThe file was downloaded to the Downloads folder in my home directory, and I wanted to save the transcoded file in the Videos folder, so this is the command I ran:

[swapnil@arch ~]$ HandBrakeCLI -i /home/swapnil/The\ Distributed \ Genius.flv -o /home/swapnil/Videos/the_dstributed_genius.mp4 --preset="High Profile"

Lo and behold, Handbrake will start transcoding your video (Figure 2). Then, HandBrake will tell you once the transcoding is finished (Figure 3).

swapnil-encode-finished

So, if you are planning to transcode some video, Handbrake is my easy to use, go-to solution. In the future, I will talk about other CLI tools for performing the same task. Let me know which tools you use, in the comments below.

MyPaint Fills a Graphics Void on Linux

$
0
0

jack-mypaint 1When you think of Linux and graphic art tools, you probably consider Gimp or Blender to be the only available software. With that thought, you’d be very wrong. Yes, Gimp and Blender are the de facto standard tools for either image manipulation (Gimp) or Blender (3D graphics and animation), but what if you need a tool to create images from scratch?

Naturally, a program like MyPaint requires a certain skillset. Just because you are a master of Gimp, doesn’t mean you’ll run MyPaint and start creating masterpieces. With an application like MyPaint, you really need drawing/painting skills in order get the most out of the tool. you will also need a pressure-sensitive graphics tablet—as neither a mouse nor a trackpad is up to the task at hand.

The basic features of MyPaint are:

  • Available for Windows and GNU/Linux

  • Designed for pressure-sensitive graphics tablets

  • Simple and minimalistic user interface

  • Extensive brush creation and configuration options

  • Unlimited canvas (you never have to resize)

  • Basic layer support

Where MyPaint truly excels is in the area of the brush collection. Not only does MyPaint already offer an outstanding (and very usable) set of brushes, it includes an amazingly simple brush import tool (more on that later).

With that said, let’s install MyPaint on Elementary OS Freya and kick the tires.

Installation

Many standard repositories contain the stable version of MyPaint. However, I would suggest installing from the testing PPA (which is a rolling release PPA), so you are getting the most recent fixes and features.

If you want to install from that PPA, here are the steps:

  1. Open up a terminal window

  2. Add the PPA with the command sudo apt-add-repository ppa:achadwick/mypaint-testing

  3. Update apt with the command sudo apt-get update

  4. Install MyPaint with the command sudo apt-get install mypaint mypaint-data-extras

You should now see MyPaint within your distribution’s desktop menu. Plug in your pressure-sensitive graphics tablet (I use a Wacom Bamboo) and prepare to be impressed with what the software offers.

Usage

When you open up MyPaint, the first thing you should notice is the simplistic interface (see Figure 1 above).

The developers/designers of MyPaint did an outstanding job of keeping the interface out of the way. You can easily select your brush from the either the menu bar or the toolbar. But what happens when you want to adjust a brush, work with layers, or even see a preview? For that you have to open the various available panels. These panels appear in the right side of the main window and allow you to either adjust various elements or see a small-scale preview of your working drawing.

To add one of the panels, click Window and then select which panel you want. If you work a lot with layers, you might want to include the layer panel (Figure 2).

jack-mypaint 2jack-mypaint 3 copy
You can add layers in MyPaint in similar fashion to that of Gimp. You can:

  • Add a layer

  • Select the layer mode

  • Lock a layer

  • Hide a layer

  • Adjust the layer opacity

  • Move/copy/delete layers

  • Rename layers

Brushes

Of all the tools MyPaint has to offer, it’s the brushes that make or break the software. In this case, they definitely make it. If you click on Window > Brush Groups you’ll see seven different brush groups. Select from one of those groups and that brush group panel will appear in the right side of the window (Figure 3).

Once you’ve added a brush group panel, you can then select from the many brushes available to that group. Or, if you want to fine-tune a particular brush, you can click Window > Brush Settings Editor. When this window opens (it’s not a panel), you can go through every setting of a particular brush and make adjustments (Figure 4).

jack-mypaint 4

But, what if you don’t find the brush you’re looking for? Fortunately, the developers have included a brush import tool. To import a new brush pack, click Brush > Get More Brushes and your browser will open to a page where there is a small selection of available brushes. Locate the brush pack you want and do the following:

  1. Download the zip file for the brush pack

  2. Go back to MyPaint

  3. Click on Brush > Import Brushes

  4. Locate and select the downloaded zip file in your file manager

  5. Click Open (in your file manager)

  6. When prompted, okay the installation (Figure 5)

jack-mypaint 5To open the new brush pack, click Window > Brush Groups, and select it from the list.
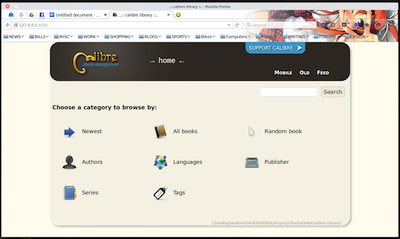
Canvas

As mentioned in the feature list, MyPaint includes an unlimited canvas. This means that you don’t have to guess the size of the image you are about to create. Every image begins with an infinite canvas. But, what do you do when you need to move the canvas around (to work on other parts of your drawing)? If your graphics tablet pencil has a control button, you can press that and then move the canvas about as needed. If you can’t get the hang of that, you can always use your mouse by pressing and holding the middle mouse button (scroll wheel) and moving the canvas around as needed.

To make these actions even easier, MyPaint also allows you to zoom in and out of the canvas. This way you can zoom out to see the entire image, position it such that the portion you want to work on is centered, and then zoom back in.

jack-mypaint 6

Scratchpad

A really handy tool called the Scratchpad Panel lets you select a brush, test it on the scratchpad, and then use it on your image. This approach will prevent you from mistakenly using the wrong brush on your work and having to undo the mistake. You can even save scratch pads (if you come up with an idea and want to use it later) by clicking the Save button in the Scratchpad Panel (Figure 6), or by clicking Scratchpad > Save Scratchpad.

If you’re looking for the missing piece to the graphics art puzzle in Linux, MyPaint will do an outstanding job of lining up with Gimp and Blender as your go-to tools for the creation of your masterpieces. Install it and give it a try and see if it stands up to your needs and talents.


Tips and Tricks for Using the Two Best E-Readers for Linux

$
0
0

ereader AIt is 2015 and your home library that once resided on bookshelves and milk crates now exists on either a handheld reader, your laptop, or your desktop. That, of course, is not to say the end of physical books is nigh. But when you want the most convenient way to either read or keep your library with you, e-books are the way to go. This is especially true for larger, heavier textbooks.

The good news for Linux users is that there are plenty of outstanding apps to make reading e-books quite easy. And, because these tools happen to be offered on the Linux platform, they offer some really cool features to make your e-book life even better.

Let’s take a look at two of the best e-book readers available for Linux, as well as a trick or two for each.

Calibre

Calibre is the mack daddy of e-book tools on Linux. Not only does it offer an outstanding e-reader, it also helps you to convert your .html files into e-book format (it’ll convert .odt and other files...just not as well). The Calibre reader does a great job of displaying your e-books (from a vast array of formats). Calibre also offers a number of really handy features, such as:

  • Bookmarks

  • Reference mode (when in this mode, if you hover your cursor over a paragraph, it will show you the reference number in the form of Chapter.ParagraphNumber)

  • Table of Contents (view the book TOC as a sidebar)

  • Full-screen mode

  • Themes

  • And so much more

There is, however, one feature that places Calibre heads above all other competition: the Calibre server. With this, you can run a server and access your books from any device. Let’s set this up and access the Calibre server from another machine. I will assume you’ve already installed Calibre (it can be found in your distribution’s standard repositories). The steps are simple:

  1. Open Calibre and click on the Preferences button

  2. Click Sharing over the net (under the Sharing section)

  3. Configure the necessary port (if applicable)

  4. Give the server a username (passwords can cause some devices to not work with the server)

  5. Click Start Server

  6. Click Test Server

When you click Test Server, your default web browser should pop up to display the web-based Calibre Library interface (Figure 1 above).

With the server running, locate the IP address of the machine hosting your Calibre server. You can now access that server in the form of http://192.168.1.70:8080. From that page, you can open a book by locating what you want to read and then clicking the associated Get button (Figure 2).

jack-ereader BOnce you click Get, the e-book file will download and you can then open it in your local copy of Calibre (or whatever e-reader you choose).

The one caveat to this is, by starting the server in this way, it will stop the second you close the app. If you want to leave the server running (without the GUI open), you can run it with the following command:

calibre-server --daemonize

This command will allow you to run the server without having to open Calibre. You can then set it to run as a startup service. How you do this will depend on what startup service your distribution uses (systemd or init).

There are even Android apps that let you access your Calibre library from anywhere (if you happen to save your Calibre Library in a cloud location). One particular app, Calibre Cloud, does a great job of accessing your Calibre Library from the likes of Google Drive, Dropbox, etc. Both a free version and a Pro version ($1.99 USD) are available. The Pro version also contains a built-in reader. If you opt for the free version, you’ll need to also install an e-book reader to use for viewing.

Lucidor

Lucidor doesn’t offer all the power and features that comes along with Calibre, but it is one of the best straight-up e-readers you’ll find for Linux. This tool is strictly a reader. Even without all that power under the hood, Lucidor delivers an outstanding e-reader experience. One of the coolest features of Lucidor is its tabbed interface, which allows you to open not only multiple books, but also multiple books from multiple sources.

You won’t find Lucidor in your standard repository. In fact, you’ll have to download the file for installation on your distribution. Let’s install Lucidor on Ubuntu. Here’s how:

  1. Download the .deb file

  2. Open a terminal window

  3. Issue the command sudo dpkg -i lucidor_XXX_all.deb (where XXX is the release number)

  4. Hit Enter

  5. Type your sudo password

  6. Hit Enter

  7. Allow the installation to complete

You should now see the Lucidor launcher in your Dash (or menu, depending upon your desktop). Run the app and you will be greeted by the minimal welcome screen (Figure 3).

jack-ereader CThe interface is quite simple to use. You click on the Links drop-down and select what you want to open. Let’s open up the Personal bookcase in a tab and then add a book. Click Links > Bookcase and the new tab will open, defaulting to the Personal Bookcase. Now click File > Open File. Locate the .epub file you want to add and then click Open. When the file opens in the Lucidor tab, you will prompted whether you want to add the file to the current Bookcase (Figure 4). Click Add and the book will now be available in your personal bookcase.

jack-ereader DAt this point, you can click the Tab button, click Open Bookcase, and start the process over to open a new book.

You can also add annotations to books for easy note-taking. Here’s how:jack-ereader F

  1. Open the book in question

  2. Locate a section of the book you want to annotate

  3. Click the Contents drop-down

  4. Select Annotations

  5. Highlight the portion of the text you want to annotate

  6. Click Create Note

  7. Enter your note for the annotation (Figure 5)

  8. Select Highlight (if you want the selected text to be highlighted)

  9. Select Mark Annotations to place a mark on the text where the annotation starts

  10. When you’re finished, click Add

There are several other features you can enjoy with either Calibre or Lucidor. Most importantly, however, is that you can simply read your books. Other e-readers are available for the Linux platform, but once you’ve used either of these, you won’t settle for anything less.

Linux Foundation Certified System Administrator: Steve Sharpe

$
0
0

logo lf newThe Linux Foundation offers many resources for developers, users, and administrators of Linux systems. One of the most important offerings is its Linux Certification Program, which is designed to give you a way to differentiate yourself in a job market that's hungry for your skills.

How well does the certification prepare you for the real world? To illustrate that, the Linux Foundation will be spotlighting some of those who have recently passed the certification examinations. These testimonials should serve to help you decide if either the Linux Foundation Certified System Administrator or the Linux Foundation Certified Engineer certification is right for you. In this latest installment of our continuing series, we talk with Steve Sharpe.

How did you become interested in Linux and open source?

I first started reading and learning about Linux prior to high school, what sparked my initial interest was so long ago I can’t remember. I do, however, remember spending weeks trying to download workable distributions at 33.6kbps and wrestling with compilation dependencies.   

What kept me interested in open source is the sheer amount of tasks you can accomplish without licenses and the possibility of community contributions.

What Linux Foundation course did you achieve certification in? Why did you select that particular course?

The certification I achieved was the Linux Foundation Certified System Administrator (LFCS), however, I haven’t completed any of the courses from front to back, but I have done several sections from the free LF-sponsored edX course, and recently signed up for the paid LFCS course for a review. Besides the cost, which is most certainly an important factor, these courses allow for self-paced learning style. It’s has taken me a decade of learning to get to where I am now, so I was not convinced much could be learned a 4-day workshop. It’s easy to forget things from even a 4-month semester.  

What are your career goals? How do you see Linux Foundation certification helping you achieve those goals and benefiting your career?

I feel the certification forces a certain level of competency, which in turn acts as a litmus test for my confidence in the field. I like the technical and design roles that Linux allows (something that ordinarily you don't do in an ordinary Windows role).  I'm sure there is a lot of staff management but I am hoping for individual case studies to explore high availability, grid, and cluster computing, etc.

steveThere are a few specific areas I would like to use Linux: System administrator role at the Ontario Institute for Cancer Research in Toronto and Sickkids (which is also in Toronto).  They use Linux for high-performance computing (clusters) to run queries on enormous data sets in search of answers to diseases. I have a deep passion for science and also for helping people and would love to make a contribution -- working on computers that researchers use to find cures is both a contribution and a hand in science.
What other hobbies or projects are you involved in? Do you participate in any open source projects at this time?

As cliche as it sounds, I follow Slashdot regularly and scientific publications from Nature and Scientific American. I volunteer at my local college assisting students in a range of topics which sometimes does involve open source. I also regularly check the Fedora Project’s open help desk tickets that are publicly viewable to see if there is anything within scope of my abilities. So far, it’s been an indication to continue learning more.  

Do you plan to take future Linux Foundation courses? If so, which ones?

I do plan to sign up for any self-paced Linux Foundation courses that arise that are within budget.

In what ways do you think the certification will help you as a systems administrator in today's market?

I feel certification will help get the foundational skills to be involved in open source projects, which in turn will further test my abilities. I feel if I can regularly fix technical issues facing community projects that I may be an asset to an organization.

What Linux distribution do you prefer and why?

I give props to Debian for fixing the biggest pain point I personally had when trying to learn Linux fifteen years ago. Because of that, I still have a warm fuzzy feeling with Debian-based distros (and personally like Cinnamon that Linux Mint popularized). I did my certification with Ubuntu Server, and the package management software just works like a charm.  

Are you currently working as a Linux systems administrator? If so, what role does Linux play?

I actually work with a company that is a Microsoft Partner. I do use Linux on my own time to do proof of concepts for work, such as laptop imaging and a captive portal for wireless.

Where do you see the Linux job market growing the most in the coming years?

I certainly see a lot more Linux at Microsoft =)  The latest edition of Windows Server supports NFS, and their System Centre includes Linux management. I see Linux integrating with organizations that used to be Microsoft-only partners.  

What advice would you give others who are preparing for certification?

Focus mostly on doing, not memorizing. Put other people’s flashcards and prepared questions away and build your own. You’ll have things you’ll need to memorize while you’re going through labs, and that will be the best flashcards to use while waiting in line at the grocery store.  The bulk of what I did to pass the exam was hands-on labs and doing the task with less and less documentation. My two main lab sources were Tecmint and Linux Academy and some of the nicest documentation can be found on Arch Linux’s wiki.

Template Management in LibreOffice 5

$
0
0

jack-templates-AIf you’re a LibreOffice power user, you’ve probably ventured into the realm of templates. But, if you’ve upgraded to LibreOffice 5, you’ve probably noticed a few minor changes to the way this feature is managed. It’s not a profound or game-changing shift, but a shift nonetheless.

Because many people overlook the template feature in LibreOffice, I thought it would be a good idea to approach template management for LibreOffice 5 as if it were a new feature...and one that should be considered a must-have for all types of users. So, sit back and prepare to discover that feature which will make your time with LibreOffice exponentially easier.

Why Use Templates?

You might be wondering why you would need to use templates in the first place. The answer to this question is simple—because you have certain types of documents, all of which follow the same formatting and similar information data, that you frequently create. For this, you should be using templates. When you need to create that document again, you open up the template, add your data, and you’ve just saved yourself from having to reinvent the wheel.

Where Does LibreOffice Save Templates?

When you open up LibreOffice 5, click Ctrl+Shift+E and the template manager will open (see Figure 1 above). From this window, you can see all of the available templates. The My Templates section is special, as it is all of the templates you have created (more on that in a moment).

If you happen to be using the Linux platform, there’s a particular folder in your home directory (aka ~/) called Templates. That folder happens to hold a bit of “magical” properties within certain desktop environments. If you use a desktop like Ubuntu Unity, Elementary OS Freya, KDE, GNOME 3, etc, you’ve probably noticed a handy menu entry when you right-click within a folder in your file manager called New. If you click New > Templates, you should see any templates you’ve saved to the My Templates section in the Templates Manager. You can select from that list and a new file will be created, from that template, in that working directory.

Adding a New Template

There are two ways to add templates to LibreOffice: You can create them on your own or you can download templates from the Templates Repository. I will warn you on the Templates Repository...many of them haven’t been updated for a very long time, so some of the styles may or may not render correctly in LibreOffice 5. On the off chance you find a template you really want to use, but it doesn’t render correctly, you can always save it, fix it, and then save it again as a template. There may be some older templates that will either not open and some might even crash LibreOffice—so use them with caution.

When you download a template from the repository (or any other location), there are two ways to save it. The first, and easiest, is to save it to that “magical” folder ~/Templates. Doing this will cause that template to appear in the My Templates section of the LibreOffice Template Manager.

But, what if you want to save that template to a specific section (or create a new section)? Here’s what you need to do:jack-templates B

  1. Open the template in the correct LibreOffice tool

  2. Click File > Templates > Save as Template

  3. Double click the folder (aka Section) that you want to house the template

  4. Click Save

  5. Give the template a name

  6. Click OK

If there isn’t a section within the Template Manager that suits your needs, all you have to do is click the New Folder button (Figure 2), give the folder a name, and click OK.

Using Templates

Once you’ve added those templates to the manager, how do you use them? Fortunately, the developers of LibreOffice have made this process quite simple. There are two ways to use a template—from the LibreOffice home window or from each tool (Writer, Calc, etc).

If you’re in the LibreOffice home window (Figure 3), click Templates, click in the section housing the template, and then double-click the template you want to use. That template will open as an untitled document, ready for data entry.

jack-templates C

The second route to opening a template for use is from within each individual tool. We’ll use Writer as an example. Open up Writer and click File > Templates > Manage. This will open the Templates Manager where you can find your template and open it with a double-click.

You’ll also notice, when you select a template within the Template Manager, a row of icons appears at the top of the window (Figure 4).jack-templates D

Once selected, you can:

  • Open a template

  • Edit a template (this will open the template up for editing)

  • View the properties of the template

  • Set the template as the default for that tool

  • Move the template to another folder

  • Export the template

  • Delete the template

If you happen to select a template as the default, you cannot unset it. The only way to revert to a blank document as the default template is to create a blank document, save it as a template, and set it as the default. The nice thing about this is that you can then set the styles exactly as you like so that every time you open a new document, you won’t have to go through and set the styles to suit your needs.

You should now have as complete an understanding of the LibreOffice 5 template manager as an end user should have. And, with this understanding comes a certain level of power—as in you powering up your LibreOffice usage to the next level.

Have you become a recent convert to templates? If so, how have they helped your usage?

An Introduction to Uncomplicated Firewall (UFW)

$
0
0

ufw AOne of the many heralded aspects of Linux is its security. From the desktop to the server, you’ll find every tool you need to keep those machines locked down as tightly as possible. For the longest time, the security of Linux was in the hands of iptables (which works with the underlying netfilter system). Although incredibly powerful, iptables is complicated—especially for newer users. To truly make the most out of that system, it may take weeks or months to get up to speed. Thankfully, a much simpler front end for iptables is ready to help get your system as secure as you need.

That front end is Uncomplicated Firewall (UFW). UFW provides a much more user-friendly framework for managing netfilter and a command-line interface for working with the firewall. On top of that, if you’d rather not deal with the command line, UFW has a few GUI tools that make working with the system incredibly simple.

But, before we find out what GUI tools are available, it’s best to understand how the UFW command-line system works.

Working with the Command

The fundamental UFW command structure looks like this:

ufw [--dry-run] [options] [rule syntax]

Notice the --dry-run section. UFW includes the ability to include this argument which informs the command to not make any changes. Instead, you will see the results of your changes in the output.

As for working with the command, UFW can be used in two ways:

  • Simple syntax: Specifies a port and (optionally) the protocol

  • Full syntax: Specifies source, destination, port, and (optionally) the protocol

Let’s look at the simple syntax first. Say, for example, you want to allow traffic on port 22 (SSH). To do this with UFW, you’d run a command like:

sudo ufw allow 22

NOTE: I added sudo to the command because you must have admin privileges to run ufw. If you’re using a distribution that doesn’t take advantage of sudo, you’d first have to su to root and then run the same command (minus sudo).

Conversely, say you want to prevent traffic on port 22. To do this, the command would look like:

sudo ufw deny 22

Should you want to add a protocol to this, the command would look like:

sudo ufw deny 22/tcp

What happens if you don’t happen to know the port number for a service? The developers have taken that into consideration. UFW will run against /etc/services in such a way that you can define a rule using a service instead of a port. To allow SSH traffic, that command would look like:

sudo ufw allow ssh

Pretty simple, right? You can also add protocols to the above command, in the same way you did when defining a rule via port number.

sudo ufw allow ssh/tcp

Of the available arguments, the ones you’ll use the most with the ufw command are:

  • allow

  • deny

  • reject

  • limit

  • status: displays if the firewall is active or inactive

  • show: displays the current running rules on your firewall

  • reset: disables and resets the firewall to default

  • reload: reloads the current running firewall

  • disable: disables the firewall

If you want to use a fuller syntax, you can then begin to define a source and a destination for a rule. Say, for example, you have an IP address you’ve discovered has been attempting to get into your machine (for whatever reason) through port 25 (SMTP). Let’s say that address is 192.168.2.100 (even though it’s an internal address) and your machine address is 192.168.2.101. To block that address from gaining access (through any port), you could create the rule like so:

sudo ufw deny from 192.168.2.100/8 to 192.168.2.101 port 25

Let’s look at the limit option. If you have any reason for concern that someone might be attempting a denial of service attack on your machine, via port 80. You can limit connections to that port with UFW, like so:

sudo ufw limit 80/tcp

By default, the connection will be blocked after six attempts in a 30-second period.

You might also have a need to allow outgoing traffic on a certain port but deny incoming traffic on the same port. To do this, you would use the directional argument like so. To allow outgoing traffic on port 25 (SMTP), issue the command:

sudo ufw allow out on eth0 to any port 25 proto tcp

You could then add the next rule to block incoming traffic on the same interface and port:

sudo ufw deny in on eth0 from any 25 proto tcp

GUI Tools

Now that you understand the basics of UFW, it’s time to find out what GUI tools are available to make using this handy firewall even easier. There aren’t many which are actively maintained, and many distributions default to one in particular. That GUI is…

Gufw is one of the most popular GUI front ends for UFW. It’s available for Ubuntu, Linux Mint, openSUSE, Arch Linux, and Salix OS. With Gufw, you can easily create profiles to match different uses for a machine (home, public, office, etc.). As you might expect from such a tool, Gufw offers an interface that would make any level of user feel right at home (see Figure 1 above).

Some distributions, such as Ubuntu, don’t install Gufw by default. You will, however, find it in the Ubuntu Software Center. Search for gufw and install with a single click.

uwf BIf your distribution happens to be Elementary OS Freya, there’s a new front end for UFW built into the settings tool that allows you to very easily add rules to UFW (Figure 2). You can learn more about the Elementary OS Freya UFW front end from my post “Get to Know the Elementary OS Freya Firewall Tool.”

You might also come across another front end called ufw-frontends. That particular GUI hasn’t been in developed for some time now, so it’s best to avoid that particular app.

For most users, there is no need to spend the time learning iptables—not when there’s a much more user-friendly front end (that also happens to include solid GUI tools) that’ll get the job done. Of course, if you’re looking for business- or enterprise-class firewalling, you should certainly spend the time and effort to gain a full understanding of iptables.

Which is right for your needs, UFW or iptables?

The Perfect Server - Ubuntu 15.10 (Wily Werewolf) with Apache, PHP, MySQL, PureFTPD, BIND, Postfix, Dovecot and ISPConfig 3

$
0
0

This tutorial shows how to install an Ubuntu 15.10 (Wily Werewolf) server (with Apache2, BIND, Dovecot) for the installation of ISPConfig 3, and how to install ISPConfig 3. ISPConfig 3 is a webhosting control panel that allows you to configure the following services through a web browser: Apache or nginx web server, Postfix mail server, Courier or Dovecot IMAP/POP3 server, MySQL, BIND or MyDNS nameserver, PureFTPd, SpamAssassin, ClamAV, and many more. This setup covers the installation of Apache (instead of nginx), BIND (instead of MyDNS), and Dovecot (instead of Courier).

Read more at HowtoForge
Viewing all 525 articles
Browse latest View live


Latest Images