Quantcast
Channel: Linux How-Tos and Linux Tutorials
Viewing all 525 articles
Browse latest View live

Zorin OS: The Linux Distribution for Windows XP and 7 Fans

$
0
0

jack-zorin aWindows XP and Windows 7 are gone...at least as far as Microsoft is concerned. For many, many users across the globe, however, those platforms still live on. Both businesses and homes still use both desktop operating systems that have seen their End Of Life. These platforms are no longer supported by Microsoft, which means they are no longer getting security updates. What does that mean to end users? It means their computers and data are at risk.

Fear not, there is a solution—thanks to Linux.

Zorin OS has been around for a while. In fact, it’s only recently released its 11th iteration. Not surprisingly, the latest release looks and feels very similar to the previous release. The previous release also looks very similar to its predecessor (and so on, and so on). But, Zorin offers a bit more than just a single platform to make Windows XP/7 users feel at home. You’ll find both Zorin OS 11 (the cutting-edge release) and Zorin OS 9 (the stable release). That’s not all. If you select either Zorin OS 9 or 11 (from the Zorin OS download page), you’ll find four different flavors for each:

  • Core (Free): The essential Zorin OS (everything you need for a typical Zorin OS desktop)

  • Lite (Free): A lightweight version of Zorin OS (to run on older hardware)

  • Business (€8.99): Core plus everything you need to run a business (Accounting, bookkeeping, retail, and more)

  • Ultimate (€9.99): Core plus everything you need for business, multimedia, gaming, etc.

All flavors, except Lite, are available in both 32- and 64-bit editions.

How Close Is Zorin OS to Windows XP or 7?

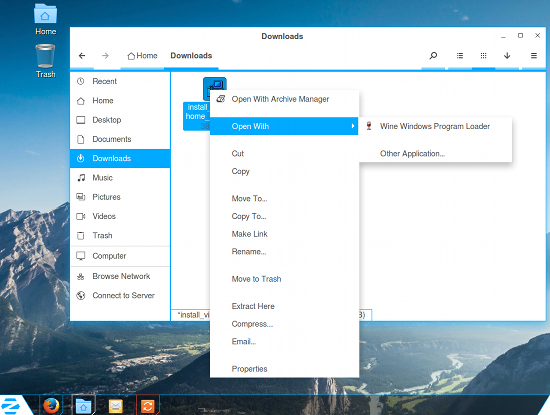
This is looming question. Before I get into the minutiae of the Zorin OS desktop, it cannot be left unsaid that this is not a Windows platform. To many, that’s not a bad thing. However, to those who depend upon Windows to get their daily work done, this could be a hurdle. Fortunately, Zorin saw fit to include Wine, which allows end users to install many of their favorite Microsoft software. This means you can download those .exe files, right-click them from within the file manager, and select Run with Wine (Figure 1 above) to install the Windows software. Once installed, you can run the software as expected.

Of course, you shouldn’t expect to have to use Windows software when on Linux...and Zorin OS makes sure you have everything you need to get your work done. You’ll find Firefox (web), LibreOffice (office suite), Geary (email), Gimp (graphics), Rhythmbox (music), and much more. You can also easily install tens of thousands of software titles from what is clearly the Ubuntu Software Center (hopefully, Zorin will migrate from USC to GNOME Software).

If you work with either Windows XP or 7 on a network that often requires you to share folders with others, you’ll find that process incredibly similar. To share out a folder on your Zorin OS desktop, follow these steps:

  1. Open up the File Manager

  2. Right-click the folder to be shared

  3. Select Local Network Share

  4. In the resulting window (Figure 2), check the box for Share the folder

  5. Give the share a name, add a comment (if needed), and check the box(es) required for necessary permissions

  6. Click Create Share

If you’ve altered the permissions (by checking either permission box), you will then be prompted to click Add the permissions automatically. Click that and the share will be added. That share should now be available on your network.

jack-zorin bNOTE: You might see an error when sharing a folder. This is most likely due to the fact that Samba isn’t running. Samba is the service used to share out folders on a network. If you see that error, here’s what you need to do to resolve that issue:

  1. Click on the Zorin Start button

  2. Type start

  3. Click Startup Applications when it appears

  4. In the resulting window, click Add

  5. Enter the details as shown in Figure 3

  6. Click Save

  7. Reboot

jack-zorin cNow Samba will always run at startup, and you didn’t even have to get your fingers dirty with the command line.

AWN

At the heart of Zorin OS’s ability to closely resemble Windows XP and 7 is Avant Window Navigator. This is a particular dock, placed on the desktop, that serves to act as the Windows Start button, Taskbar, and System Tray.

AWN is an outstanding choice for this task. Not only is it very stable, it’s also quite flexible. You can add/remove applets, change the theme, add application launchers, and so much more. In fact, the AWN dock offers significantly more configuration options than does either the Windows XP or 7 panel. But if you really only want Zorin OS to look and feel like XP/7, here’s what you need to know.

To add an application launcher to the panel, you first must add it to the desktop. To do this, follow these steps:jackw-zorin d

  1. Find the application launcher in the Start menu

  2. Right-click the launcher

  3. Select Create Desktop Shortcut

  4. Go to the desktop

  5. Click and drag the shortcut to the panel

You’ll need to drag the shortcut to the currently existing launchers on the panel (otherwise, it can’t be added to the panel). When you see a small + sign on the launcher (Figure 4), you can release it and it will be added to the panel.

NOTE: You can remove the shortcuts from the desktop, once you’ve added the launcher to the panel.

To configure AWN, right click the panel and select Preferences. In the Preferences window (Figure 5), you can configure AWN to better fit your needs/taste.

zorin eIf you don’t find a theme you like in the included selection, you can always find plenty more (e.g., these on Deviant Art). To install a new theme, follow these steps:

  1. Download the theme to the ~/Downloads directory

  2. Open the File Manager and change to the Downloads directory

  3. Right-click the downloaded theme and select Extract Here

  4. Open up the AWN Preferences

  5. Go to the Themes tab

  6. Click Install

  7. Navigate to the newly extracted theme (will end in the .tgz extension) and select it

  8. Click Open

  9. In the theme window, select the newly installed them

  10. Click Apply

Play around with the AWN configurations to get it to perfectly match your needs.

The Zorin Tools

Click on the Star button and type zorin. Click on Zorin Look Changer and you can easily switch between Windows XP, Windows 7, and GNOME 2 (Figure 6). This tool does an amazing job of picking up some of the subtleties between Windows 7 and XP.

jack-zorin fWhen you typed zorin in the Start menu, you should have also noticed the Zorin Web Browser Manager. This tool allows you to easily install from the Firefox (default), Chrome, Web, and Midori browsers. Click on the browser you want to install from the selection (Figure 7), click Yes when prompted, and the browser will be installed.jack-zorin g

How Close Can You Get?

You’ll be surprised at how closely you can get Zorin OS to look and feel like either Windows XP or 7. Out of the box, the experience is incredibly close to Windows XP. With just a little tweaking, you can be sure that Zorin OS will behave exactly how you need it. Will it serve as a perfect drop-in replacement for Windows? That all depends on what you need to get your work done.

Wine does an outstanding job of running a great many Windows applications, but you may find some applications will not run or do not work exactly as expected. To find out which apps will run on Wine, check out the Wine Application Database. If the software you need will run with Wine, Zorin OS will get you as close to Windows XP/7 as possible (and give you the added stability and reliability of the Linux platform. Now that is a serious win-win.


How to Easily Back Up and Restore Linux File Permissions

$
0
0

permissions aYou’ve done an outstanding job of setting up a backup for your files and folders. Your system is running like a champ, and all is smooth sailing. But truth be told, there’s this guy named Murphy...and he has a habit of wreaking havoc when you least expect it.
One such instance of havoc can happen when you’re tweaking file system permissions (on that directory hierarchy you’ve worked so hard on). One wrong tweak and the script is flipped. This is especially true when you’re not one hundred percent sure what you’re doing -- for example, accidentally running chmod -R 777 on a crucial folder. You know what happens next...things take a turn for the tragic.

Fortunately, there’s a way for you to back up only the permissions of files and folders before you work your monstrous sysadmin magic and fubar the folder. Thanks to Access Control Lists (ACL), this is really quite simple.

Let me show you the way. I will demonstrate on an Ubuntu 16.04 daily build.

Install ACL

The first thing you must do is to install the acl tool. The installation of acl on most modern Linux systems is easy. For Ubuntu, the process goes like this:

  • Open a terminal window (hit the key combination Ctrl+Alt+T)

  • Type the command sudo apt-get install acl

  • Type your sudo password and hit Enter

  • When prompted type y and hit Enter

  • Allow the installation to complete

The installation on other systems will be similar (only substituting apt-get for your package manager of choice -- such as, dnf install acl, zypper install acl, or yum install acl).

Backing Up Permissions

Once you have acl installed, you can use it to back up folder permissions. I’ve created a folder called TEST that contains five files:

  • test1

  • test2

  • test3

  • test4

  • test5

The original permissions of the folder are rwxrwxr-x and the permissions of the files are rw-rw-r--. The first thing to do is back up the permissions into a text file. To do this, follow these steps:

  1. Open up a terminal window

  2. Type the command getfacl -R TEST > test_permissions.txt

  3. Hit Enter

The above command will create the file test_permissions.txt that contains all the permissions of the folder and files within. The format of the created file is shown in Figure 1 above.

Restoring File Permissions

Say you’ve issued the command chmod -R ugo-rw TEST. This will cause no end of problems with the contained files. At this point, the permissions for that folder (and its contained files will be --x--x--x). Issue the command ls -l to make sure the permissions are, in fact, fubar’d. Not much going on there now.

So, how can you fix this problem? You restore the permissions with the help of acl and the backup file you just created. To do, follow these steps:

  1. Open up a terminal window

  2. Change into the directory containing the folder with the wonky permissions (I’ll assume the permissions backup file is in the same location)

  3. Type the command setfacl --restore=test_permissions.txt

  4. Hit Enter

  5. Type the command ls -l to ensure the permissions have, in fact, returned to their original state

This system is so powerful, it can backup/restore permissions of a folder, no matter how badly they are botched. The one caveat to this would be if, by some odd chance, the permissions of the /usr/bin folder were wrecked to the point you couldn’t issue the commands getfacl or setfacl. But, even if that did happen, you could probably get around the issue by mounting the affected drive on another system and running the setfacl command to restore the permissions (assuming you had a backup in the first place).

A Major Word of Warning

Do exercise caution when using this method. To test the limits of this system, I backed up the permissions of the /etc directory and then issued sudo chmod -R ugo-w /etc (knowing it would cause systemic problems across the board). When I attempted to run the restore, the command failed (unable to locate certain files). The problem with /etc is that it contains files like the sudoers list. Break the permissions of that file and you break the system. This clearly indicates backing up and restoring permissions with the acl tool isn’t infallible. So, avoid changing  permissions on system files/folders at all costs.

Cron That Task

Now, say you have a particular folder that’s of crucial importance...down to the file permissions. You might want to make sure you get a regular backup of those permissions, just in case. And, suppose you have a folder (we’ll call it SITE) in /var/www/ that is the lifeblood of your company. Not only do you want to ensure that folder is backed up daily, but you’ll want a regular backup of its permissions. To make this happen, you’ll take advantage of the Linux cron tool. Here’s how.

First, you’ll want to create a folder to house the permissions backup file. For the sake of example, I’ll create the folder in my external drive /media/jlwallen/DATA/ and the folder will be called PERMISSIONS. Next, I open cron in edit mode with the command crontab -e. I want to set this backup to run daily, so I enter the following line crontab:

0 0 * * * getfacl -R /var/www/SITE > /media/jlwallen/DATA/PERMISSIONS/SITE_permissions_backup.txt

NOTE: The above must be all one line.

Save the file and you’re good to go. You should start seeing a daily backup of the /var/www/SITE permissions in /media/jlwallen/DATA/PERMISSIONS/.

Should the permissions of that SITE folder change (on any given day), you now have the power to restore it.

Not Foolproof, But a Must-Know

This is clearly not a foolproof system, but it’s one every Linux admin should know. File/folder permissions change and, when they do, bad things can occur. Having the ability to backup and restore those permissions could save you a world of headaches.

How To Test Solid State Drive Health with GNOME Disks

$
0
0

gnome disks aSolid State Drives (SSDs) are slowly becoming the norm, with good reason. They are faster, and the latest iterations are more reliable than traditional drives. With no moving parts to wear out, these drives can (effectively) enjoy a longer life than standard platter-based drives.
Even though these drives are not prone to mechanical failure, you will still want to keep tabs on their health. After all, your data depends on the storing drives being sound and running properly. Many SSDs you purchase are shipped with software that can be used to monitor said health. However, most of that software is, as you might expect, Windows-only. Does that mean Linux users must remain in the dark as to their drive health? No. Thanks to a very handy tool called GNOME Disks, you can get a quick glimpse of your drive health and run standard tests on the drive.

With GNOME Disks, you can:

  • Get a quick glimpse of your drive’s health

  • Run standard tests against your drives

  • Format your drives

  • Create a disk image

  • Restore a disk image

  • Benchmark a disk

  • Power off a disk

All from a handy, user-friendly GUI tool.

Let’s install GNOME Disks and use it to test the health of your installed SSDs.

Installation

GNOME Disk is not limited to distributions running GNOME. In fact, I will demonstrate GNOME Disks from my Elementary OS Freya desktop. The installation is quite simple. If you’re using a non-Ubuntu-based distribution, the installation can be achieved by swapping out the package manager used on your system (i.e. dnf or zypper for apt-get).

The installation of GNOME Disks can be done from a single command. Here’s how:

  1. Open up a terminal window

  2. Issue the command sudo apt-get install gnome-disk-utility

  3. Type your sudo password and hit the Enter key

  4. Type y when prompted

  5. Allow the installation to complete

That’s it. GNOME Disks should now be installed. Go through your desktop menu, locate the app, and click to launch.

Using GNOME Disks

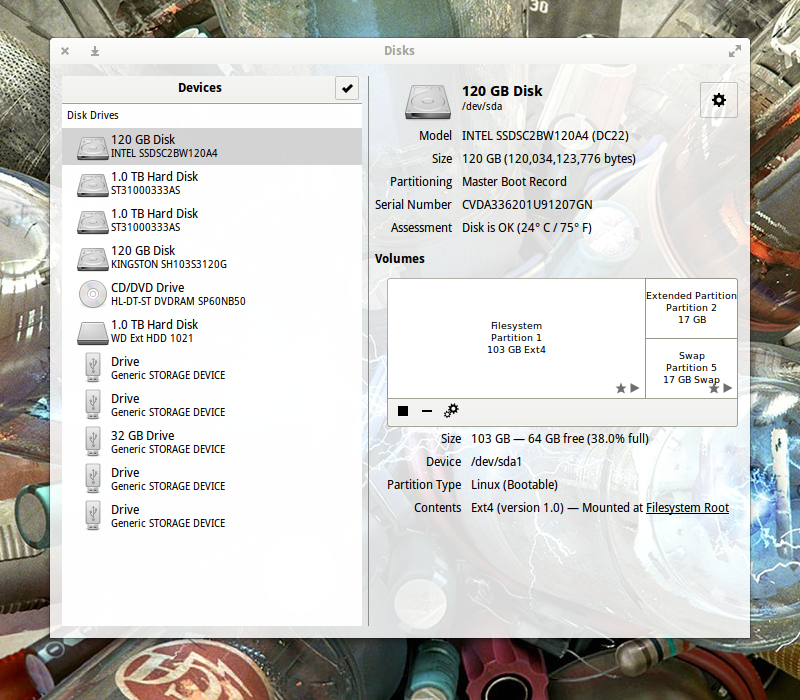
The GNOME Disks main window is laid out quite well (Figure 1 above).

From here you should see all of your attached drives. The SSDs will not be labeled any differently than the standard drives (unless the manufacturer included SSD in the name (as you see with the INTEL 120 GB SSD on my system—labeled SSDSC2BW120A4). Otherwise, it’ll be up to you to know which drives are SSDs and which are Standard.

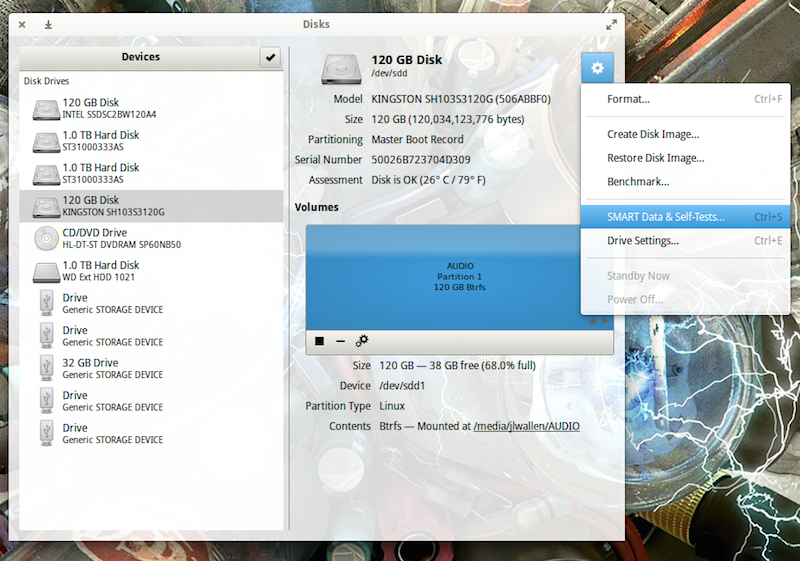
gnome disks bLet’s run a test. To do so, open up GNOME Disks and select the disk you want to test. You should automatically see a quick Assessment of the drive (size, partitioning, Serial number, health, and temp). Click on the gear icon and then, from the drop-down, select SMART Data & Self-Tests… (Figure 2).

In the new window, you should see the results of the last test run (Figure 3). You should also see that the SMART (Self-Monitoring, Analysis and Reporting Technology) option is enabled (slider in the top right of the window). If SMART isn’t enabled, click the slider to enable.

To run a new test, click the Start Self-test button.

gnome disks cWhen you click the Start Self-test button, a drop-down menu will appear, from which you can choose one of three tests:

  • Short—A collection of test routines that have the highest chance of detecting drive problems.

  • Extended—Tests complete disk surface and performs various test routines built into the drive.

  • Conveyance—Identify damage incurred during transporting of drive.

You will be required to enter your sudo password to continue on with the test. Once authenticated, the testing will begin. As the test runs, a progress meter will report the percentage of the test complete (as well as the Start button will change to Stop).

After the Self-Test completes, the new results will populate the window. One thing you will notice is that each SSD will return different test entries. Not all manufacturers follow the same standard. For example, I have two different SSDs installed in my System76 Leopard Extreme. The first (an Intel SSD) was installed by System76. The second, a Kingston SSD, was installed by me. If I run the SMART test on both, I see different tests appear in the results. For example, the Kingston drive doesn’t have Media_Wearout_Indicator enabled (whereas the Intel drive does). I confirmed this by using the smartmontools command:

sudo smartctl -a /dev/sda | grep Media_Wearout_Indicator

The above command reported (for the Intel drive):

233 Media_Wearout_Indicator 0x0032   092   092   000    Old_age   Always       -       0

For the Kingston, the same command returned nothing.

If the smartctl command is missing, you can install smartmontools with the command:

sudo apt-get install smartmontools

You can get a full listing of your drive health with the command:

sudo smartctl -a /dev/sdX

where X is the name of the drive.

However, one of the most important lines you’ll want to look for in the results, is Power-On Hours. This will tell you how many hours your drive has actually been in use. According to GNOME Disks, my Power-On Hours for both disks is shown in Figure 4.

gnome disks dAccording to smartctl, that breaks down to:

  • Kingston—17868h+55m+21.280s

  • Intel—13833 (194 68 0)

Both of those figures are accurate.

How Many Power-On Hours Should You Expect?

How many Power-On Hours you will get depends on the make and model of your drive. Most modern SSDs should easily last 3-5 years under a heavy server load. Your best bet, however, is to check with your manufacturer. Just five short years ago, SSD manufacturers were reporting lifespans of around 10,000 Power-On Hours.

Clearly, my two drives have already exceeded that. Of course, getting a true estimate is much more complicated than this (you should factor in write-cycles, temperature, etc.) However, modern SSDs are capable of actually outliving the machine's housing them. If you’re paranoid about data loss (and you should be), it’s good to know that getting a quick glance into the health of your SSDs is nothing more than a user-friendly GUI away.

GNOME Disks happens to be one of the best means of assessing drive health in Linux with a GUI. Give this tool a try and keep tabs on your drive health with ease.

Introduction to Docker Compose Tool for Multi-Container Applications

$
0
0

Docker compose tutorial image

Docker is celebrating its third birthday this week, on March 23, but some of you may still not know about all the tools that come with Docker. In this blog we will introduce you to Docker Compose, one of the tools, which with the Docker Engine, Docker Machine and Docker Swarm, empowers developers to develop distributed applications.

If you have started working with Docker and are building container images for your application services, you most likely have noticed that after a while you may end up writing long `docker run` commands. These commands while very intuitive can become cumbersome to write, especially if you are developing a multi-container applications and spinning up containers quickly. 

Docker Compose is a “tool for defining and running your multi-container Docker applications”. Your applications can be defined in a YAML file where all the options that you used in `docker run` are now defined. Compose also allows you to manage your application as a single entity rather than dealing with individual containers.

In this tutorial we give you a brief introduction to Docker Compose, by building, you may have guessed...a Blog site.

Installing Docker Compose 

Just like the Docker engine, Compose is extremely easy to install. First verify that you have the Docker engine installed, since Compose will use it. Then if you are comfortable with it you can simply use `curl` to download the Compose binary. If you struggle with the following commands or need additional details, check the very good documentation

```

$ docker version

$ curl -L https://github.com/docker/compose/releases/download/1.6.2/docker-compose-`uname -s`-`uname -m` > /usr/local/bin/docker-compose
$ docker-compose version

```

Running a Ghost blog

While you can read the entire documentation and go through the compose reference manual. Nothing beats trying this out to discover a new tool. To dive straight into using Compose we are going to run a Ghost blog using containers.

You can run Ghost in a standalone mode which uses an embedded SQlite database in a single container. It is simple, and you do not need Compose for this, but it breaks the principles of single service functionality per container and will not allow you to scale any components of your blog if you need to. Let’s see how to do it anyway:

```

$ docker pull ghost

$ docker run -d --name ghost -p 80:2368 ghost

``` 

Once the above commands are successful, you should be able to access Ghost with your browser on port 80 of the Docker host you are using. Using a small trick, we will use this single container deployment to get the Ghost configuration file and modify it for a multi-container setup. Copy the Ghost configuration file located in the container to your local file system using the `docker cp` command like so:

```

$ docker cp -L ghost:/usr/src/ghost/config.js ./config.js

$ cat config.js

```

Edit the development section of the config.js file, to point to a Mysql database. We will assume that you can reach a Mysql database with a DNS name of `mysql`. We will setup a ghost database, with a Ghost user and a password set to `password`. You could also use a config file that takes advantage of environment variable. For simplicity, in this blog, we override the Ghost config file like so:

[config.js]

```

...

database: {

           client: 'mysql',

           connection: {

               host     : 'mysql',

               user     : 'ghost',

               password : 'password',

               database : 'ghost',

               charset  : 'utf8'

           }

       },

...

```

For that new configuration to be used, you need to create a Dockerfile that will be used to build your own local image of Ghost using your custom config file. You could do this several different ways, but building your own image with a two line Dockerfile is as easy as it gets. Here is the Dockerfile: 

```

FROM ghost


COPY ./config.js /var/lib/ghost/config.js

```


This new Docker image will be built automatically in your Docker Compose file using the `build` argument.

Your Compose file takes the following form. Two services are defined, a Mysql service and a Ghost service. The Mysql service is configured via environment variables set in the docker-compose file. We use the official Mysql Docker image that Compose will automatically pull from the Docker hub. Port 3306 is exposed to other containers in the same network. The Ghost service is based on our custom image; it depends on the Mysql service to ensure that the database will start first. We expose the default port of Ghost `2368` to port 80 of our Docker host.

[yaml]

```

version: '2'

services:

 mysql:  

  image: mysql

  container_name: mysql

  ports:

   - "3306"

  environment:

   - MYSQL_ROOT_PASSWORD=root

   - MYSQL_DATABASE=ghost

   - MYSQL_USER=ghost

   - MYSQL_PASSWORD=password

 ghost:  

  build: ./ghost

  container_name: ghost

  depends_on:

    - mysql

  ports:

    - "80:2368"

```

This would be the equivalent of running the following `docker run` commands: 

```

$ docker run -d --name mysql -e MYSQL_ROOT_PASSWORD=root -e MYSQL_DATABASE=ghost -e MYSQL_PASSWORD=password -e MYSQL_USER=ghost -p 3306 mysql

$ docker build -t myghost .

$ docker run -d --name ghost -p 80:2368 myghost

```

Keeping all these steps in a single YAML configuration file will be easier to maintain and evolve than writing your own Docker commands wrapper in bash scripts. Plus compose allows you to manage the entire app and individual services. 

To start your Compose application, you just need to run `docker-compose up -d`. The two containers will get started and will be properly connected to each other on the network. You can then open your browser at `http://localhost>` and start using Ghost. To create new posts go to `http://localhost/ghost/setup>` create an account and start editing your posts. Once the containers have started you can view the state of your application as simply as with `docker-compose ps`. 

Ghost blog on Docker compose

[bash]

```

$ docker-compose up -d

Starting mysql

Starting ghost

$ docker-compose ps

Name            Command            State            Ports          

------------------------------------------------------------------

ghost   /entrypoint.sh npm start   Up      0.0.0.0:80->2368/tcp    

mysql   /entrypoint.sh mysqld      Up      0.0.0.0:32770->3306/tcp

```

Note that if you have used Compose before, in this example we use version ‘2’ of Compose. Hence we do not need links. The two services will take advantage of the embedded DNS server now running on Docker engine 1.10 and will be able to find each other using their service name. Hence if you want to ping ‘ghost’ from the mysql container you can and vice versa: 

[bash]

```

$ docker exec -ti mysql bash

root@b1e66140ddb3:/# ping ghost

PING ghost (172.18.0.3): 56 data bytes

64 bytes from 172.18.0.3: icmp_seq=0 ttl=64 time=0.074 ms

64 bytes from 172.18.0.3: icmp_seq=1 ttl=64 time=0.222 ms

...

```

And voila! Docker Compose is a very handy tool that helps you write a distributed application definition in a single YAML file. It can handle most of the `docker run` options and since the last release also supports Docker networks and volumes. In following posts, we will dive into more advanced setup and use cases using Compose as well as the use of Docker Swarm to distribute your containers across a cluster of Docker hosts.

How to Use Your Android Device as a Trackpad on Linux

$
0
0

droidmote aIf you long to have a trackpad on your Linux machine but don’t want to shell out the cash for one, what do you do? If you happen to have an Android device handy, you already have most of what you need to make this happen.

That’s right, you can turn your Android smartphone or tablet into a sleek trackpad for Linux. For free! What’s best about this solution is you’d be hard-pressed to find a better feeling and responding trackpad than that Android device display. It’s smooth as silk and works better than any trackpad I’ve used.

I’ll walk through the process of setting this up, so you can enjoy the feel of a sweet trackpad on your Linux machine.

What You’ll Need

Most likely, you already have an Android smartphone. The app we’ll be using, DroidMote, requires Android 4.0 or newer. You will also need admin rights on the desktop machine (so the ability to run an app with sudo is perfect). Also, you’ll need the ability to open up port 2302 on your machine/network. I’ll be demonstrating DroidMote on a System76 Leopard Extreme running elementary OS Freya and using a Verizon-branded LG G3 as my trackpad. Finally, you’ll need the DroidMote server. You can download the server for either 32-bit or 64-bit Linux here.

Installing the App

First, you’ll need to install the app on Android. Here are the steps:

  1. Open up the Google Play Store on your device

  2. Search for droidmote

  3. Locate and tap the entry by Videomap

  4. Tap Install

  5. Read the permissions listing

  6. If the permissions listing is acceptable, tap Accept

  7. Allow the installation to complete

Before you open up DroidMote, you’ll need to get the server up and running on your Linux machine.

“Installing” the Server

There is very little to be done on this end, because the downloaded .tar file includes a self-contained server. Here’s what you need to do (I’ll assume you downloaded the file to ~/Downloads):

  1. Open up a terminal window

  2. Change into the ~/Downloads directory

  3. Unpack the file with the command tar xvf droidmote-server-linux-XXX.YYY.tar Where XXX is the system architecture and YYY is the release number)

  4. Give the newly extracted server file executable permissions with the command chmod 777 droidmote

You’re now ready for testing.

Connecting the App to the Server

The first thing to do is start up the server. From within the ~/Downloads directory (this is temporary), issue the command sudo ./droidmote 2302 password (Where password is an actual password to be used). You should then see output like:

Waiting for incoming connections on ip:
192.168.1.145 on port 2302
Client connected with thread 139891787163392

The IP address given is the IP address of the client machine running the server.

Now, head over to the Android device and fire up the app. When the app starts, the first thing you’ll want to do is tap the settings button (three vertical dots in the upper right corner) and then tap Password (Figure 1 above).

droidmote bEnter the password you used when running the server on the client and tap OK. You can also go through the various settings and tweak them to fit your needs.
Go back to the DroidMote main window (Figure 2) and tap the droid icon in the center.

When you tap the DroidMote icon in the main window, a listing of IPs will appear (each of which is running the DroidMote server). Tap the address you want to connect to, and you will automatically be connected to the server.

You can now use your Android device as your desktop trackpad. You can also tap the keyboard icon and use the Android keypad as your desktop keyboard. If you have an app set up for voice input, you can tap the mic icon and then use speech to text on your desktop (It shouldn’t surprise you to know that this feature works surprisingly well with Google Docs).

You will also notice an icon with an up and down arrow. If you tap that icon, you can then scroll with the device with one finger. By default, the DroidMote app/server does recognize two-finger input as up and down scroll, but using the scroll icon does make for a much more smooth scrolling experience.

Setting the Server Up to Run Automatically

For the server script to run automatically, you have work through a few steps. How you do this will depend upon your distribution. I’ll walk you through the process of doing this using the Elementary OS Freya Startup GUI. Here’s what you need to do:

  1. With admin permissions, copy the droidmote server to /usr/bin

  2. Make sure the /usr/bin/droidmote has the correct permissions with the command sudo chmod 777 /usr/bin/droidmote

  3. Create a shell script, named startdm.sh (contents below) and save it to /usr/local/bin

  4. Issue the command sudo chmod +x /usr/local/bin/startdm.sh

  5. Open the Elementary OS Settings window

  6. Click on Applications > Startup

  7. Click on the + button

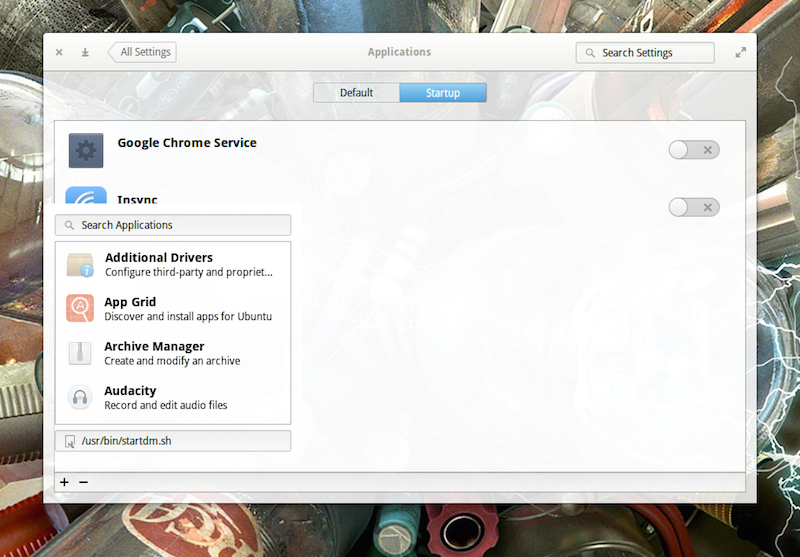
  8. In the text area enter /usr/bin/startdm.sh (Figure 3) and hit the Enter key

  9. You should now see an enabled custom command for DroidMote

  10. Log out of Elementary OS and lot back in

droidmote c

Contents of startdm.sh
#!/bin/sh
droidmote 2302 password &

Where password is the actual password you’ll use.

You should now be able to connect to the DroidMote server. As I mentioned above, how you set DroidMote up to run automatically will depend upon your distribution of choice. However, most desktop distributions offer a Startup app configuration tool.

If you’re looking for a way to make use of your Android device as a trackpad for your Linux box, DroidMote is the simplest, most reliable way to do so. Give this free app and server a try and see if it doesn’t make for one of the smoothest trackpad experiences you’ve ever had with Linux. If you run into trouble, check out the DroidMote FAQ for answers to common questions.

Viewing all 525 articles
Browse latest View live